Introduction
In this post, I will guide you through building an integration between Oracle APEX and PayPal. I will show you how to set up a developer account in PayPal and perform test transactions (in the PayPal Sandbox) from an Oracle APEX Application. This post is not intended to be a comprehensive guide to building a production-ready integration, but it will accelerate your journey.
PayPal is a global leader in online payment solutions, with over 325 million accounts worldwide. At the time of writing this post, PayPal is available in 202 countries and 25 currencies around the world. PayPal enables global eCommerce by making payments possible across different locations, currencies, and languages.
PayPal Setup
This section will cover the PayPal setups required for the integration. These setups include signing up for a Developer Account, creating test user accounts, and getting credentials to use in our APEX application.
Setup Developer Account
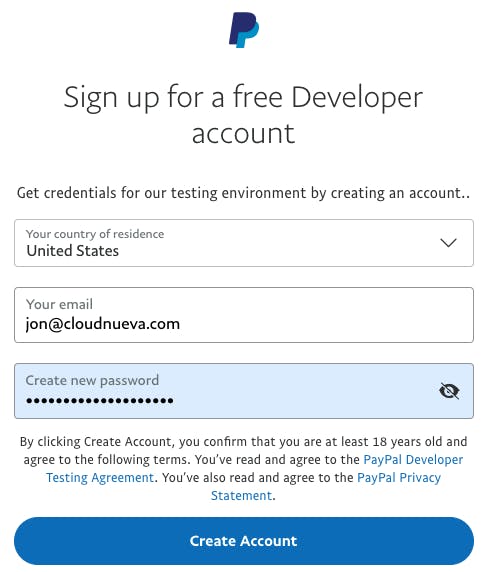
- Navigate to developer.paypal.com and signup for a free developer account.
Setup Test Personal and Business Accounts
PayPal provides a Sandboxed environment where you can perform end-to-end integration testing without generating any actual payments. As part of the Sandbox, PayPal supports two account types; personal and business (see screenshot below). These accounts behave precisely like real PayPal accounts; you can even log in as these users to view payments, etc.
PayPal creates default personal and business accounts during sign-up. As you can see, these are not very meaningful:

I think of a Personal Account as a Consumer Account and a Business Account as a Merchant Account.
For this post, we will create two more meaningful accounts:
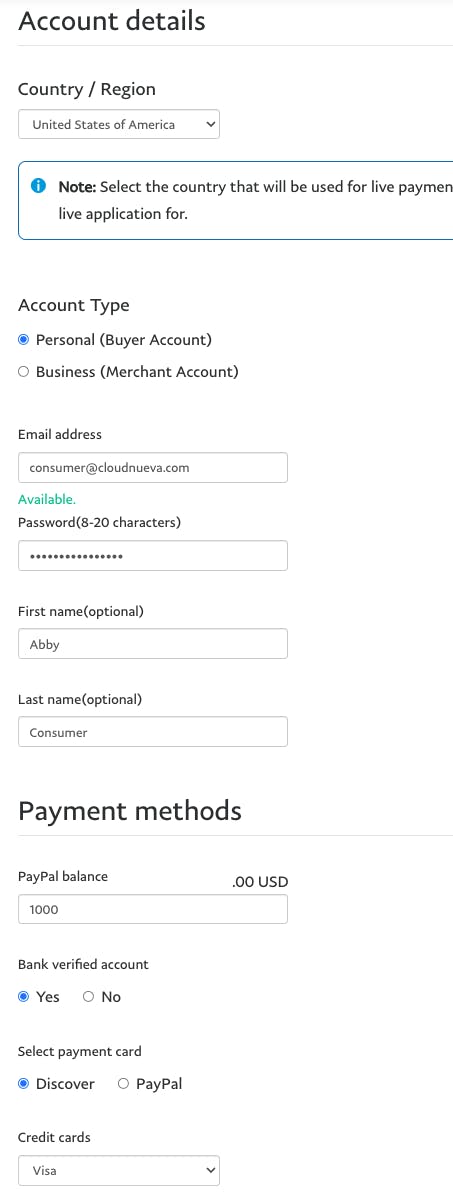
- Personal/consumer test account is Abby Consumer (consumer@cloudnueva.com)
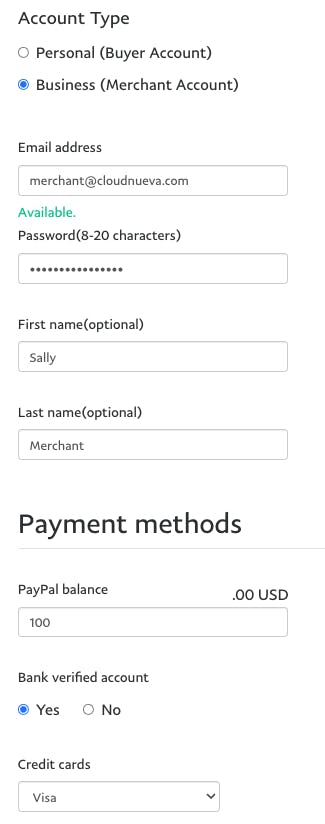
- Business/merchant test account is Sally Merchant (merchant@cloudnueva.com)
Follow these steps to complete their setup:
- log in to your developer account at developer.paypal.com
- Select the 'Accounts' menu option
- To create the Personal account, click 'Create Account', then click 'Create custom account', then enter details for your personal test account, and click 'Create account'
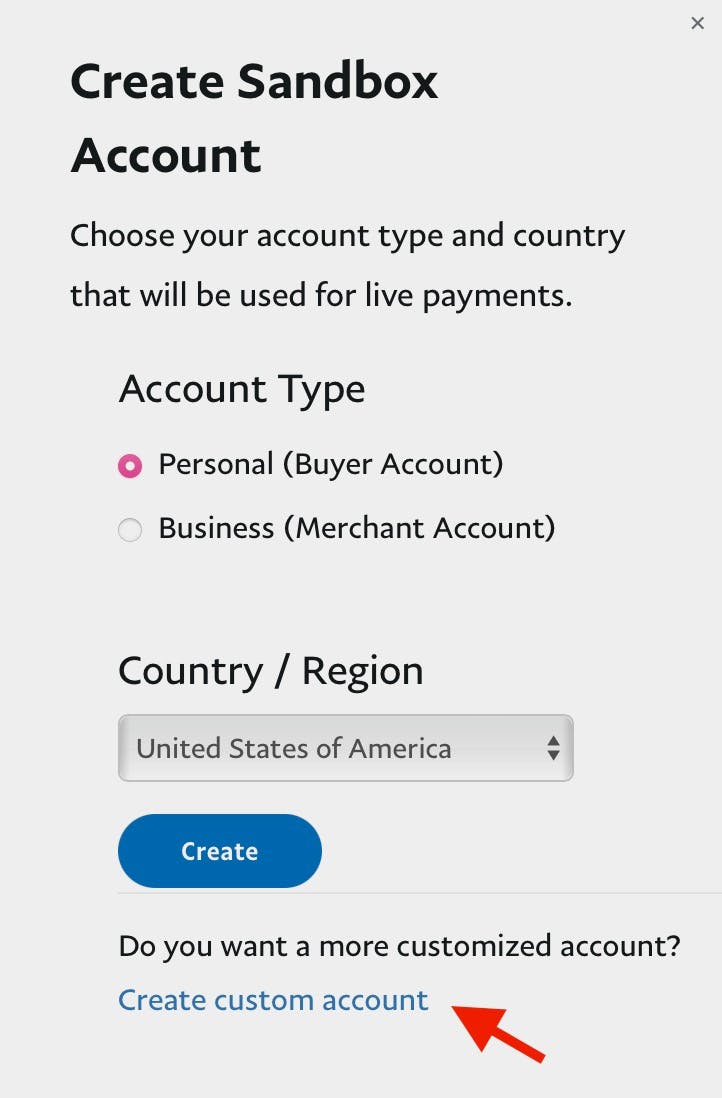
- To create the Business account, click 'Create Account', then click 'Create custom account', then select 'Business (Merchant Account)'. Enter details for your test business account and click 'Create account'
Create a PayPal App
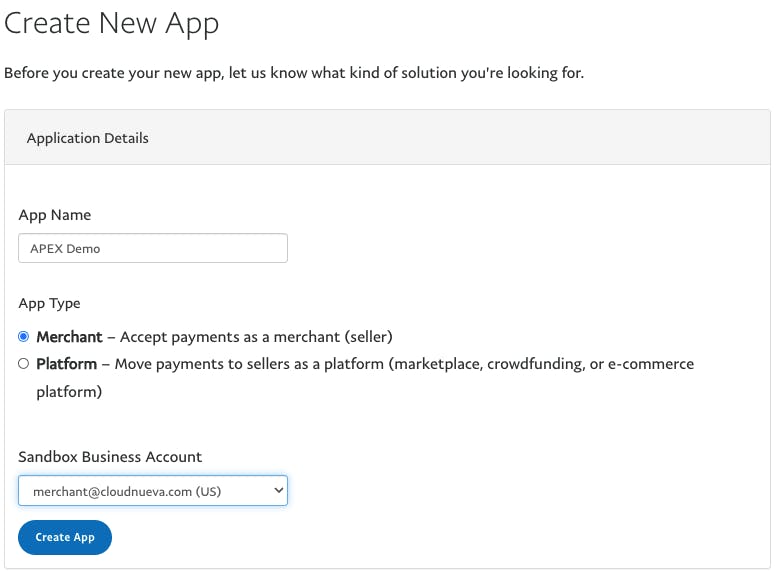
We must create a new 'App' in the PayPal developer portal. Creating a new App will generate a unique set of credentials for this integration. I have named my App 'APEX Demo'.
- Log in to your developer account at developer.paypal.com
- Select the 'My Apps & Credentials' menu option, then click 'Create app'
- Enter the details below (make sure to select the newly created sandbox business account) and click 'Create app'
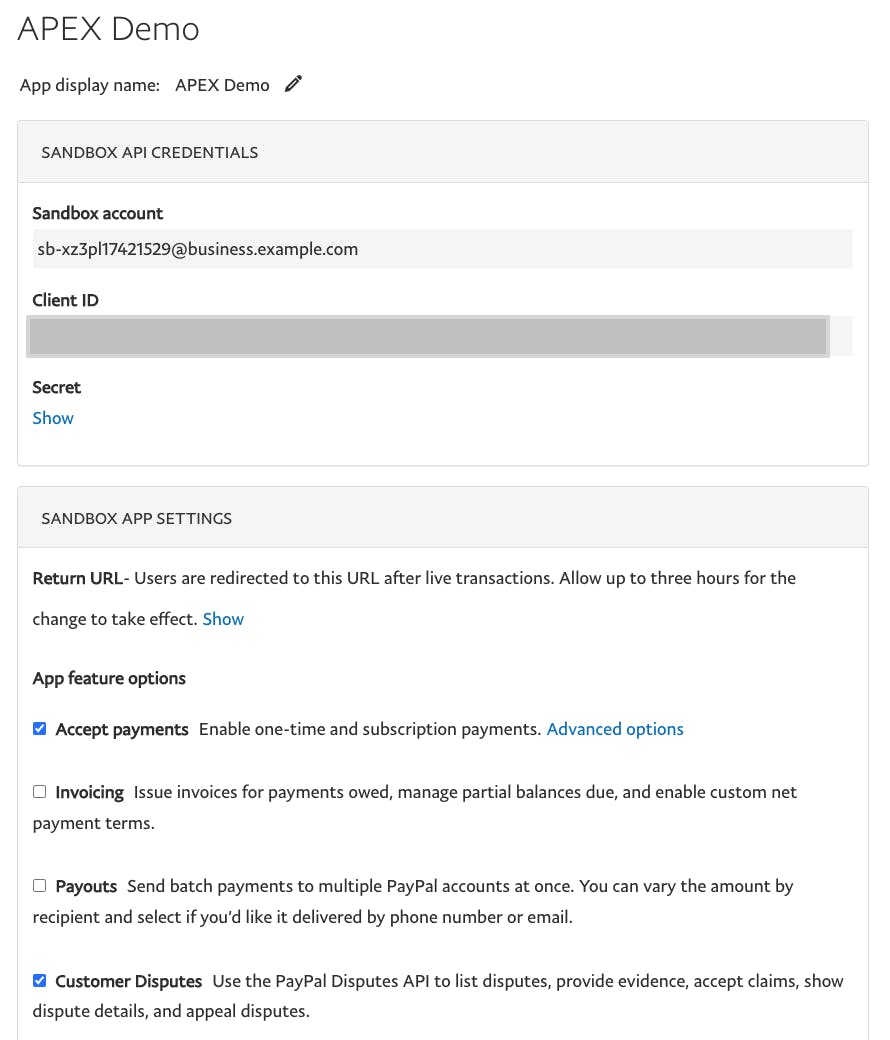
- ✏️ Take note of the Client ID and Secret. Then check the options in the screenshot below and click 'Save'.
❗At this point, you have provisioned a developer account and a Sandbox in which you can safely perform test transactions. Nothing you do here will generate any actual payments.
PayPal Integration Documentation
You will find the following links helpful in building your integration. I suggest reviewing this documentation before you start the integration with APEX.
- You can try the integration using PayPal Integration Builder. You can try various integration aspects using the Integration Builder and see the effects in real time.
- You can view the PayPal Integration Guide here.
- The PayPal JavaScript SDK documentation can be found here
APEX Integration
I have built a Demo APEX Application to demonstrate the integration. You can download the demo app here.
You must perform all the PayPal setup steps above to use the demo App.
The App is a basic demonstration of a shopping cart where users can buy country flags. The App was built with APEX 22.1, and you can install and run it on apex.oracle.com. APEX Collections drive the application, so no dependent objects need to be installed. Please note that the demo app is by no means production-ready.
⏰ Change the Before Header process 'Prepare Checkout' on Page 2 to set P2_PAYPAL_CLIENT_ID to the PayPal App Client ID you created above.
Demo Application Structure
- There is an 'After Authentication' Application Process which populates a collection called 'FLAGS' with flags for purchase
- The Home Page (Page 1) allows you to select flags to add to a shopping cart. The shopping cart is stored in a second collection called 'CART'
- The Checkout Page (Page 2) demonstrates the PayPal integration. The rest of this section will focus on this page
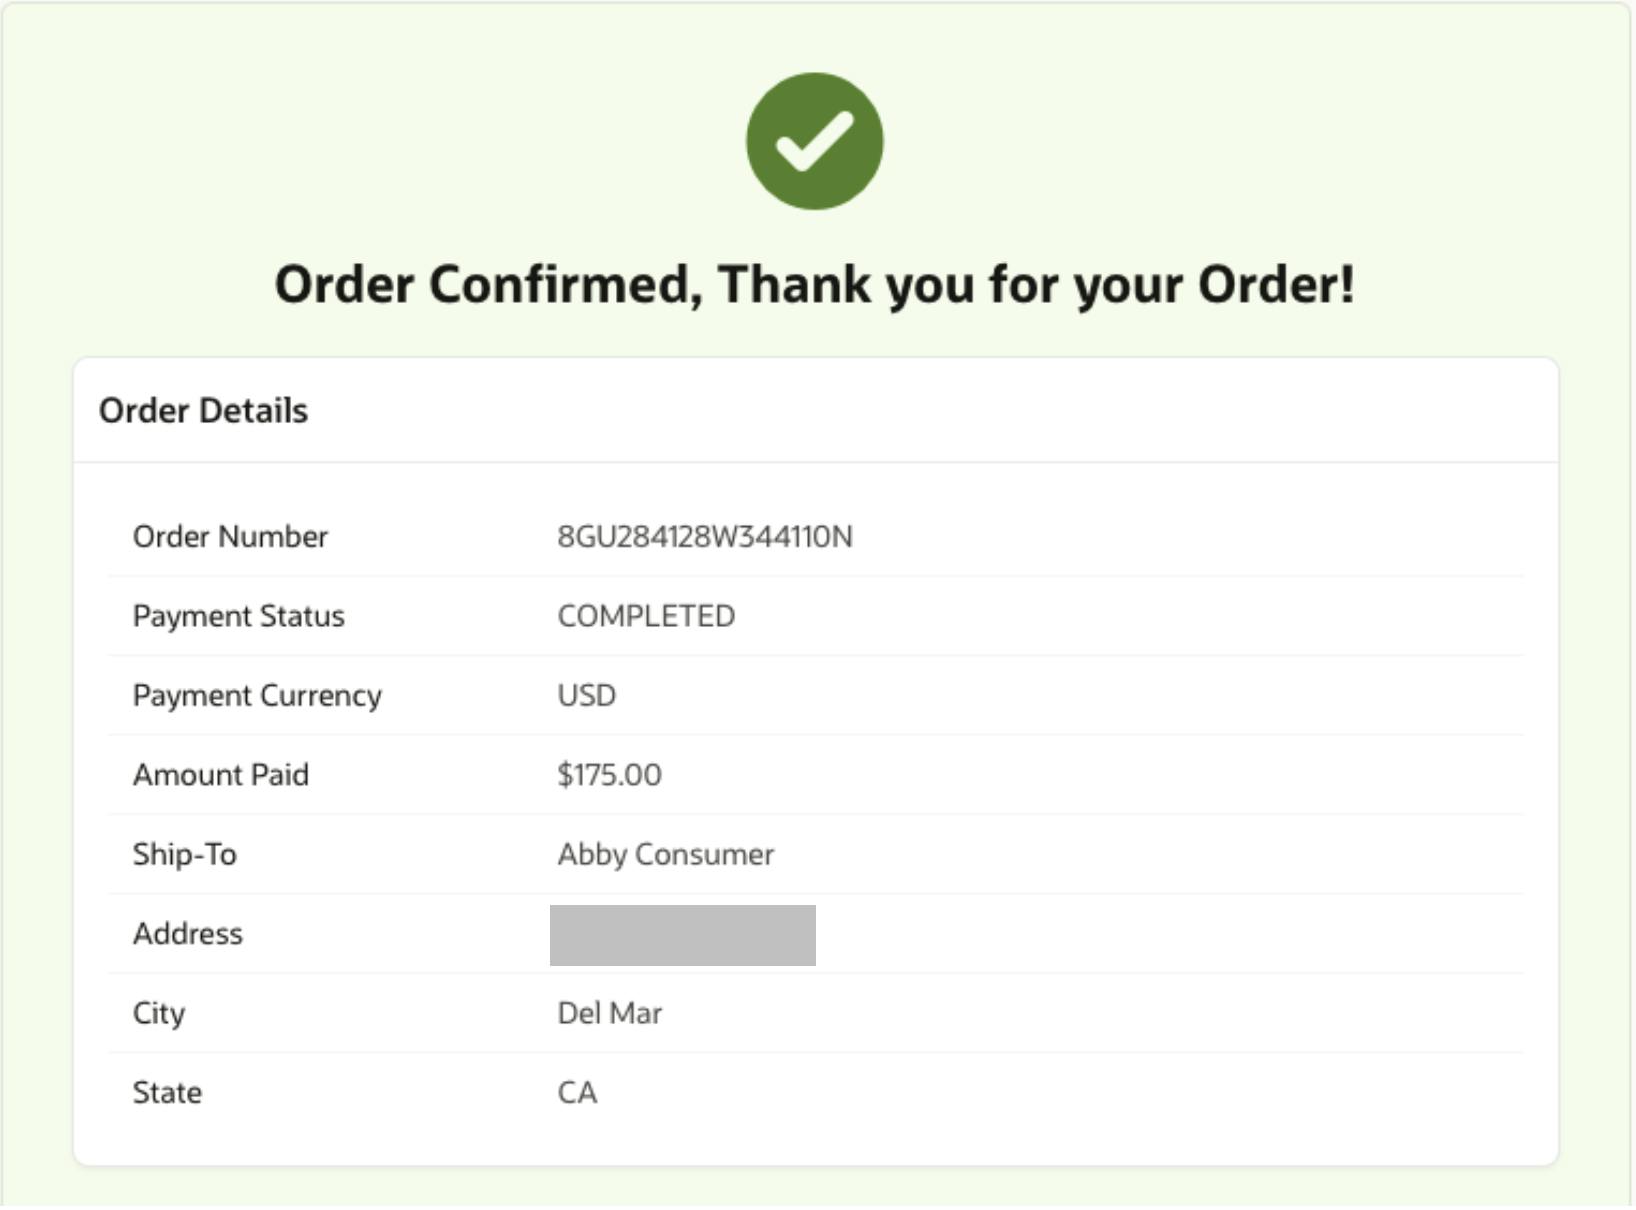
- The Order Confirmation Page (Page 3) parses the JSON response returned from PayPal and displays order confirmation details to the user
PayPal Integration Activities
The integration hinges on five fundamental activities:
- Loading the PayPal JavaScript SDK
- Identifying a region for the PayPal buttons
- Rendering the PayPal buttons
- Capturing the Payment Response
- Order Confirmation
(1) Loading the PayPal JavaScript SDK
The PayPal SDK can be loaded with your APEX page by referencing it in the page's JavaScript 'File URLs' section.
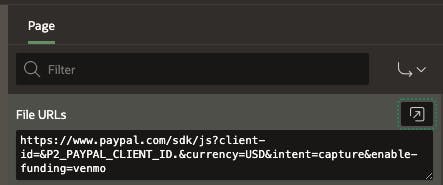
You can see that the URL has four parameters:
- The
client-id(stored in page item P2_PAYPAL_CLIENT_ID) - The
currencyof the transaction (USD) - The
intent(capture payment immediately after the customer makes a payment) - The final parameter
enable-fundingenables Venmo as a payment option
(2) Identifying a region for the PayPal buttons
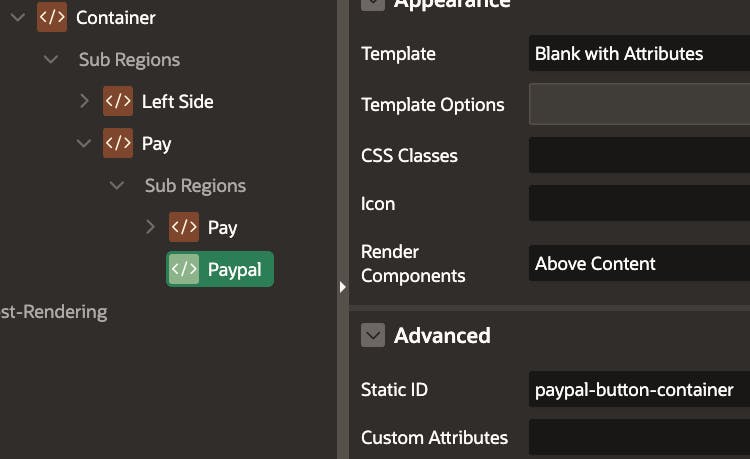
For the Demo App, I created a region called 'PayPal'. The important thing to note is the Static Id paypal-button-container. The Static Id will be referenced in the next step.
(3) Rendering the PayPal buttons
This step causes the PayPal SDK to render the PayPal buttons in the region we identified. It also sets up code that will be called when the user selects a payment option and code that captures the result of the PayPal transaction in a JSON object. This code is placed in the 'Execute when Page Loads' page property.
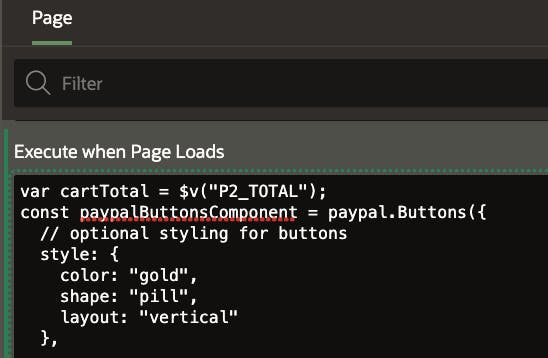 You can see the complete code below. Don't be overwhelmed; 90% of the code was lifted directly from the PayPal Integration Builder.
// Capture the Order Total in a JS Variable.
var cartTotal = $v("P2_TOTAL");

const paypalButtonsComponent = paypal.Buttons({
  // optional styling for buttons
  style: {
    color: "gold",
    shape: "pill",
    layout: "vertical"
  },

  // Prepare the PayPal transaction with the Order Total
  createOrder: (data, actions) => {
      const createOrderPayload = {
          purchase_units: [
              {
                  amount: {
                      value: cartTotal
                  }
              }
          ]
      };
      return actions.order.create(createOrderPayload);
  },

  // finalize the transaction, called when user completes payment.
  onApprove: (data, actions) => {
      const captureOrderHandler = (details) => {
      const payerName = details.payer.name.given_name;
      // Store the PayPal JSON Response in an APEX Page Item.
      $s("P2_PAYPAL_RESPONSE_JSON", JSON.stringify(details, null, 2));
      };
      return actions.order.capture().then(captureOrderHandler);
  },

  // handle unrecoverable errors
  onError: (err) => {
    // Additional Code required here to handle errors from PayPal.
    console.error('An error prevented the buyer from checking out with PayPal');
  }
  });

  // Cause PayPal buttons to be rendered.
  paypalButtonsComponent
      .render("#paypal-button-container")
      .catch((err) => {
        // Additional Code required here to handle errors rendering PayPal Buttons.
        console.error('PayPal Buttons failed to render');
});
With the first three pieces in place, the Checkout page looks something like this:
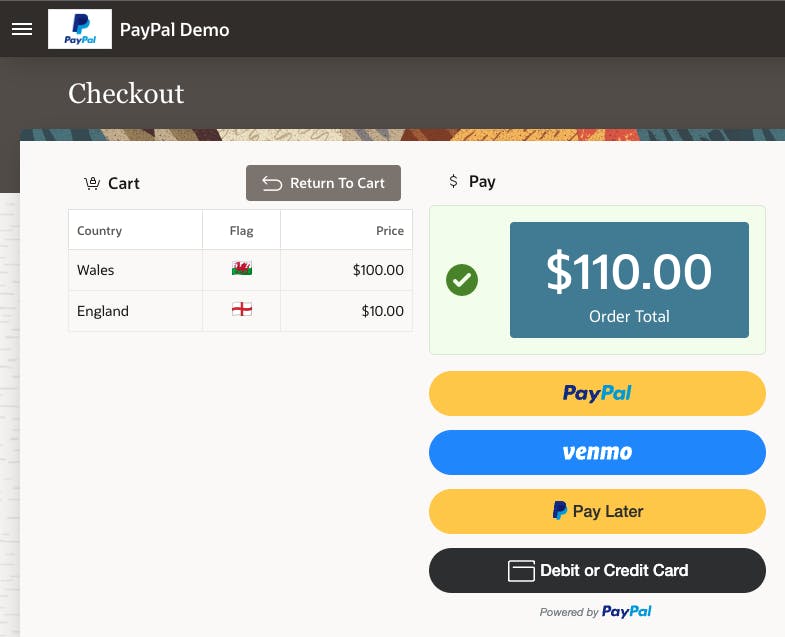
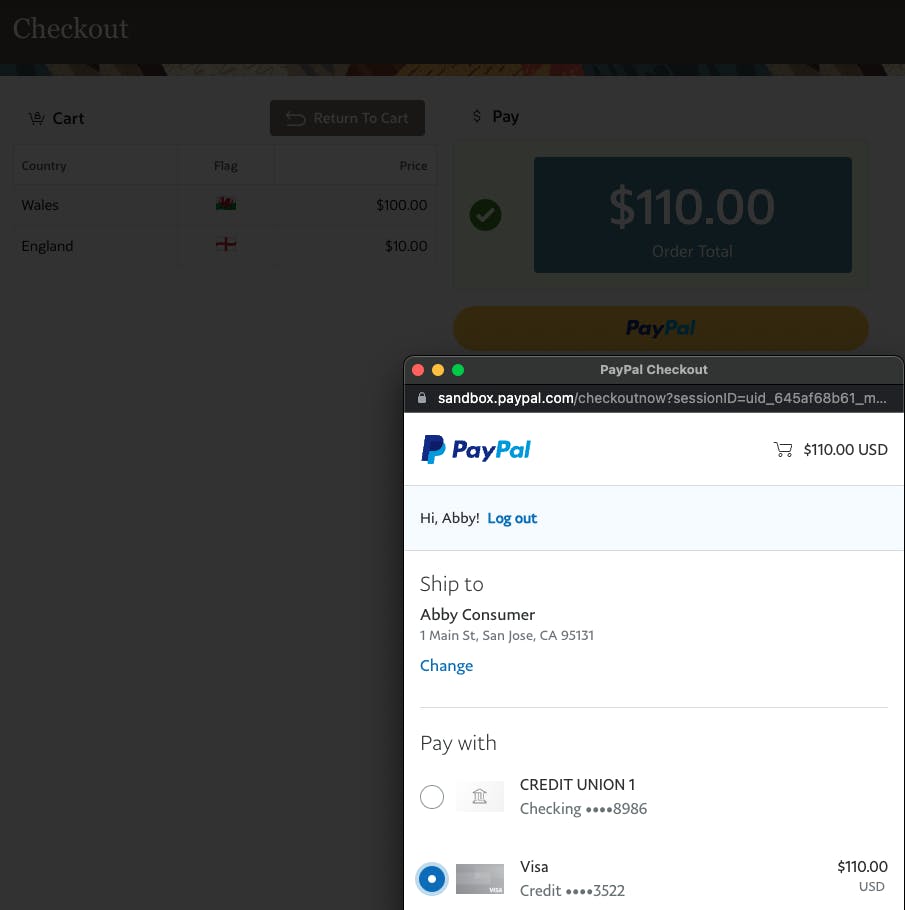
When the user clicks the 'PayPal' button, the PayPal SDK opens a modal where you can log in as a personal/consumer user. In our case, this is Abby Consumer (consumer@cloudnueva.com). Abby can complete her payment details and complete checkout (as seen in the screenshot below).
(4) Capturing the Payment Response
The onApprove function is called when the user confirms her payment details. In this function, we can capture the JSON response from PayPal. The JSON response details the PayPal consumer account and the shipping address. We are storing this in the page item "P2_PAYPAL_RESPONSE_JSON". Here is an example response:
{
    "id": "13J36569MA8322140",
    "intent": "CAPTURE",
    "status": "COMPLETED",
    "purchase_units": [{
        "reference_id": "default",
        "amount": {
            "currency_code": "USD",
            "value": "110.00"
        },
        "payee": {
            "email_address": "merchant@cloudnueva.com",
            "merchant_id": "5YWKCLRCZ969U"
        },
        "shipping": {
            "name": {
                "full_name": "Abby Consumer"
            },
            "address": {
                "address_line_1": "1 Main St",
                "admin_area_2": "San Jose",
                "admin_area_1": "CA",
                "postal_code": "95131",
                "country_code": "US"
            }
        },
        "payments": {
            "captures": [{
                "id": "0L263272DW1400254",
                "status": "COMPLETED",
                "amount": {
                    "currency_code": "USD",
                    "value": "110.00"
                },
                "final_capture": true,
                "seller_protection": {
                    "status": "ELIGIBLE",
                    "dispute_categories": [
                        "ITEM_NOT_RECEIVED",
                        "UNAUTHORIZED_TRANSACTION"
                    ]
                },
                "create_time": "2022-06-21T21:47:54Z",
                "update_time": "2022-06-21T21:47:54Z"
            }]
        }
    }],
    "payer": {
        "name": {
            "given_name": "Abby",
            "surname": "Consumer"
        },
        "email_address": "consumer@cloudnueva.com",
        "payer_id": "CNVUJBLPTAY4J",
        "address": {
            "country_code": "US"
        }
    },
    "create_time": "2022-06-21T21:47:45Z",
    "update_time": "2022-06-21T21:47:54Z",
    "links": [{
        "href": "https://api.sandbox.paypal.com/v2/checkout/orders/13J36569MA8322140",
        "rel": "self",
        "method": "GET"
    }]
}
(5) Order Confirmation
We can then parse the JSON response from step 4 and provide the user with an Order Confirmation.
Considerations
- Make sure you do plenty of negative testing. Comprehensive negative testing will ensure you have accounted for all possible error scenarios. There is a menu option called 'MOCK > Negative Testing' in the PayPal developer account, which provides values you can use to force different kinds of errors
- PayPal implements webhooks that call user-defined REST end-points when certain events occur in your PayPal account. Events include 'Payment capture denied', 'Disputes created', 'Checkout order completed', etc. If you are familiar with Oracle REST Data Services (ORDS), then you can create REST end-points for these webhooks to call and process them in your database
Viewing Test Transactions in PayPal
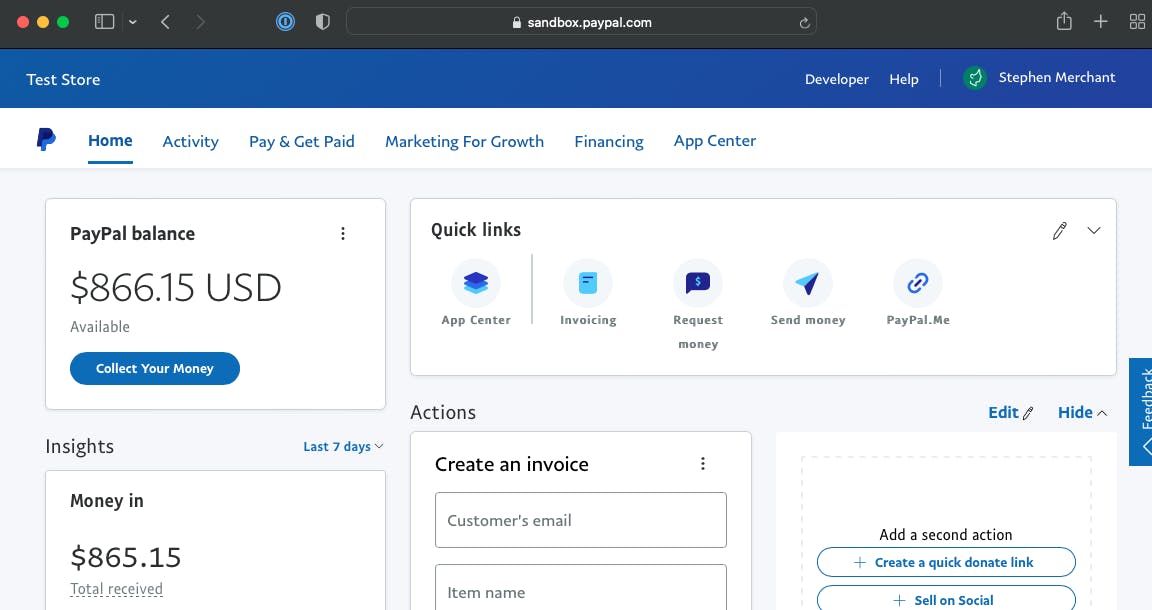
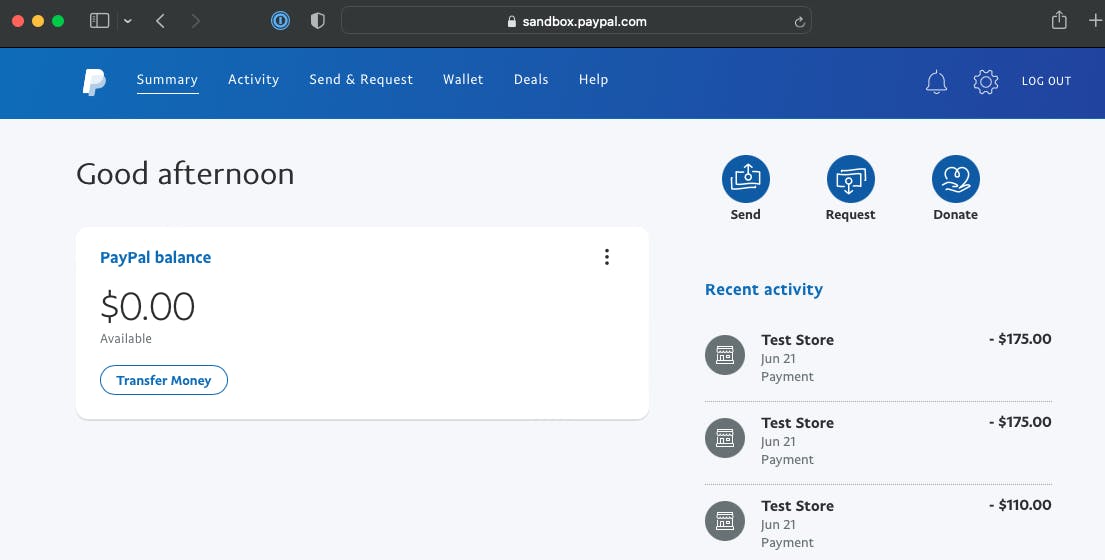
You can see a list of Payments that have been made in the Sandbox by logging into sandbox.paypal.com using the Personal/Consumer or Business/Merchant test accounts you created above.
Business/Merchant
- Log in as Sally Merchant:
Personal/Consumer
- Log in as Abby Consumer:
Going Live
Once you have completed your testing, you must take your PayPal App live. To do this, you first need to upgrade your developer account to a business account. The upgrade can be initiated from the 'My Account' menu option at developer.paypal.com
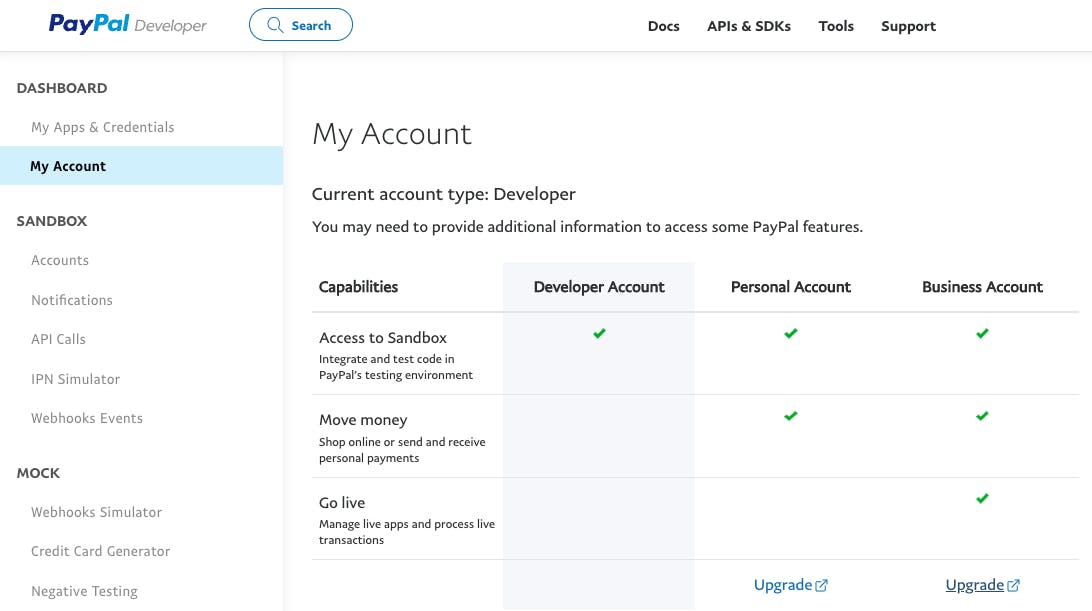 Once you have upgraded your account:
- Navigate to the 'My Apps & Credentials' menu option
- Select 'Live'

- Create a New PayPal App, just like you did for the Sandbox
- You will get a new Client ID and Secret
- You will need to update the Client ID in your APEX App to the new 'Live' Client ID
Conclusion
With the introduction of client-side (JavaScript-based) integrations, companies like PayPal and Stripe make it easy to integrate their payment solutions. Adding online payments to your APEX applications has never been easier and is now within reach of most developers.
🔗 Read More
- 🩳 APEX Shorts
- #️⃣ APEX Posts
Credits
- I got the inspiration for this post from a post by Victoria Lo

