APEX Popup LOV Deep Dive

Introduction
This post will deep dive into the APEX Popup LOV item type. Much like a Select List, the Popup LOV allows you to present users with a list of items to select from. The Popup LOV takes list selection further by offering these additional features:
Display additional columns of information for each item in the list
Allow the user to type search criteria to limit the list of options
Return additional values from the selected item to page items
Allow users to select multiple items
Allow users to enter items that are not in the source SQL or REST Source
Display icons to help highlight certain items
Group items in the list to make selection easier (Note: you can do this with a Select List also)
When to Use a Popup LOV
To display additional columns to help the user decide which item to select
To return additional values from the selected item to other page items
To give the user control by allowing them to start typing and dynamically filter the list of items
To allow users to enter values that are not in the source SQL/REST Source
To allow users to select multiple values from the list
I typically only use a Select List over a Popup LOV when fewer than 15 items are in the list.
Popup LOV Example
I will use the below use case to illustrate how to configure all of the features of a Popup LOV.
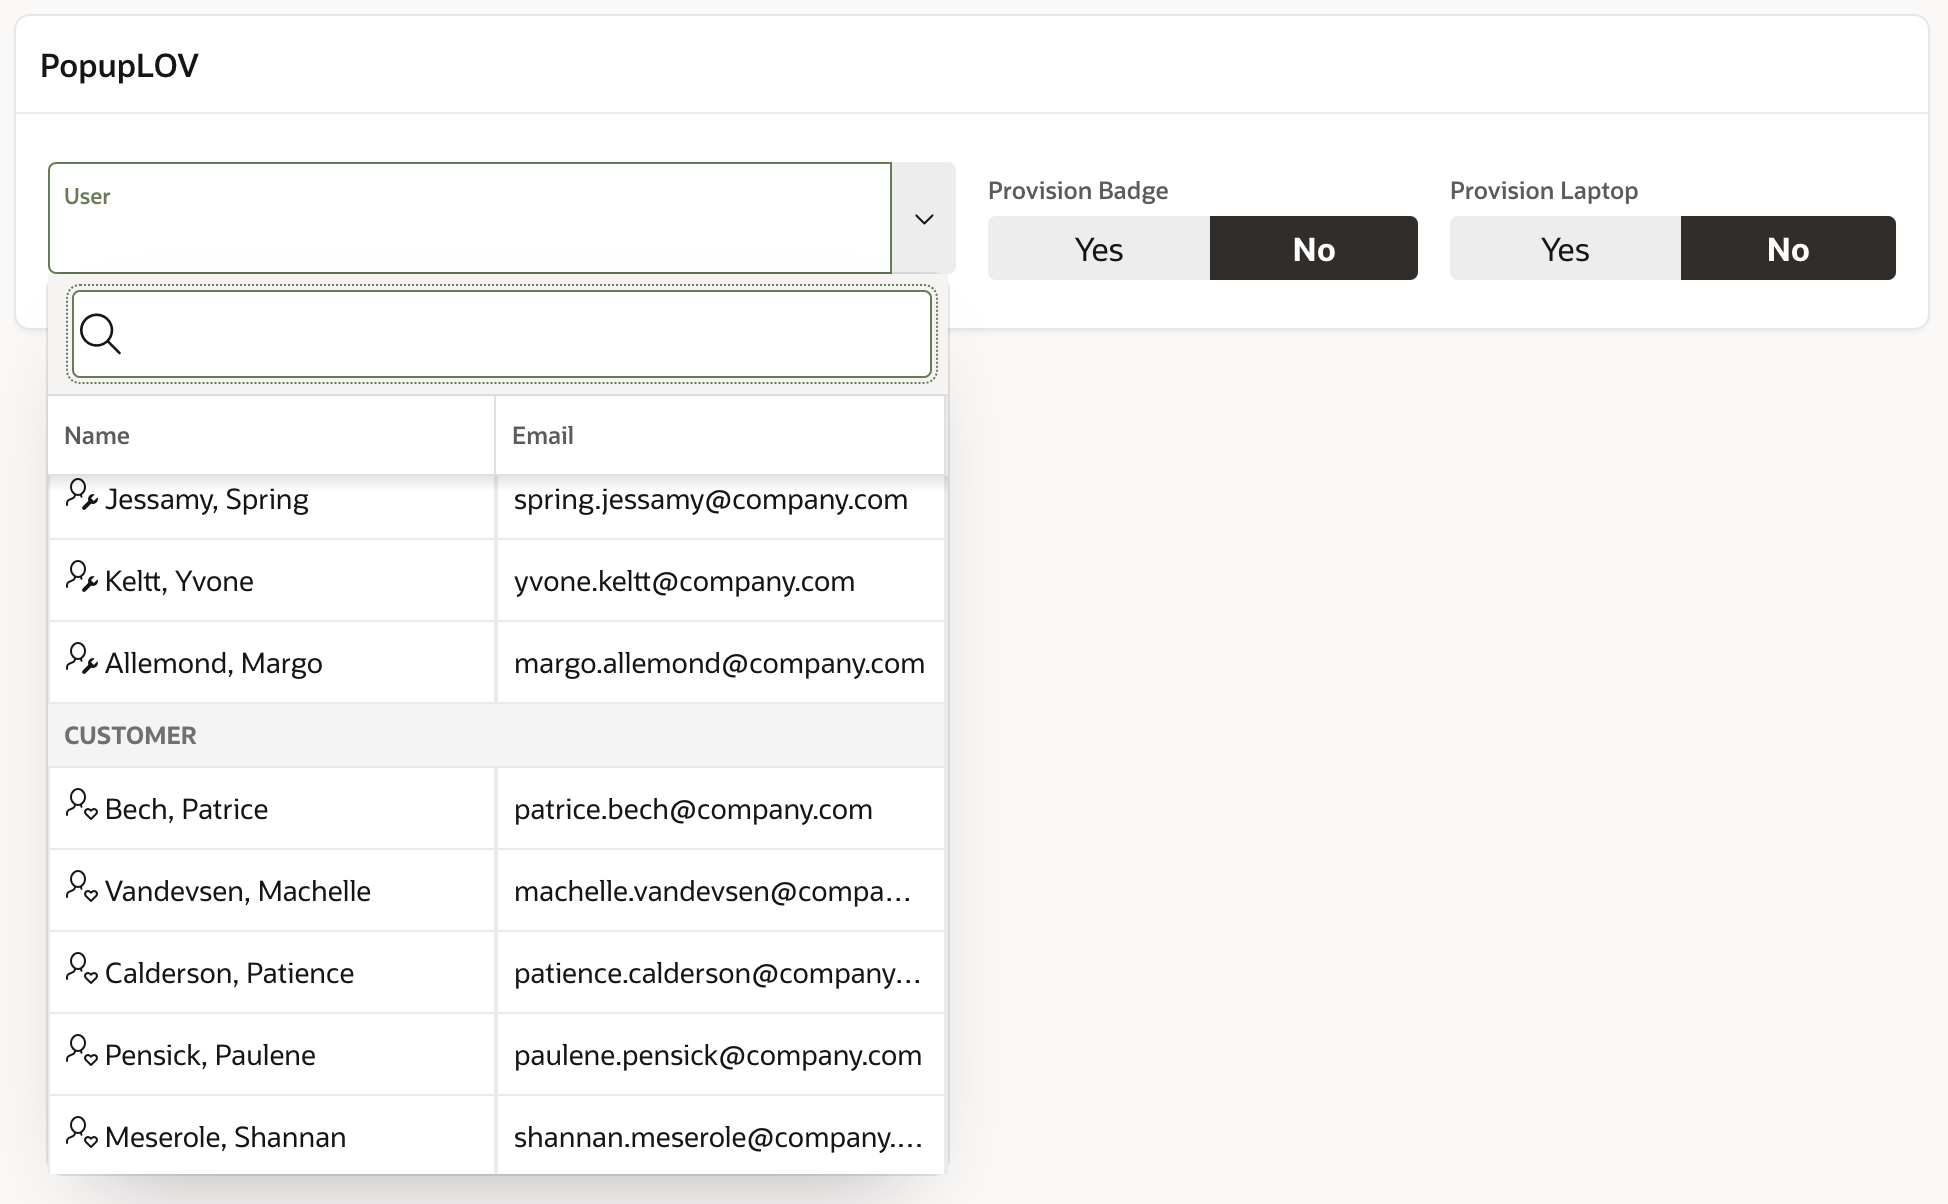
We have an APEX page where we need to present a list of users. When a user is selected, we need to set a default value for two fields, 'Provision Badge' and 'Provision Laptop'. 'Provision Badge' and 'Provision Laptop' are defaulted based on the User Type [EMPLOYEE, CUSTOMER, CONTRACTOR]. The user type field is another field in the 'users' table.
Here is what the result will look like:
List of Values
To use the advanced features of the Popup LOV, we must define a List of Values under Shared Components. Although several APEX item types can use a List of Values, some features of a List of Values are specific to a Popup LOV.
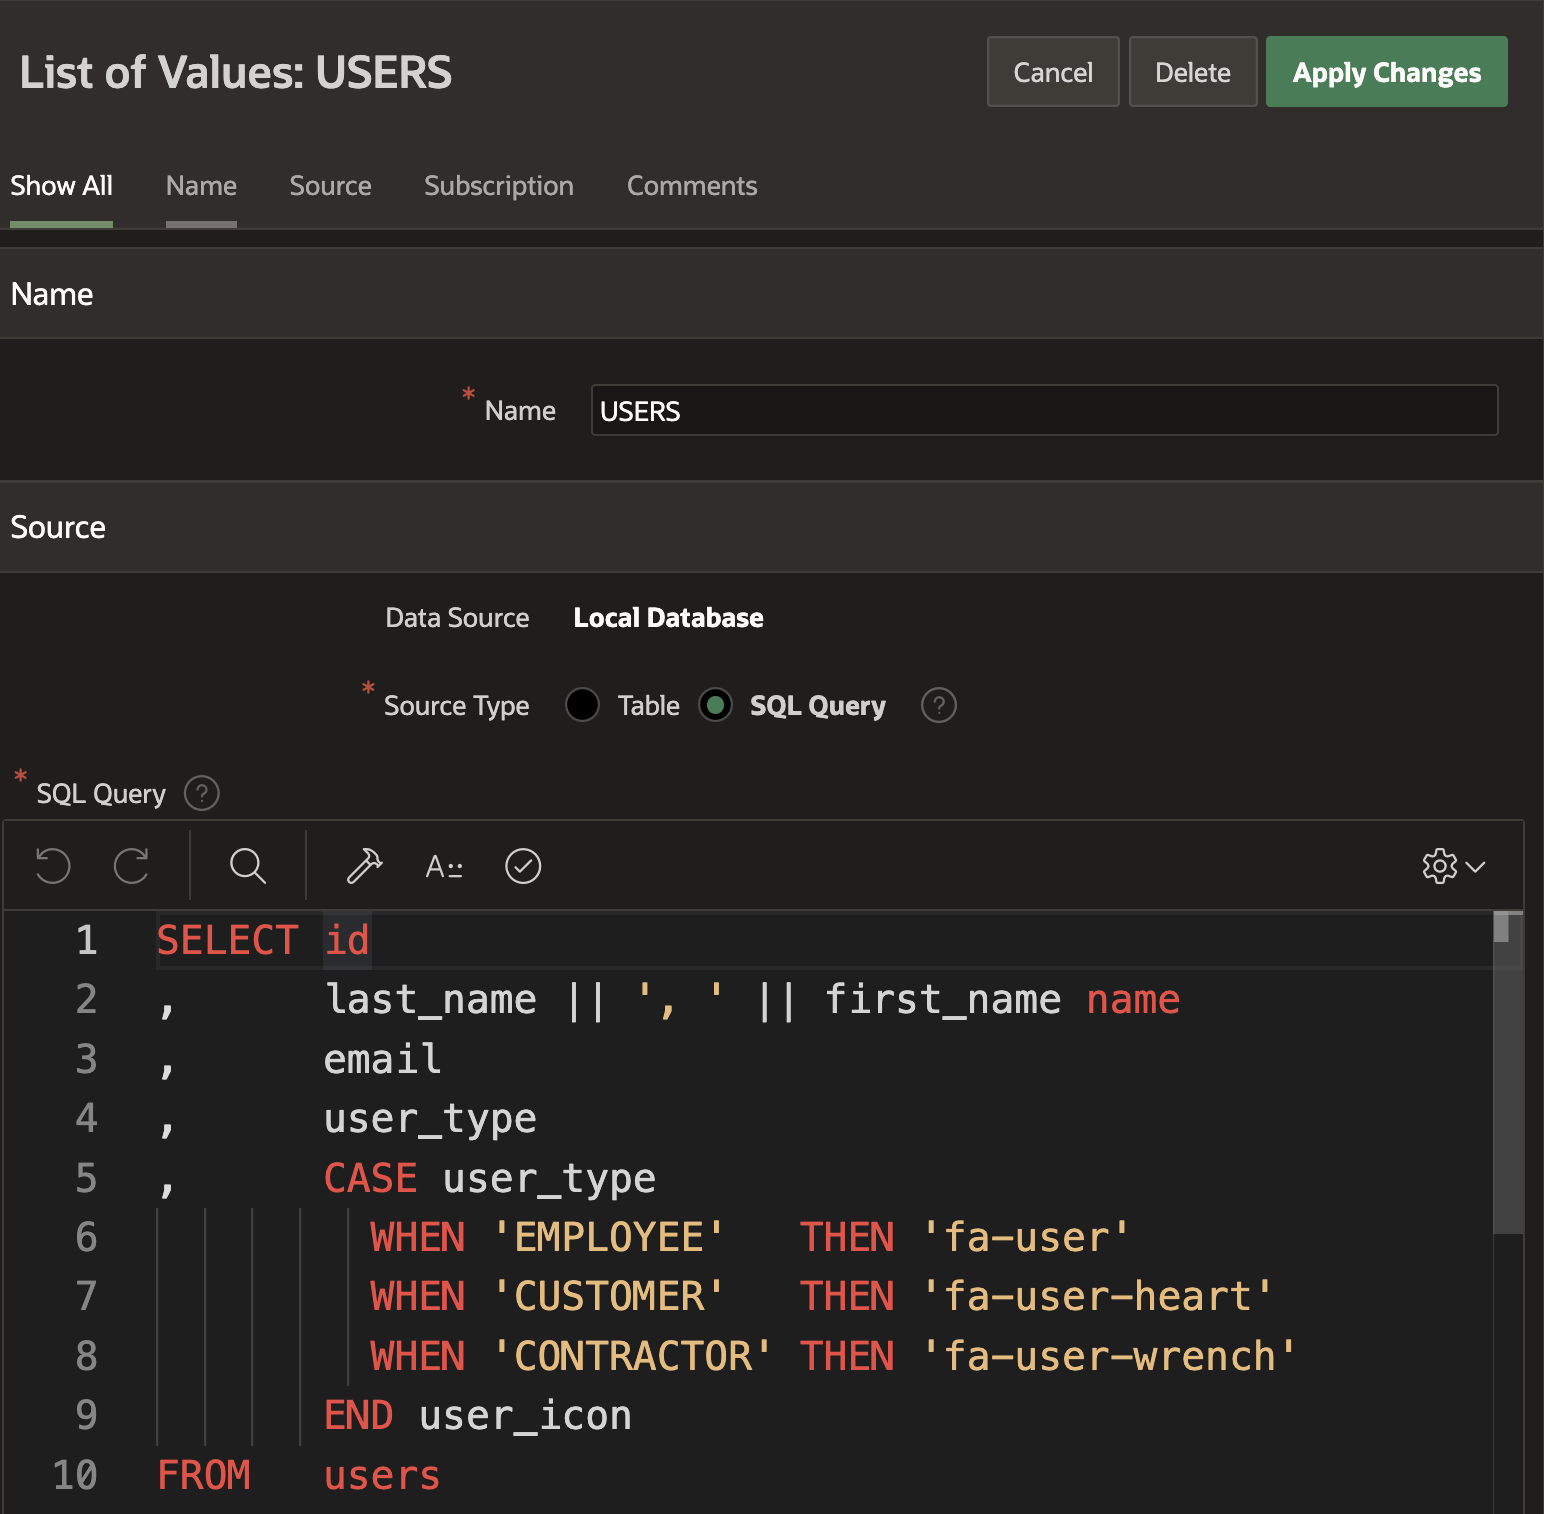
SQL Query
When creating a List of Values, we must first define the SELECT statement (or REST Source), which will generate the list of values to choose from. Notice I have included multiple columns in the below SELECT statement.
Column Mapping
The next step in creating a List of Values is to map columns from the SELECT statement to options that will drive how the Popup LOV will behave at runtime. All values are optional, except for Return.
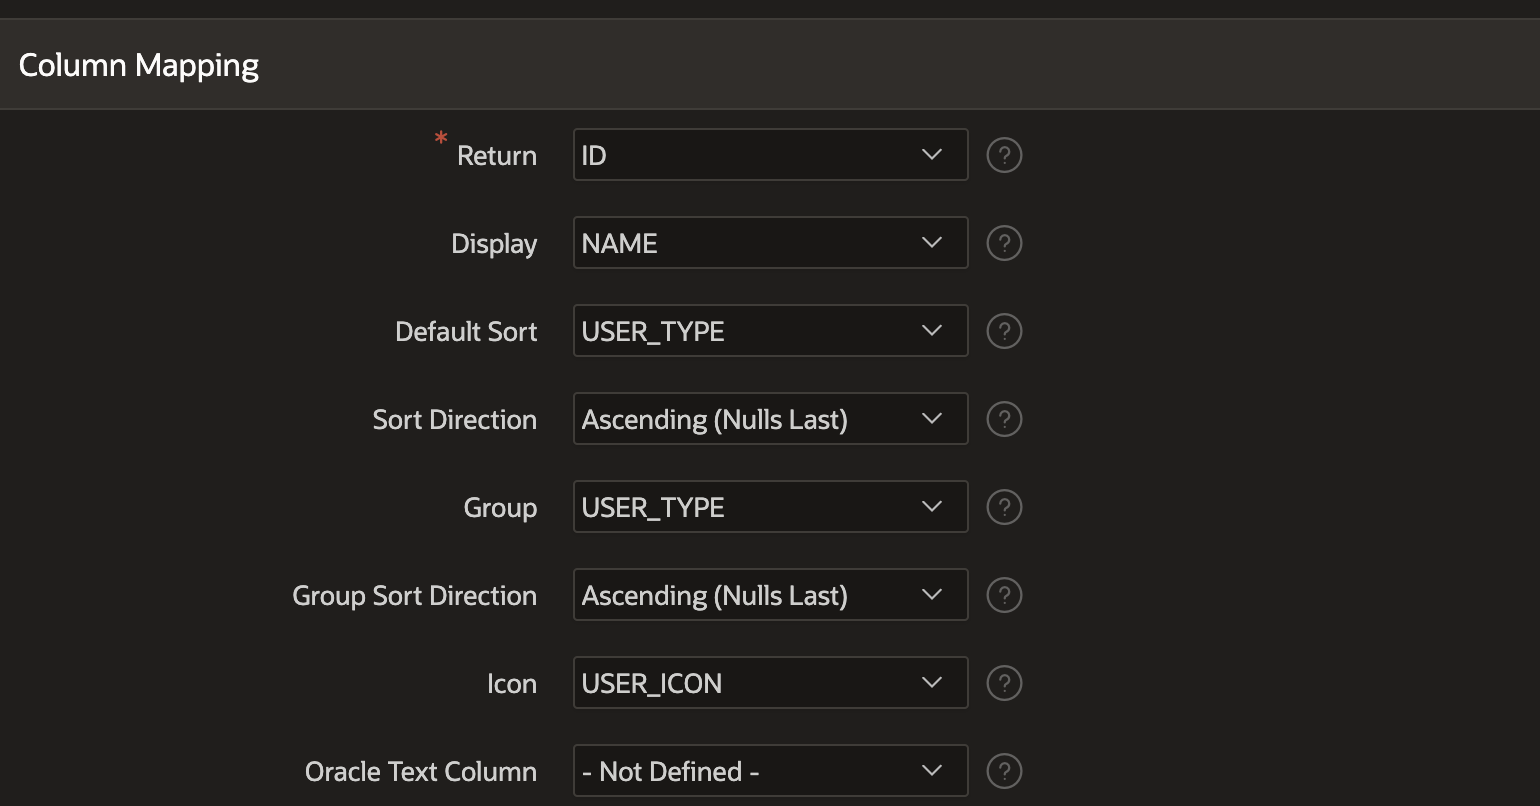
Returnis the value returned to the Popup LOV page item associated with the LOVDisplayis the value displayed by the page item when a value has been selected from the LOVDefault SortandSort Directionare the columns used to sort the LOV and the sort direction? For Popup LOVs, users can change the sort at runtimeGroupis used to group LOV items into related sets of values. The column value you select here is displayed at the start of each group. In my example, I have grouped values by user type [EMPLOYEE, CUSTOMER, CONTRACTOR]Group Sort Directionis the sort direction for the group entriesIconis the icon you want to be displayed against each item in the list. You can use font APEX icons, e.g.,fa-user, and Universal Theme CSS classes, e.g.,u-danger-texthere. In my example, the columnuser_iconshows a different icon for each user type [EMPLOYEE, CUSTOMER, CONTRACTOR]. Icons are a great way to highlight specific entries in the LOVOracle Text Columnif one of your columns has an Oracle Text index, you can reference it here. For Popup LOVs, APEX will utilize the Oracle Text index when performing row searches in the Popup LOV at runtime
Additional Display Columns
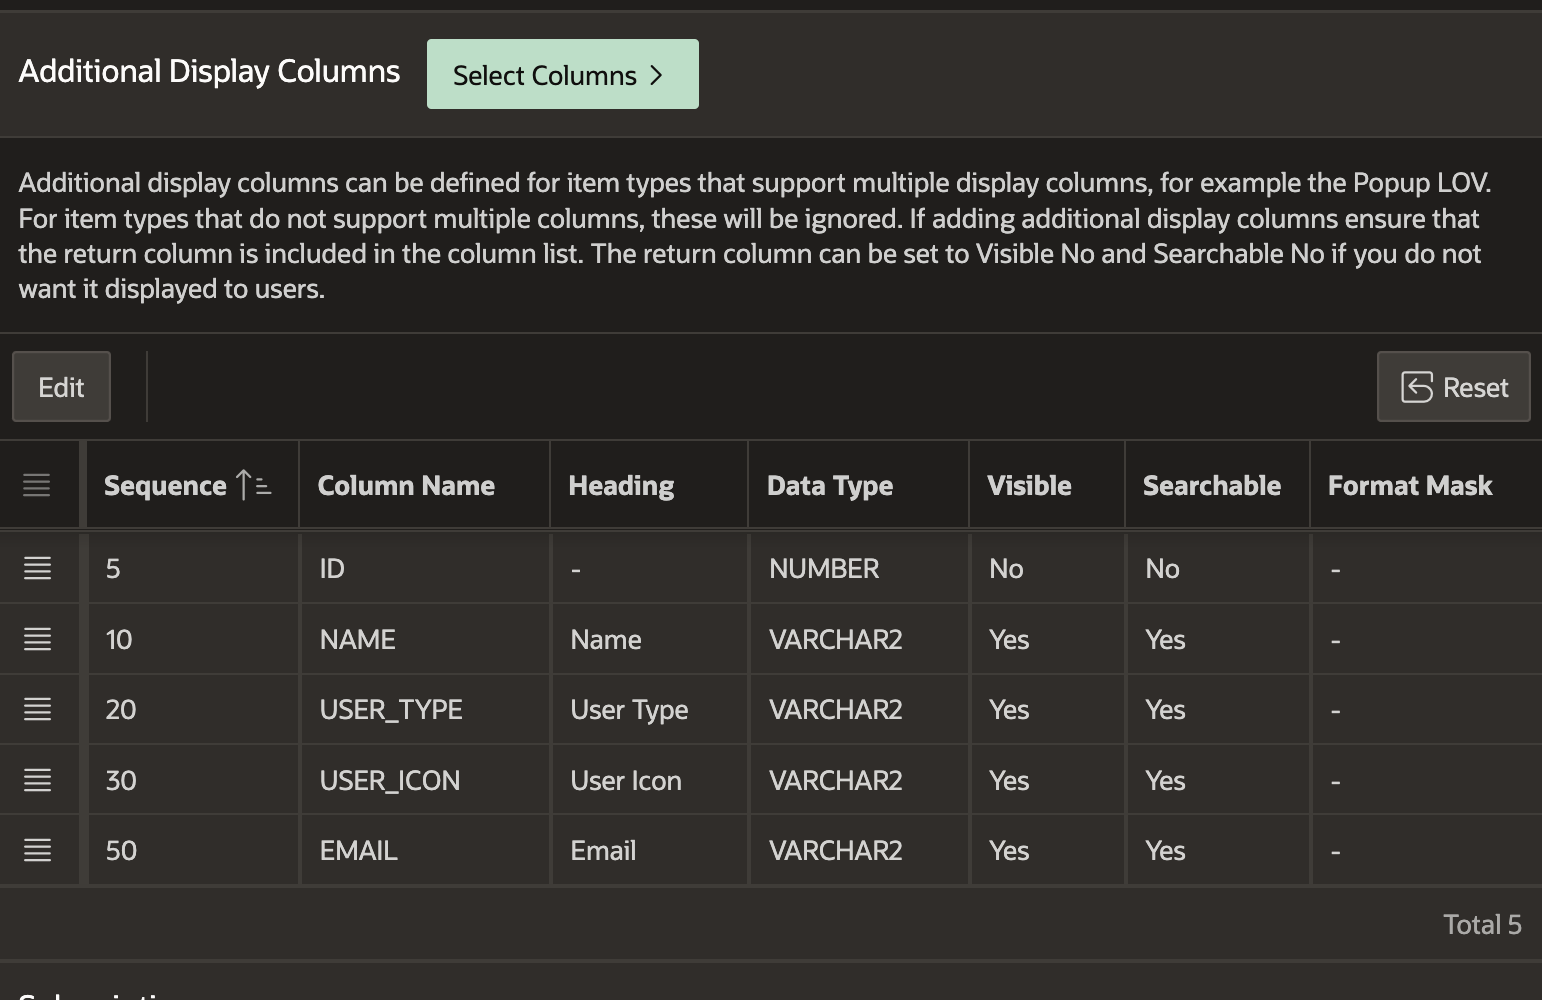
This section is specific to the Popup LOV. Here we can configure which columns are displayed to the user at runtime, what the column titles are, the format string that should be applied, and which columns are searchable. Use the Select Columns button to select which columns from your SQL statement should appear in the Additional Display Columns table. Afterward, you can adjust specific options in the table directly.
Sequenceis the order in which the column is displayed to the user at runtimeColumn Nameis read-only and represents the column name in the SELECT statement or REST SourceHeadingis the heading for the column displayed to the user at runtimeData Typeis read-only and represents the data type of the column in the SELECT statementVisibletoggle this value to determine if the column should be displayed to the user at runtimeSearchabletoggle this value to determine if the value in this column should be considered when the user is searching the LOV at runtimeFormat Maskyou can define an Oracle Format Mask for DATE and NUMBER Data Type columns here
Page Items
Now that the LOV is defined, we can create the 4-page items required for our example.
P90_USER_ID
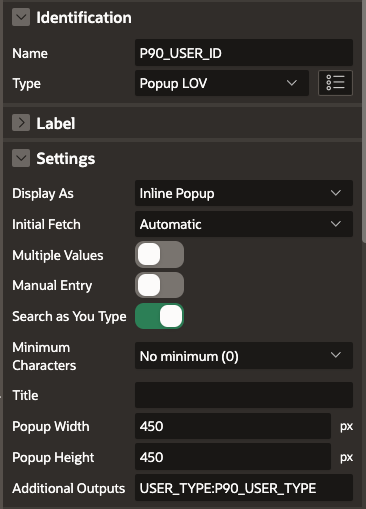
P90_USER_ID is the page item for the Popup LOV itself.
Display Asdetermines if the LOV is displayed as anInline Popupwith the field or as aModal Popup. I typically useInline PopupInitial FetchI typically set this toAutomatic; you can choose from three options:On User Request- Initially, no list of values is fetched until the user hits enter with or without a search term. This is useful if your LOV source (SQL or REST Service) is slow and you only want to perform the LOV search when the user explicitly requests itAutomaticWhen the page is loaded, the list of values is fetched without a search termAutomatic with Current ValueInitially fetch the list of values with the current value as the search term
Multiple Valuesif switched on, the user can select multiple values from the Popup LOV. Values are returned to the page item as a delimited list, e.g.,35363:28228:12922. The delimiter is determined by theSeparatorfield that is displayed if you switch onMultiple Values. If our use case required us to select multiple users and we set this on, the Popup LOV would look like this at runtime:
Manual Entryif switched on, the user can manually enter values that do not exist in the source LOV. When you switch this on, the value returned to the page item is the value the user enters at runtime. Given this, whenManual Entryis switched on, you will need to make the display value the same as the return value. This can be useful for tags. Users can select from existing tags (based on the source SQL) and enter new ones. I could enter 'PLSQL' in the screenshot below, even though it is not in the LOV. In this example, the return values would beAPEX:PLSQL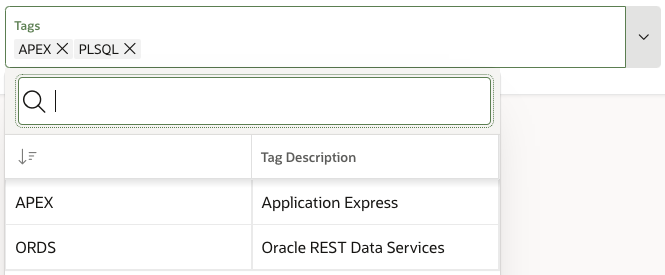
Search as You Typeif switched on, the LOV SQL or REST Source is re-executed after each keystroke, and the LOV is reduced to matching entries. This option is used in conjunction with the optionMinimum Characters, which (when set) forces the Popup LOV to start applying the filter to the LOV after the user has typed the specified number of characters.Minimum Charactersshould be used when dealing with large or slow LOVs. This prevents multiple slow executions of the LOV after each keystroke which would be annoying to the user and causes unnecessary load on the server.This screenshot shows a filtered list after the user has entered three characters:
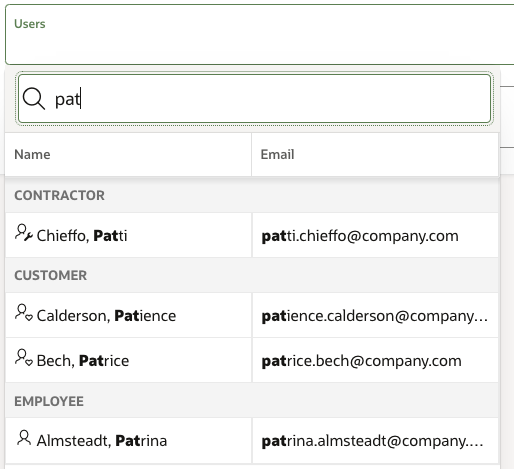
This screenshot shows a list where
Minimum Charactersis set to 3, but the user has not yet entered three characters: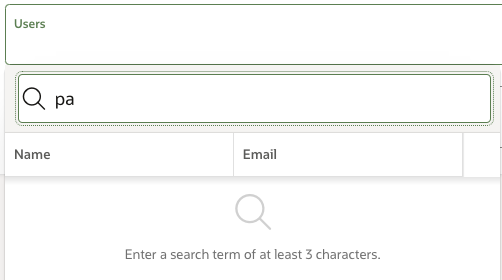
Titleis the title that is displayed if you selectedModal Popupfor theDisplay Asoption abovePopup Widthdetermines the width in pixels of the popupPopup Heightdetermines the height in pixels of the popupAdditional Outputsallows you to return column values from your LOV to page items in your APEX page (for the selected item). In my example, when the user picks a user from the Popup LOV, in addition to theIDfield being returned to the page itemP90_USER_ID, the value of theUSER_TYPEcolumn is also returned to the page itemP90_USER_TYPE. See below for more onAdditional Outputs
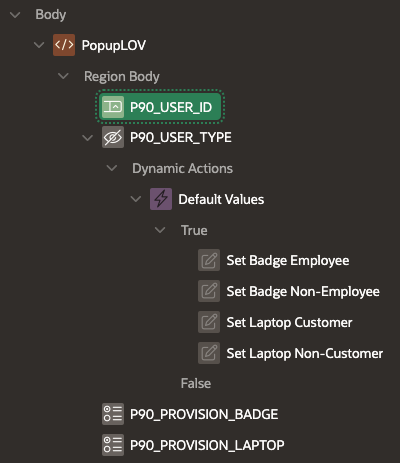
P90_USER_TYPE
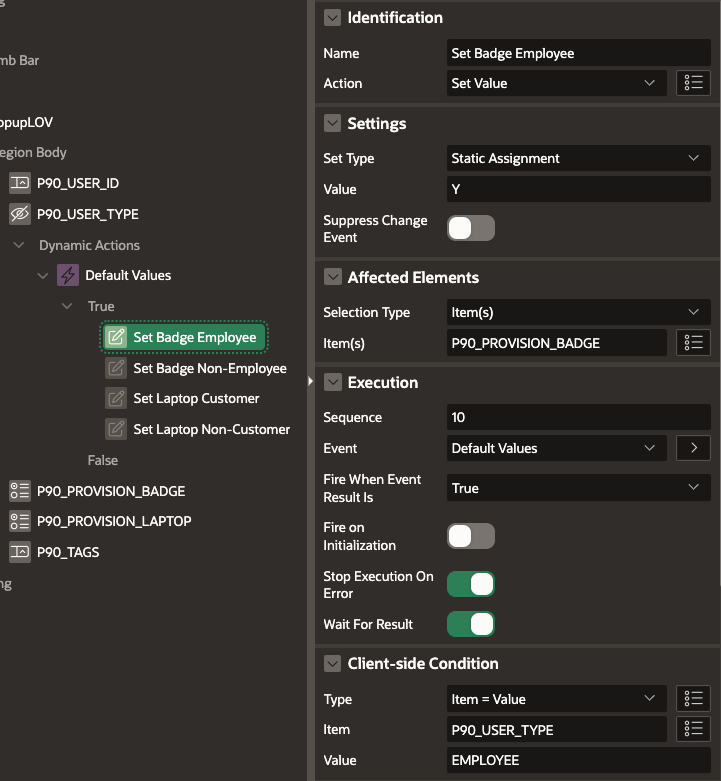
P90_USER_TYPE is a hidden page item that receives the additional output USER_TYPE when a user is selected from the Popup LOV. I have a Change Event Dynamic Action on this field which is used to set the page items P90_PROVISION_BADGE and P90_PROVISION_LAPTOP based on the user type of the selected user.
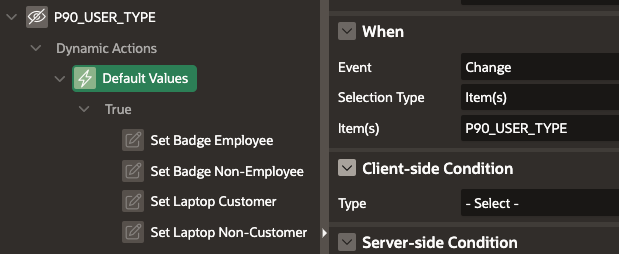
The Dynamic Action has four True actions which a very similar, so I have only shown the first one here:
P90_PROVISION_BADGE & P90_PROVISION_LAPTOP
These are two switch-type page items set by the dynamic actions attached to P90_USER_TYPE.
More on Additional Outputs
In my opinion,
Additional Outputsare an underutilized feature of Popup LOVs.
In my example, I want to set the value of two other page items based on the type of user selected. If I were using a Select List Item Type, I would have to do the following to achieve the same result:
Create a Dynamic Action on the change of
P90_USER_IDThe DA would take the selected user id and run some server-side code to get the user type for the selected user; the USER_TYPE would then be returned to
P90_USER_TYPEto trigger the dynamic action, which default values forP90_PROVISION_BADGEandP90_PROVISION_LAPTOP
It may not seem like much of a difference, but by using Additional Outputs, we removed a round trip to the database to get the USER_TYPE. This improves user experience and reduces the load on the server.
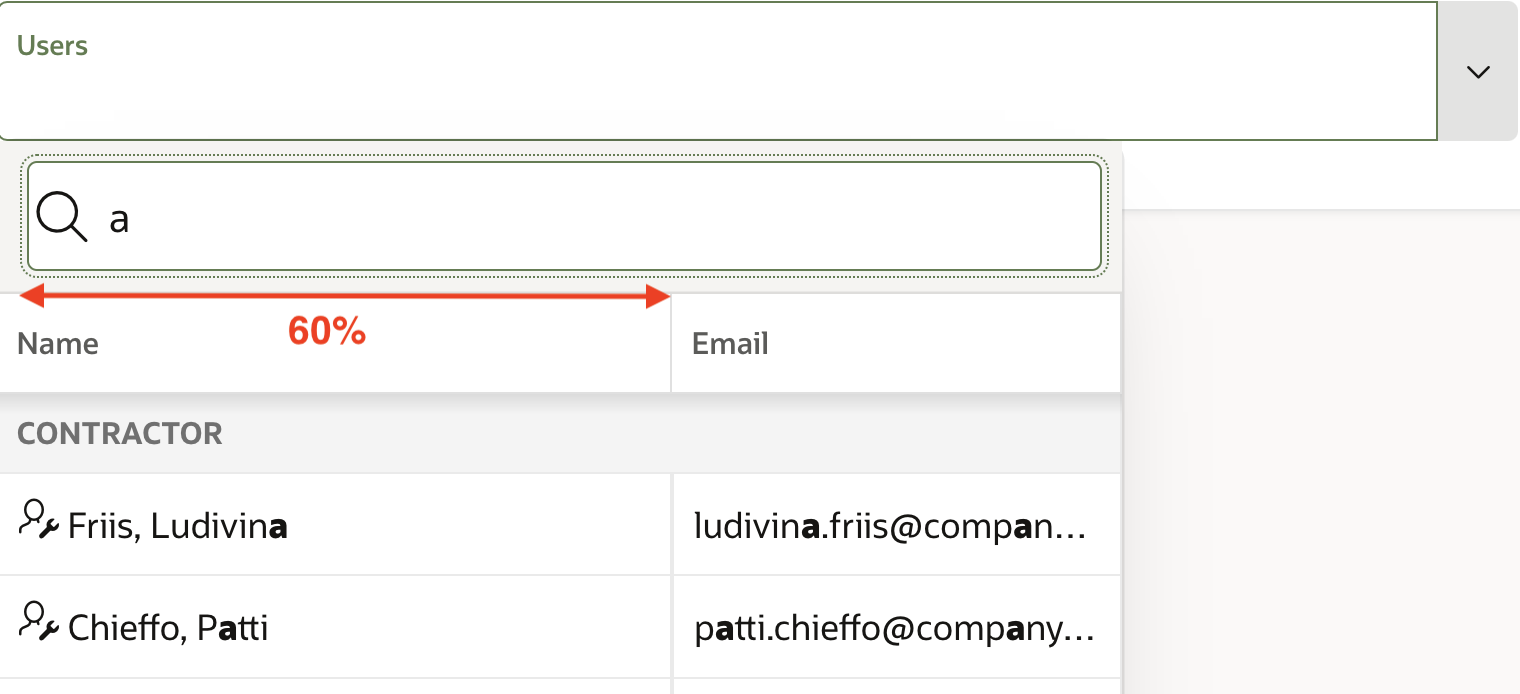
Setting Column Widths
While it is not yet possible to declaratively set the width of the columns in a Popup LOV, thanks to a Tweet from Paulo Künzel you can do it via the 'Initialization JavaScript Function' of the Popup LOV Page Item.
In the P90_USER_ID example, we can set the width of the name column to 60% of the overall width of the Popup LOV as follows:

If we open up the Popup LOV, we can see that the name column now takes up 60% of the Popup LOV.
As well as setting the column width as a percentage, you can also set a specific pixel size.
Room for Improvement
I do believe there is room for improvement, and I would like to see the following features added at some point:
Ability to configure Popup LOV column widths at design time
Ability to pass in parameters from the calling page. If your Popup LOV is dependent on a Parent Cascading List of Values item, you need to reference the parent item in the LOV definition in shared components, e.g.,
SELECT id
,      last_name || ', ' || first_name name
,      email
FROM   users
WHERE user_type = :P90_USER_TYPE
This means you need to create a different shared component LOV for each page you need to use the LOV for. Ideally, there would be an additional option for a Popup LOV item type, allowing you to enter a comma-separated list of page items that would be passed to the Popup LOV at run time. Then you could reference them using generic bind variables in the LOV definition in shared components, e.g.,
SELECT id
,      last_name || ', ' || first_name name
,      email
FROM   users
WHERE user_type = :PARAM1
Conclusion
Popup LOVs were a welcome addition to APEX and removed the need for plugins like Select2. They provide several features that offer real value to end users and convenience for developers. I hope this post has helped you realize their importance.
🔗 Read More
#️⃣ APEX Posts