Introduction
In my previous two posts, I covered sending files to the Oracle Account Reconciliation Cloud Service (ARCS) file system and running jobs in ARCS. In this post, I will complete the series by describing how you can extract data from ARCS over REST.
Background
Please refer to my first post for details on Authentication for ARCS REST Services, as well as how to get the <BaseURL>, which I refer to throughout this post.
Approach
The approach involves the following steps:
Build a custom report in ARCS to generate the data you need
Run the custom report using a REST service
Fetch the CSV file generated by the report
Parse the CSV file and display the data in APEX
This post will take a simple example of extracting setup data for ARCS Transaction Matching Match Types. You can extract any data from ARCS as long as it can be accessed using a SQL statement.
You can see all of the tables and views used by ARCS in the documentation Tables and Views for Account Reconciliation.
ARCS Custom Report
Oracle ARCS uses Oracle BI Publisher for reporting. Don't worry; you don't need to know BI Publisher to follow this post.
Report Query
To build a custom report, you must first define a Report Query. Navigate to Application > Report Configuration, and select the Queries Tab.
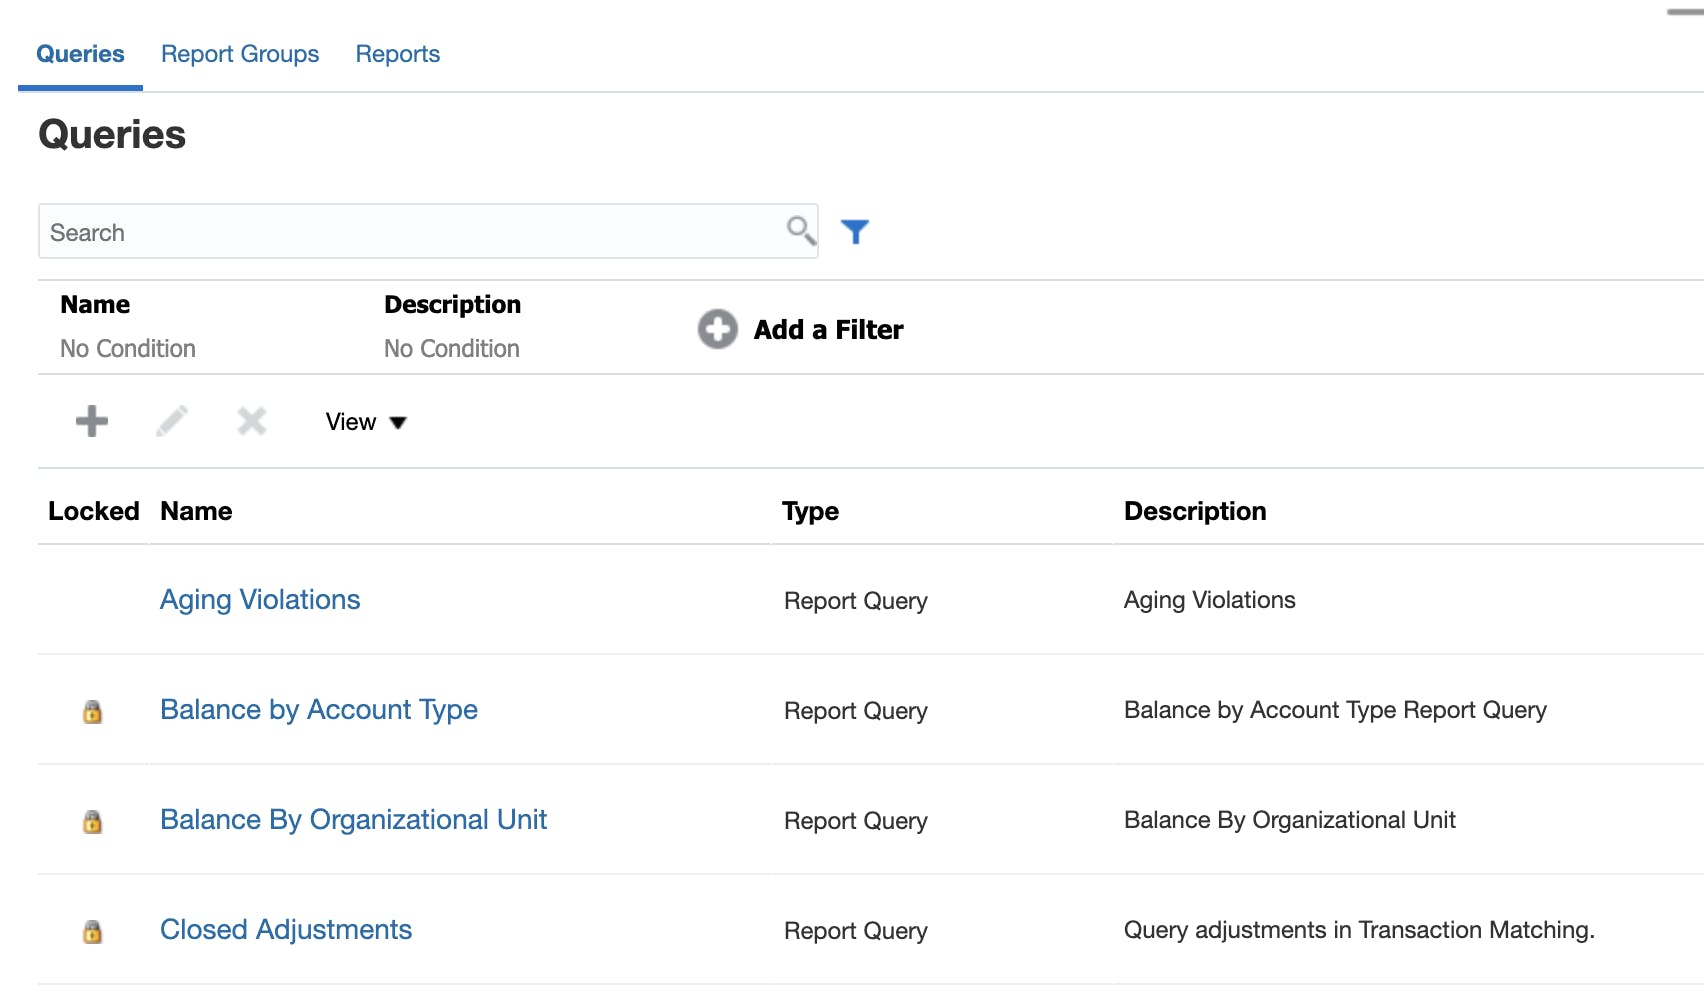
Click the Plus Sign to create a new query, then enter the following details:
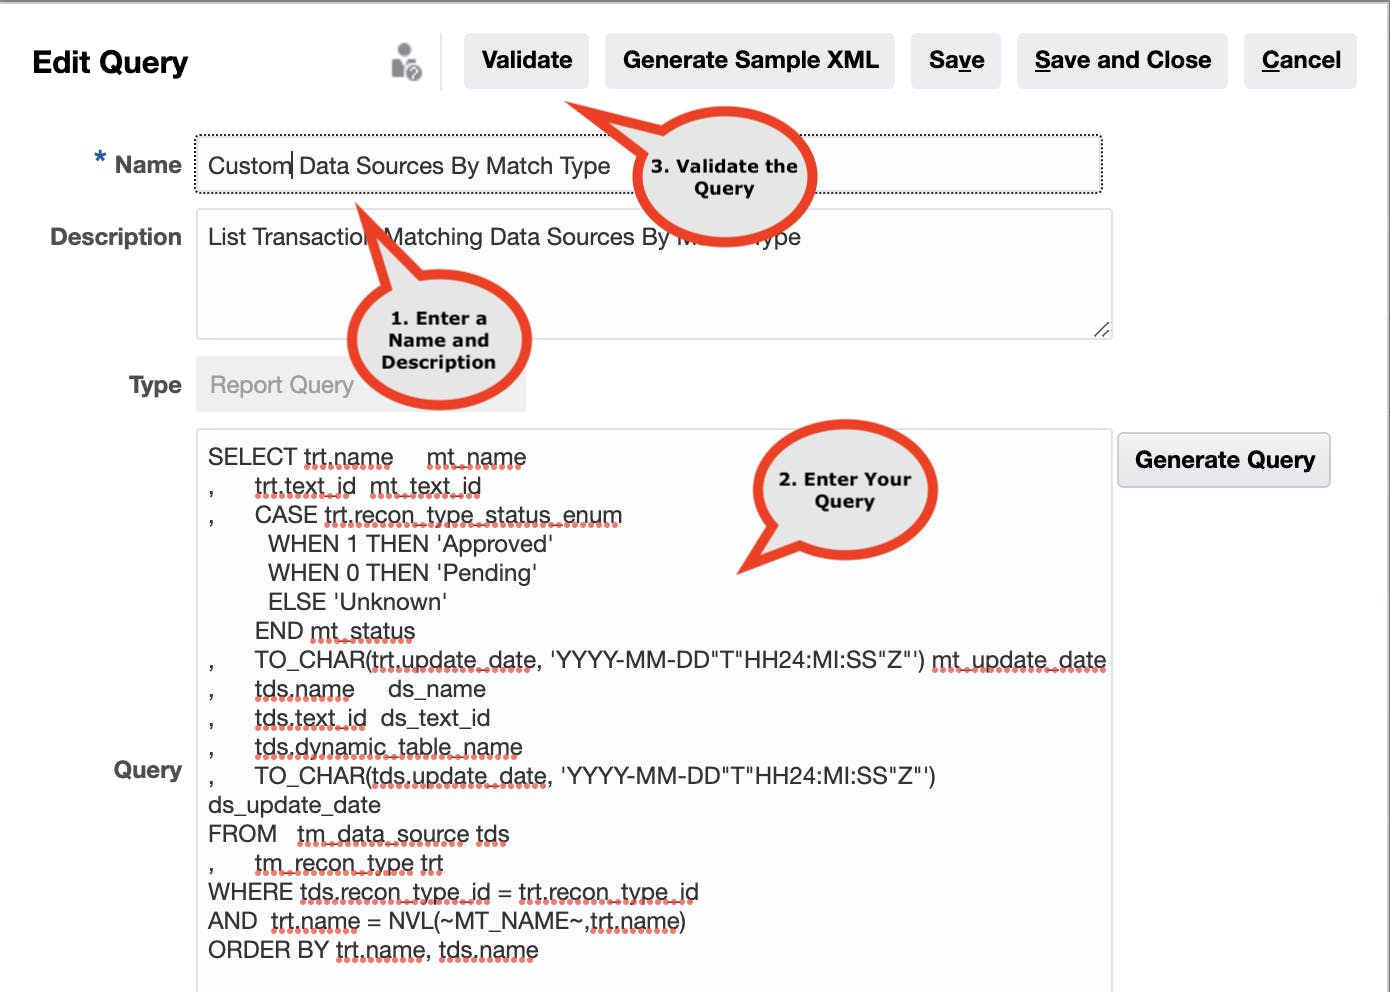
Example Query:
SELECT trt.name     mt_name
,      trt.text_id  mt_text_id
,      CASE trt.recon_type_status_enum
         WHEN 1 THEN 'Approved'
         WHEN 0 THEN 'Pending'
         ELSE 'Unknown'
       END mt_status
,      TO_CHAR(trt.update_date, 'YYYY-MM-DD"T"HH24:MI:SS"Z"') mt_update_date
,      tds.name     ds_name
,      tds.text_id  ds_text_id
,      tds.dynamic_table_name
,      TO_CHAR(tds.update_date, 'YYYY-MM-DD"T"HH24:MI:SS"Z"') ds_update_date
FROM   tm_data_source tds
,      tm_recon_type trt
WHERE tds.recon_type_id = trt.recon_type_id
AND   trt.name = NVL(~MT_NAME~,trt.name)
ORDER BY trt.name, tds.name
You can indicate a parameter using a matched pair of tildes '~' e.g.
~MT_NAME~I am converting date time fields to ISO 8601 format. This provides a standardized date and time format that we can easily consume from APEX.
Custom Report
Once we have a Query, we can create the custom report. Navigate to Application > Report Configuration, and select the Reports Tab.
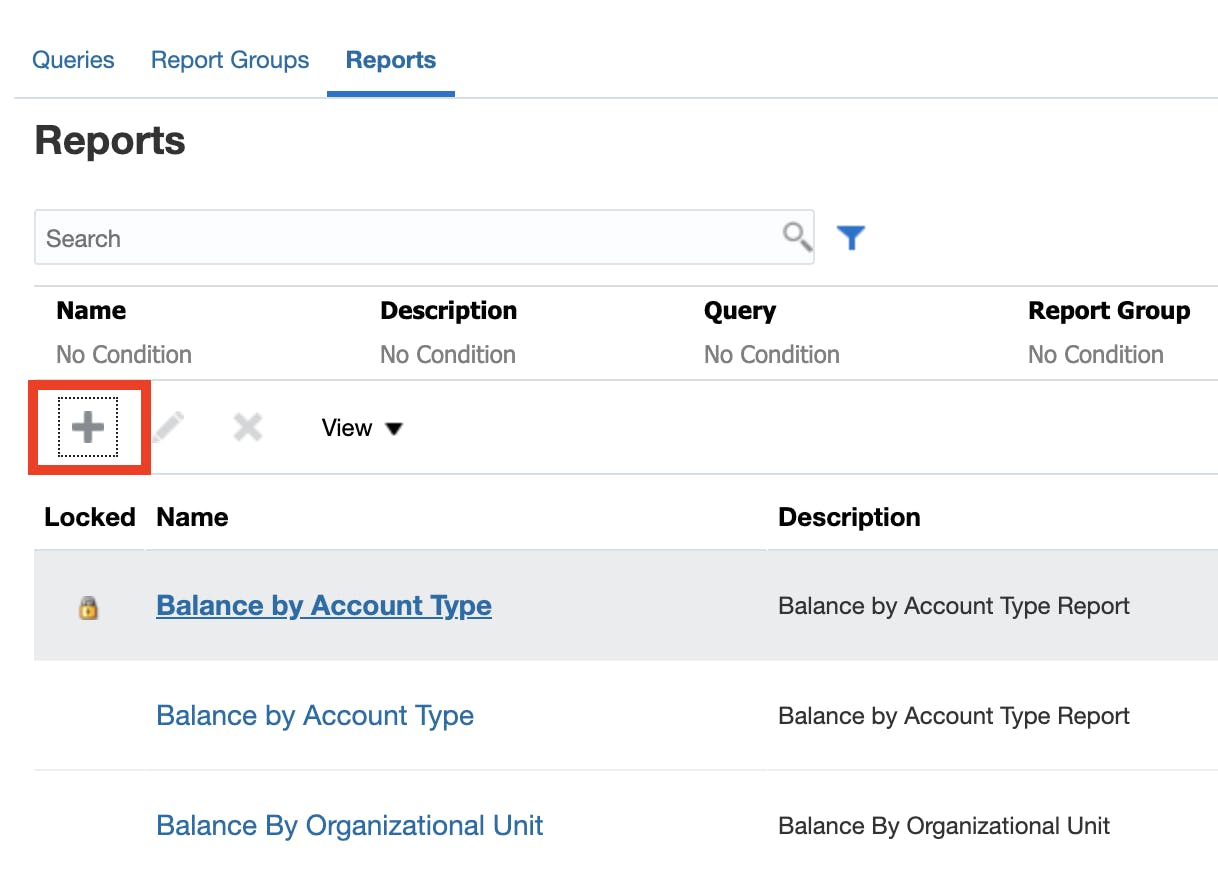
Click the + Icon to create a new report:
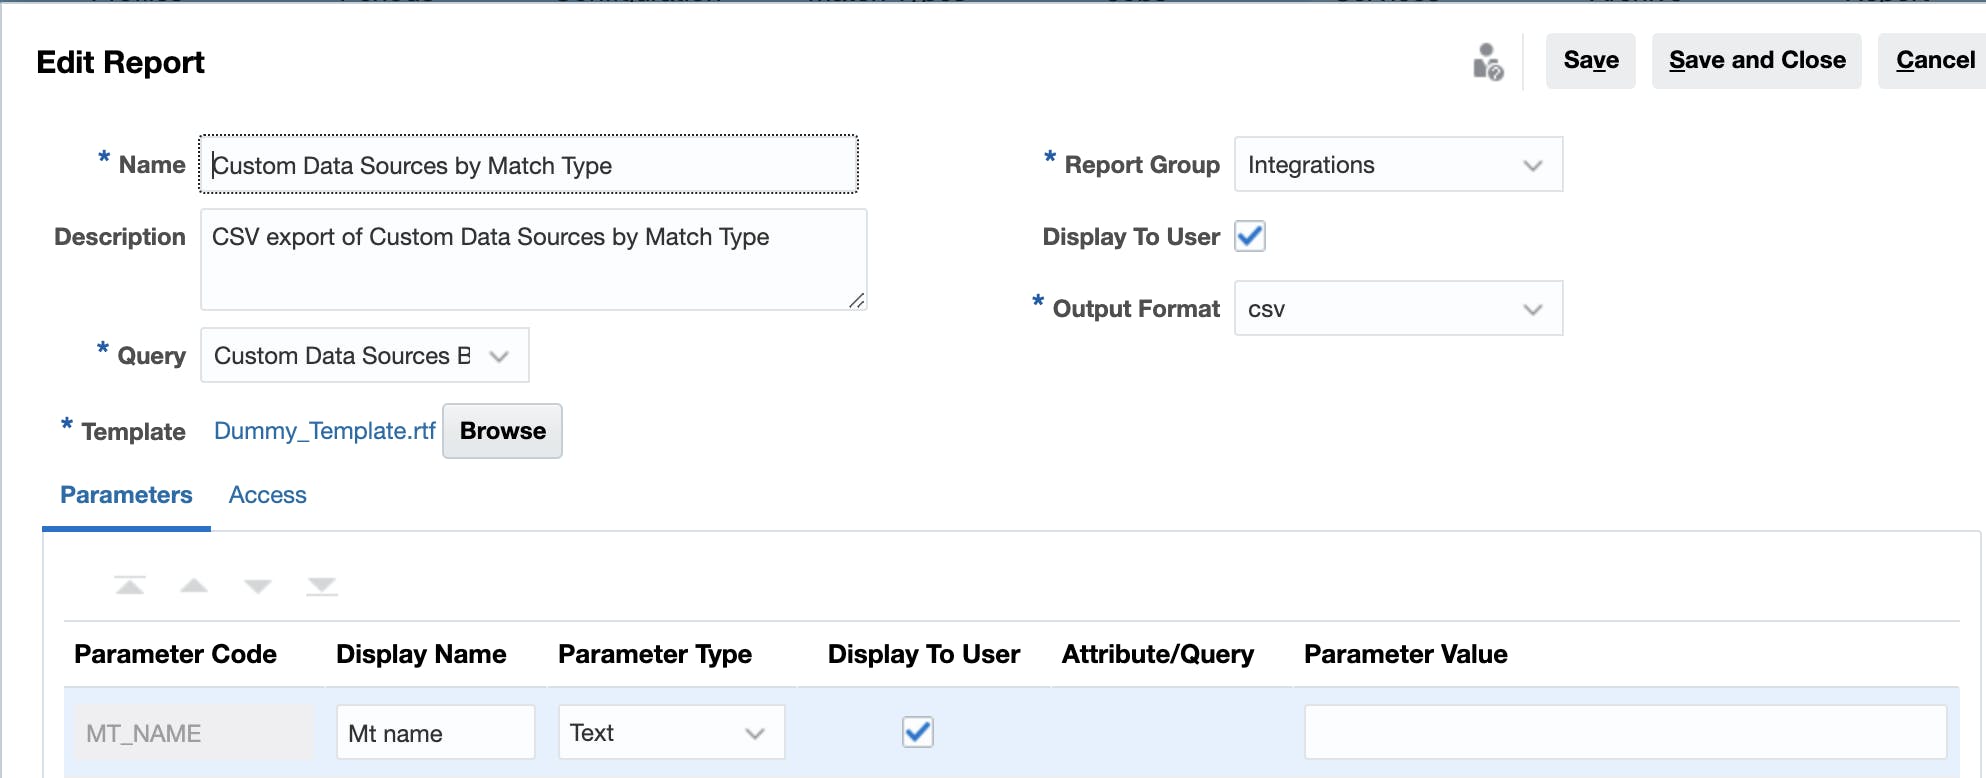
Name
- Enter a name for the report. This name will be used in the REST Service call.
Report Group
- Assign the report to a Report Group.
Display To User
- If you de-select this value, end-users won't be able to run the report, and you won’t be able to run it from a REST service either.
Query
- Select the SQL Query we created in the previous section.
Output Format
- Select 'csv'; this will generate a CSV file directly from your SQL query without applying the BI Publisher Template. This runs much faster than selecting the 'csv (Formatted)' option.
Template
- Create a .rtf file from Word and upload it. The RTF file can be empty. The UI forces you to select a template, but it is not used because we are using the 'CSV' Output Format
Parameters
- Because we identified a parameter
MT_NAMEin the Report Query, ARCS shows the parameter here also. You can enter a default value if you like.
- Because we identified a parameter
Next, identify the Application Module and Role that you want the report to run from:

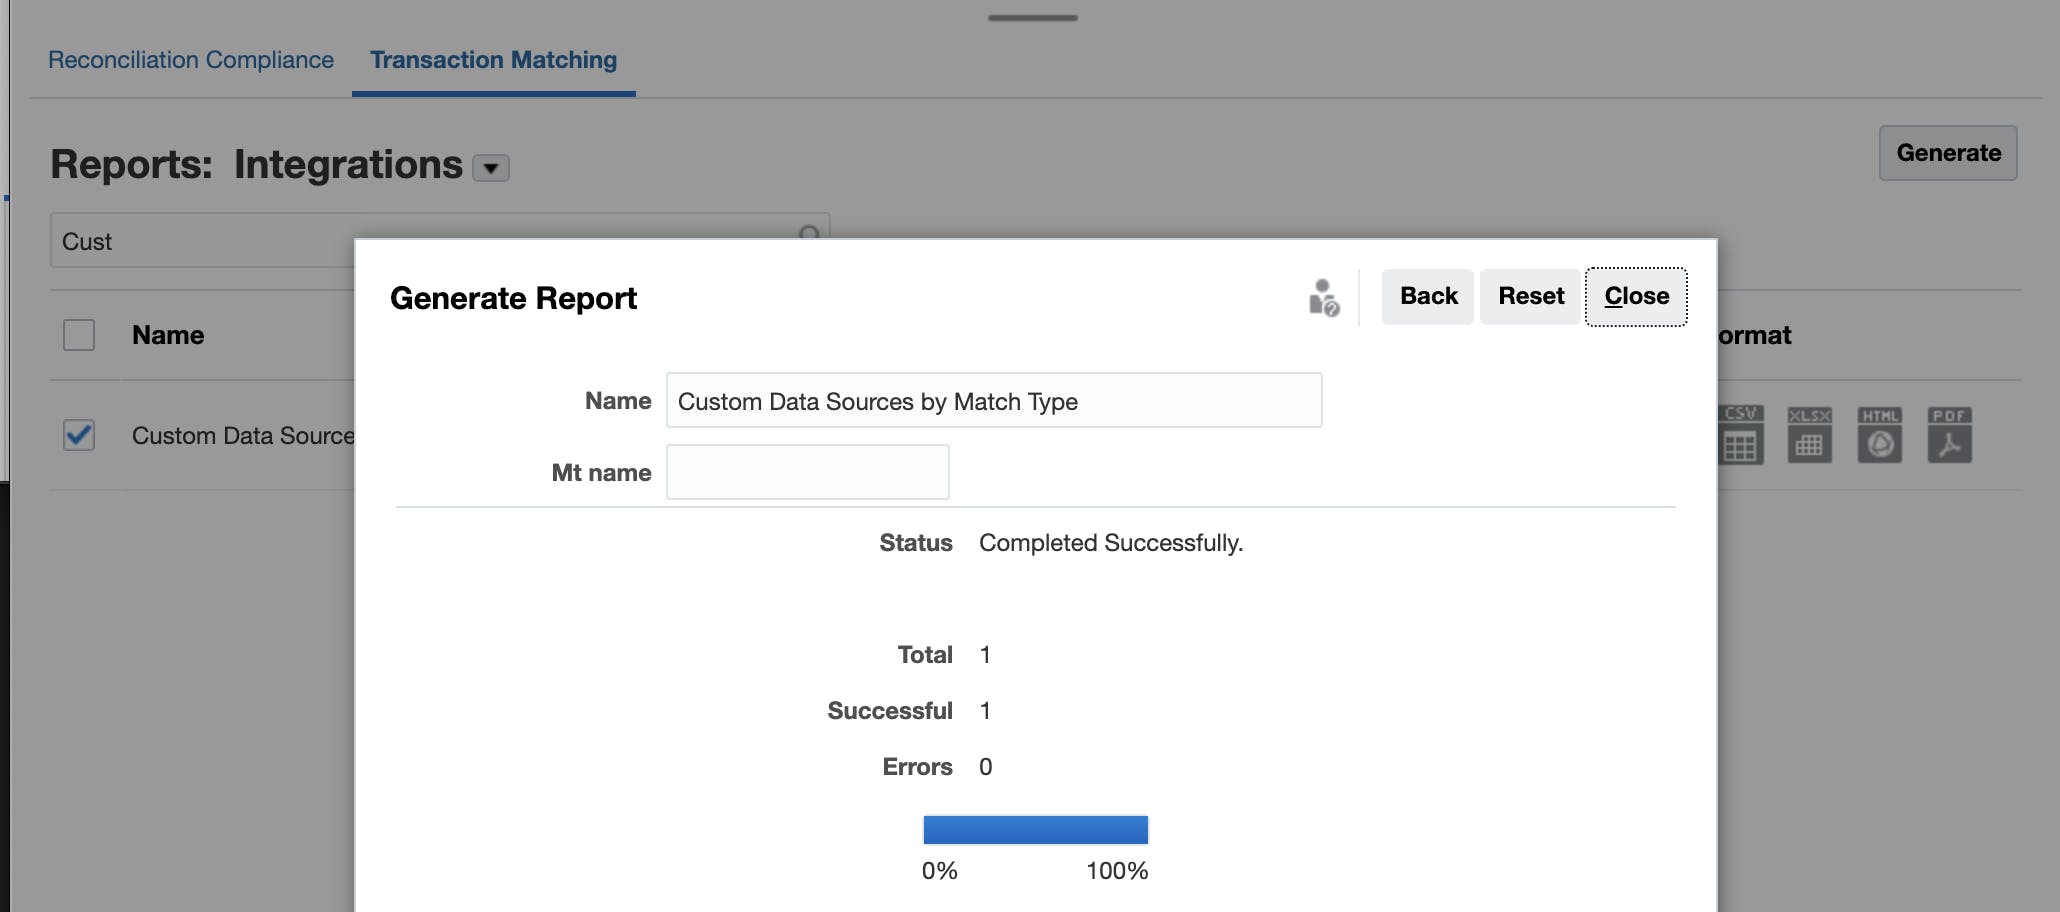
You can run the new report from the ARCS UI by navigating to Reports > Transaction Matching > then selecting the 'Integrations' report group. Select the new custom report, click the 'Generate' button, optionally enter a parameter, then click 'Generate' to run the report.
Run a Custom ARCS Report over REST
From Postman
Now that we have the custom report, we can run it over REST using the Generate Report for Account Reconciliation API.

- Content-Type =
application/json
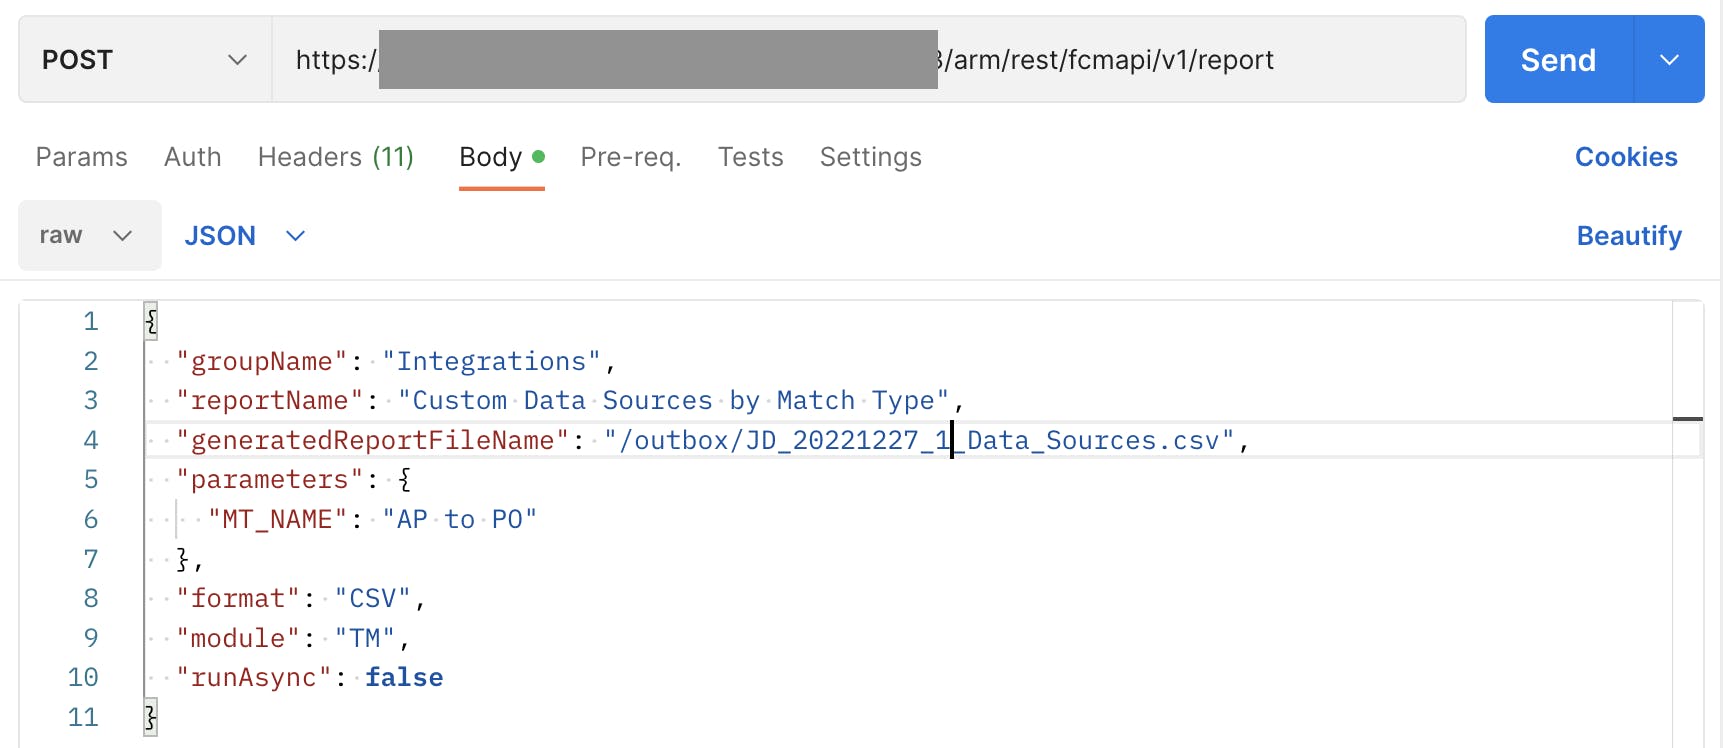
URL <BaseURL> appended with
/arm/rest/fcmapi/v1/reportJSON Payload
groupName- This is the name of the Report Group you assigned the custom report to
reportName- This is the name of the custom report
generatedReportFileName- This is the name of the CSV file that will be generated on the ARCS file system. Make this name unique so it does not clash with existing files.
parameters- These are the parameters for your specific custom report
format- The output format for the file
module- Shortcode for the Application the Report is associated with. In our case, this is Transaction Matching (TM)
runAsyncIndicate if you want to run the report synchronously
falseor asynchronouslytrue. If you set this tofalsethe REST service will not return a response until the report has finished runningUse
runAsync\=truewhen you expect the report to run for a long time (minutes vs. seconds). You can use the URL returned in the payload to check the status of the job running the report. For more details on checking the status of a Job, see my second post.
Sample Response runAsync\=false:
{
  "details": "JD_20221212_2_Data_Sources.csv",
  "links": [
    {
      "rel": "self",
      "href": "<BaseURL>/arm/rest/fcmapi/v1/report",
      "action": "POST"
    },
    {
      "rel": "report-content",
      "href": "<BaseURL>/interop/rest/11.1.2.3.600/applicationsnapshots/JD_20221212_2_Data_Sources.csv/contents",
      "action": "GET"
    }
  ],
  "status": 0,
  "type": "TM",
  "link": null,
  "error": null,
  "items": null
}
details- Contains the name of the file generated. This is the same name that you passed in the payload.
linksAn array of links returned from the report execution.
We are interested in the
rel=report-contentlink. This URL points to the GET ARCS file REST Service, which I described in my first post.
status- A
status=0means the report execution was completed successfully.
- A
Run and Display a Custom Report in APEX
Now let's see how we can run the above report from APEX and display its content in an Interactive Report in real-time.
Here is what the result looks like:
Procedure to Run a Custom Report
I created a helper PL/SQL procedure run_csv_report to run the custom report and return the URL to the Get File REST API used to get the CSV file generated by the report. I have included comments in the code to help explain what it is doing.
APEX Page to Run the Report
I created an APEX page with a PL/SQL Process that is run when the user clicks the 'Fetch Match Types' button. Of course, this process could run automatically as a 'Before Header' process. Also, in real life, I would add this code to a PL/SQL package. I have commented the code to explain what it is doing.
Here is what the APEX page looks like in APEX Builder. It is just a simple Interactive Report report querying the collection, which is populated by the above process.
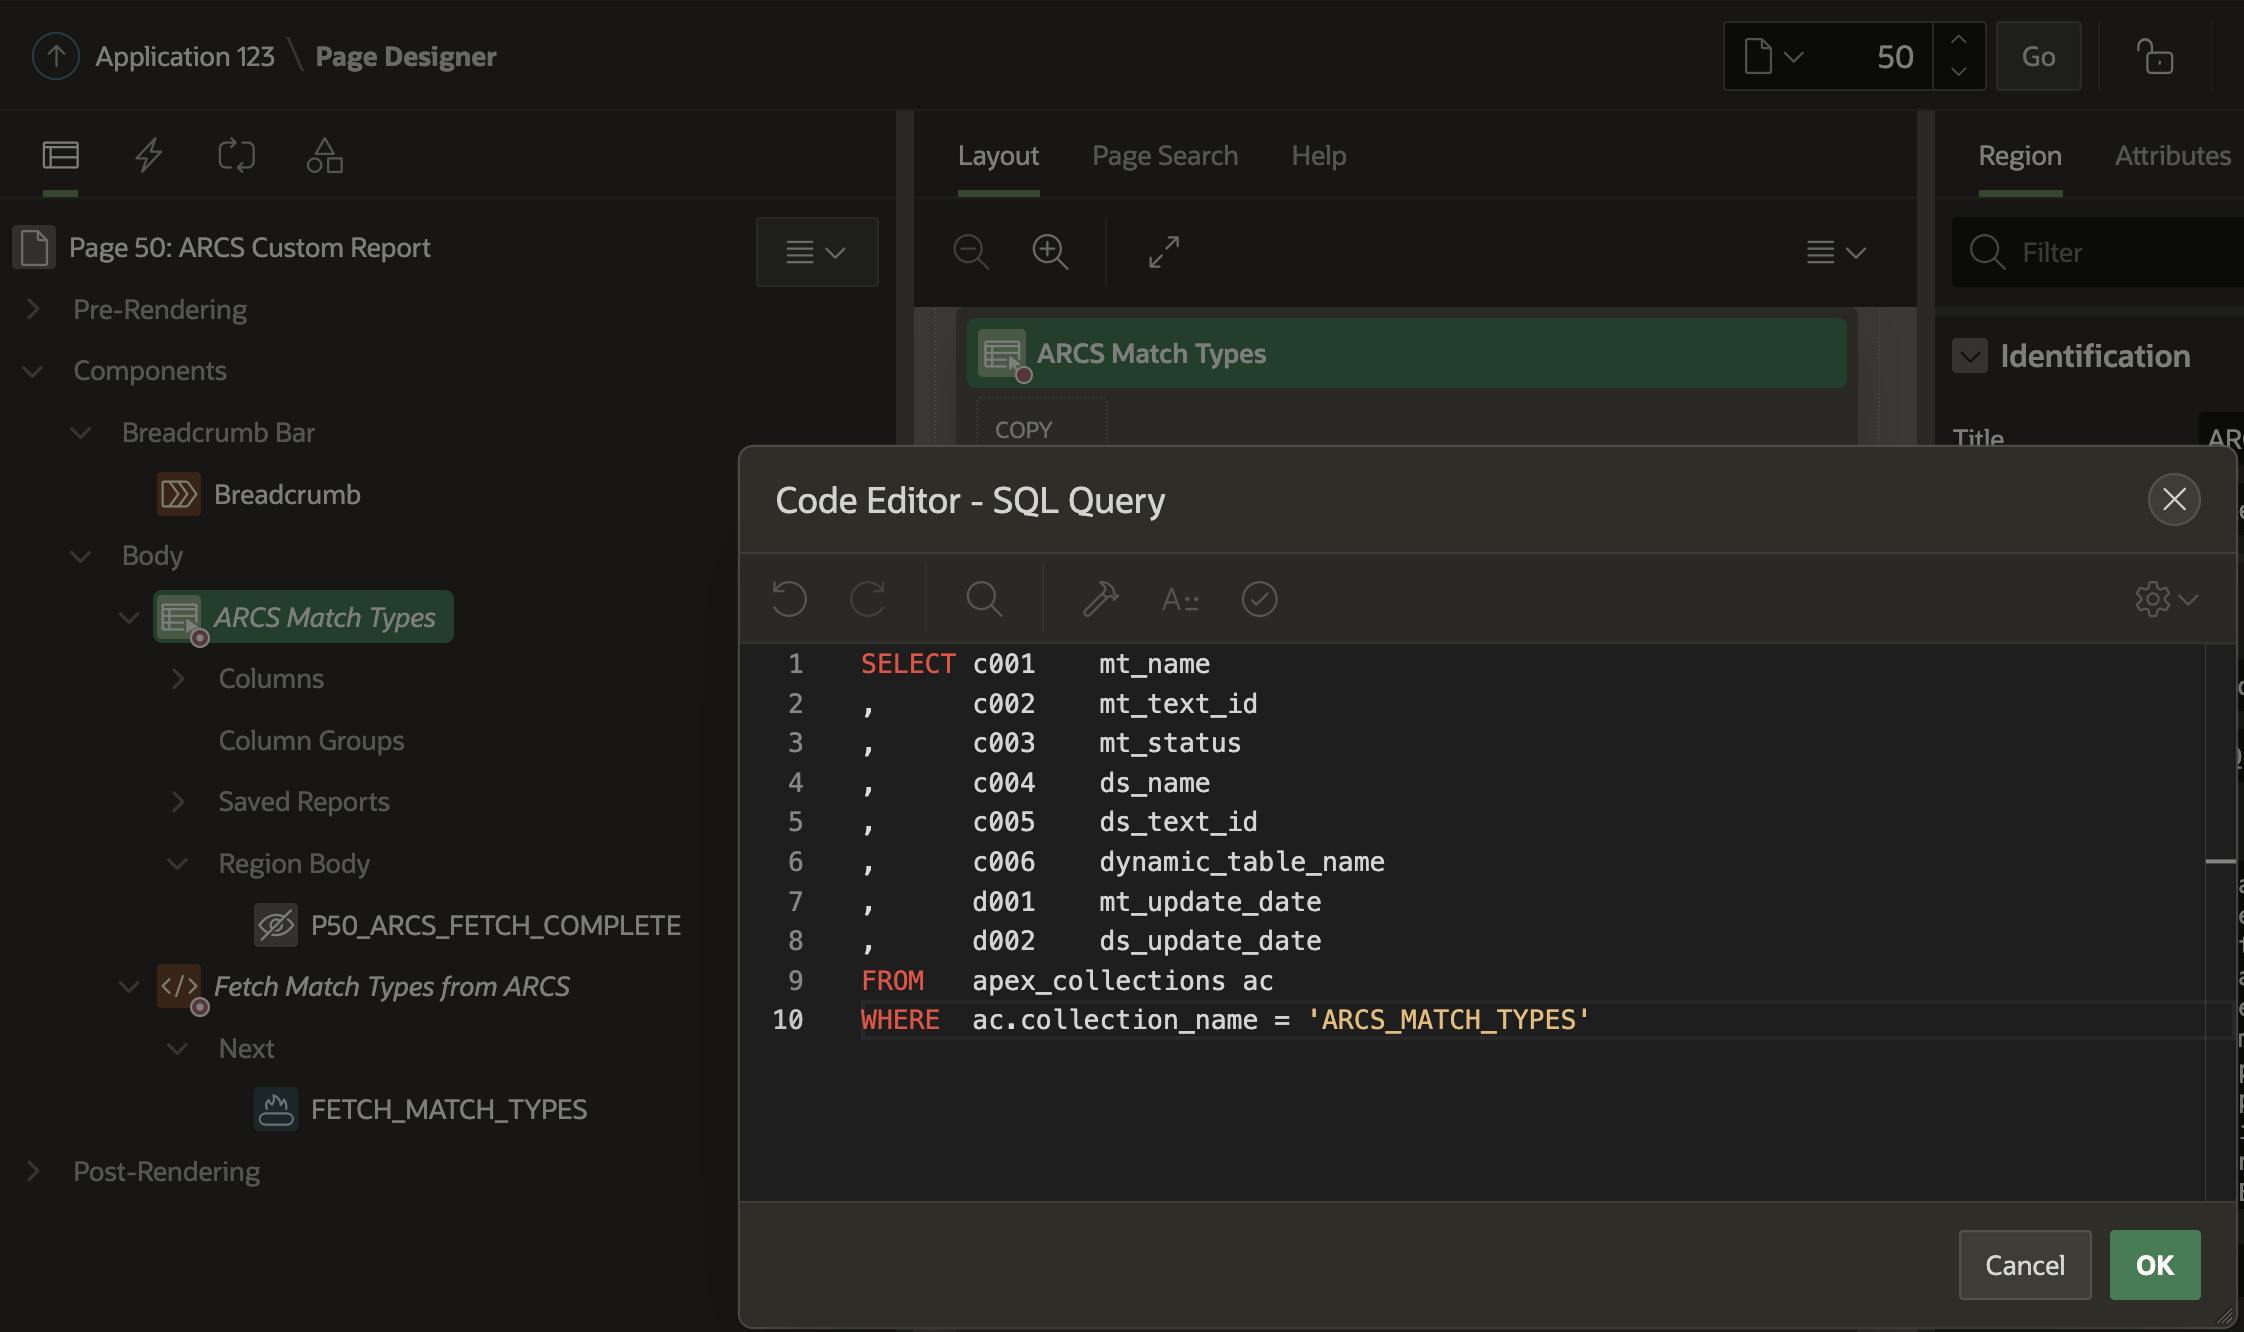
In my example, I am showing the data from the custom ARCS report in an APEX report. Of course, you could also populate a table. You could even have an APEX Automation run every 30 minutes to fetch the latest data into a local table.
Performance
I exported 8.4 MB of CSV data (104,000) records. The timings were as follows:
Custom Report Job to Generate CSV File: 16 Seconds
REST API to fetch the CSV file from the ARCS file System: 1.5 Seconds
You should only extract new or changed records to limit the performance impact. You can do this by passing in the ID of the last record interfaced (or the data and time of the previous interface run) as a parameter to the custom ARCS report. You can then use the parameter to filter the report SQL to just get newly created/updated records.
Demo Code
I have posted the PL/SQL package with the code used throughout my three posts to GitHub.
Conclusion
I hope you have enjoyed the series on Integrating with Oracle ARCS using Oracle APEX. In conjunction with ORDS, APEX offers a robust integration platform, which I feel is underutilized. Having used this combination to integrate many SaaS solutions successfully, maybe you should give it a try also!

