Scheduling Made Easy with APEX Automations

Introduction
The introduction of Automations in Oracle APEX Version 20.2 was big news for me. Most applications I build require that some code is executed on a schedule (batch jobs, queue processing, email notifications etc.). While scheduling code to run at certain times has always been possible in APEX using DBMS_SCHEDULER, having scheduling functionality built into APEX provides a much more developer friendly solution. In fact you can look at APEX Automations as a developer friendly wrapper around the DBMS_SCHEDULER API (with a bunch of useful APIs and helper utilities thrown in).
In this post I will describe APEX Automations by way of an example.
Automation Use Cases
When trying to understand a technology or feature, it is often useful to know what problems it can solve. Here are some of the use cases where I have utilized Automations:
- Executing long running processes in the background
- Dequeueing integration queue tables
- Polling external systems (via REST) to trigger activity in your local instance
- Orchestrating REST Source Module Synchronizations to Sync data from other systems
- Monitoring log tables and alerting when issues arise
- Processing a custom email queue. This may be useful if you want to log events that require an email be sent but only want to send an email every X hours with a summary digest (so you don't overwhelm your users with emails). This will be the use case we follow in our example.
Example Automation
In the example we will follow, users are creating, updating and assigning tasks in a task management application constantly throughout the day. Users have asked not to receive emails every time they are assigned a task and instead receive an hourly digest email which lists all tasks that are assigned to them.
To achieve this, we will need a queue table (cnaqa_email_q). Whenever a task is assigned to a user, a record will be added to the table. If a record already exists in the queue table for a user, a counter will be incremented instead. When our automation runs, we can expect just one record for every user that was assigned at least one task in the past 1 hour.
We now need a scheduled process to run every hour which will do the following for each record in the queue table:
- Fetch task details for the user
- Prepare and send an email
- Delete the queue record
When building an Automation, you need to decide on three things:
- When should the Automation run (Schedule)
- Under what condition should it run (Condition)
- What action(s) should be performed (Action)
In our example, we want to check for new records in the email queue table every 1 hour (Schedule), if there are records in the email queue table (Condition), then I want to execute a specified PL/SQL procedure for each record found (Action).
Configuring the Example Automation
In this section, I will describe the Automation settings required to handle our example. The screen shots you will see, are from the Edit Automation page in APEX builder. Navigation: Shared Components > Automations. All of the configurations are in a single page except for the 'Edit Action' section, this is accessed by clicking on a specific action from the list of actions.
Settings
 The first thing to decide is the 'Type' of Automation. You can choose from 'On Demand' or 'Scheduled'.
On Demand
On Demand Automations only run when you call the Automation via the apex_automation.execute API. Use On Demand automations when you want to execute your automation based on something other than a schedule. e.g. if you want to trigger the automation from a button on an APEX page or trigger it via a REST service call from another system.
Scheduled
Most Automations will be of this type. Using the powerful DBMS_SCHEDULER calendaring syntax, you can define almost any schedule you can imagine. While it is undoubtably very powerful, complex schedules can be difficult to build using this syntax. Example of calendaring syntax:
FREQ=MONTHLY; INTERVAL=2; BYMONTHDAY=15;
Run on the 15th day of every other month.
Thankfully, the 'Interval Builder' (available by clicking the icon to the right of the field 'Schedule Expression') which is built into APEX, should cover most of your scheduling requirements.
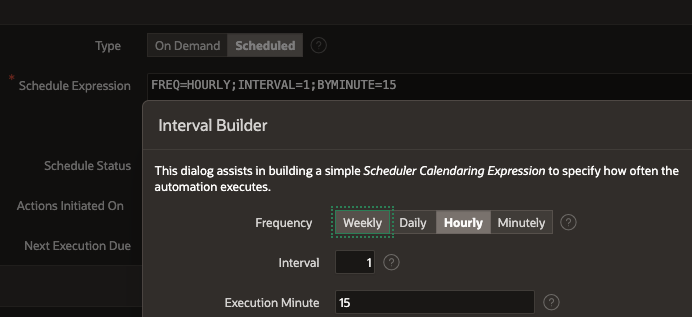 For our example, we have set the schedule to run hourly at 15 minutes past the hour.
Note: APEX Automations are driven by a master DBMS_SCHEDULE job that is controlled internally by APEX. In view of this, you cannot rely on Automations running on the exact minute you define in your schedule. Sometimes Automations do not kick off until a minute or two after the scheduled time.
Disabling the Schedule
You can stop the Automation from running by selecting 'Disabled' from 'Schedule Status' field.
When you export your application and import it into another instance, all of your automations will be set to Disabled in the new instance. This is done so that you are in control of when the automations start up following a deployment. You can re-enable them from APEX Builder, or even better, use the apex_automation.enable API in a post-install script to re-enable them automatically.
BEGIN
    apex_automation.enable(
        p_application_id  => 152,
        p_static_id       => 'test_automation' );
END;
Actions Initiated On
This option determines under what condition the Automation should run. For example, we have scheduled the automation to run every 1 hour, but we only want it to do something if there are new records in the email queue table. There are three options to choose from:
- Query - With this option the automation will run based on the result of a SQL query which you define. We will use this option for our example.
- Function Body Returning Boolean - With this option, you can define a function that will return the boolean TRUE or FALSE. If your function returns TRUE then the automation will run if it returns FALSE then it will not. This may be useful if you need to perform some complex PL/SQL logic to determine if the automation should run.
- Always - With this option, the automation will run every time the scheduled time is reached, regardless of any conditions.
Source
In this section you define the source data that will be acted upon by the actions that we will define later on.

Data Source
This is where it starts to get interesting. Not only can you run a SQL statement in your Local Database (where APEX is installed), you can also run a SQL statement in another Oracle database REST Enabled SQL Service. You can even call a REST service in a non-Oracle system REST Data Source to determine if the Automation should be run. With this in mind, you could create an automation that runs every 15 minutes to check for emails in an Office 365 Inbox (via a REST Data Source calling an MS Graph API) and then perform an action if any emails are found. Pretty darn powerful!
In our example, we are selecting all records from the queue table that were created since the last time the automation ran. The handy APEX_AUTOMATION.GET_LAST_RUN function returns a timestamp with timezone value with the last time the current automation was run. This helps to make sure we don't pick up any old records.
Whichever Data Source and Source Type you select will result in APEX attempting to fetch a set of records every time the next scheduled time for the Automation arrives.
APEX will run each of the Actions you define below for every row returned from the Source.
Source Type
In our example, we have selected 'SQL Query', you can also also select 'Table' where you can add a WHERE clause and ORDER BY clause or you can select 'Function Body Returning SQL' where you can call a Function that returns a SQL statement which is then run by the Automation.
The columns you specify in the 'Source' (SQL or REST Service) are available as bind variables to reference in the Actions you define below.
Actions
This is where you tell APEX what you want to happen when the scheduled time arrives (and the condition is met). You can create as many actions as you want and they are executed in order, once for each row returned from the 'Source' defined above.

Action Detail
This page is accessed by clicking on the pencil icon from the list of Actions (see screen shot above).
 There are two 'Action Types' available: 'Send Email' and 'Execute Code'.
Send Email This 'Action Type' allows you to configure an email to send. You can identify an APEX email template to use and even map the email template placeholder values to values from the 'Source'.
Execute Code This 'Action Type' allows you to execute PL/SQL code. You can execute code on the Local Database or in another Oracle database (via REST enabled SQL). This is the action type we will be using for our example.
In the PL/SQL block above, we are calling a PL/SQL package and passing in the bind variable :QUEUE_ID. This bind variables comes from our 'Source' SQL. We are also logging a message in the Automation log message table to show that an email was sent to the user (more on logging below).
You can reference any of the columns in the 'Source' as a bind variable. You can also reference any of the following bind variables provided by APEX:
- APEX$AUTOMATION_ROW_PK: If a primary key column has been defined (see below), this bind - variable contains the primary key value.
- APEX$AUTOMATION_ROW_NUM: For automations based on a query, this bind variable contains the current row number.
- APEX$AUTOMATION_ERROR_ROWS: For automations based on a query, this bind variable contains the number of rows, where at least the one of the actions raised errors.
- APEX$AUTOMATION_LASTRUN_ISO: Contains the timestamp of the previous automation run, in the YYYY-MM-DD"T"HH24:MI:SS.FF3TZH:TZM format.
Action Error Handling
 If an error occurs for a specific Action, you can define the error message that should be written to the log table in the 'Error Message' field. If you set the 'Stop Execution On Error' switch on, this will stop the automation and prevent any further records from the main SQL statement being processed. Turning this off will log the error for the current record and allow processing to continue on for other records. We have turned it off for our example so that we can allow other queued records to be processed if one fails.
Action Execution
We are now back on the main Automation configuration page. In this section you configure additional settings that impact the way the Automation is processed.

- Execute Actions When [Rows returned:No Rows returned] - Identify if the Automation should run if rows are returned from the 'Source' or if it should run when no rows are returned from the 'Source'. Remember the 'Source' could be a SQL statement in your local database or a response from a REST service call. We are going with Rows returned for our example.
- Primary Key Column - Here you can optionally identify a column from the 'Source' to be the Primary Key. The value you select here is output to all log messages and is available in your Action code via the bind variable APEX$AUTOMATION_ROW_PK.
- Commit [Once:Each Row] - If you select Once, APEX will perform a single COMMIT after all rows from the 'Source' have been processed. Select Each Row and APEX will perform a commit after processing each row from the 'Source'. We want to commit after each processed queue record is processed so we have selected Each Row.
- Maximum Rows to Process - This is where you can limit the number of rows from the 'Source' that will be processed. For example, set this to 100, if you are concerned that your Source SQL could return thousands of records and you only want the Automation to act on 100 rows per execution.
- Action Error Handling [Ignore:Abort Automation:Disable Automation] - Ignore will ignore any errors and continue processing additional rows from the main SQL. It will also leave the Automation to run again when the next scheduled time is reached. Abort Automation will immediately stop the automation and not process any further rows from the main SQL. It will leave the Automation to run again when the next scheduled time is reached. Disable Automation will immediately stop the automation and not process any further rows from the main SQL. It will then disable the automation so that it no longer runs on the schedule. We have selected Ignore so that the automation continues to run if an error is encountered.
Additional Code Execution
This section allows you to define additional code that should be run at different points during the Automation Execution lifecycle.

- Executable PL/SQL Code - Define PL/SQL procedures here that you want to call in the following three execution points. As with other APEX components, for performance and reusability reasons, it is better not to put code here and instead, reference PL/SQL package / procedures compiled in the database. I have included code here for illustration purposes only.
- Initialization Procedure Name - Identify a procedure to be run before the Automation starts running and before the first row is processed.
- Before Row Processing Procedure Name - Enter code here that should be run before each row from the main SQL is processed.
- Cleanup Procedure Name - Enter code here that should be run once all rows from the main SQL have been processed. In the above example I am telling APEX to send any pending emails from APEX's email queue.
APEX Session
When an Automation runs, it automatically establishes an APEX session for the application the automation was created in. You will see pages views in the APEX logs like the following, each time the automation runs.
 This allows you to call APEX APIs that can only run in an APEX session e.g. apex_web_service, apex_mail etc. without having to call apex_session.create_session.
Logging
With scheduled jobs, is important to log information at various points during their execution. This allows you to go back at a later time and diagnose issues that occurred for specific executions of your automation. The APEX_AUTOMATION package provides three procedures to log messages from the PL/SQL code in your Actions. These are LOG_INFO, LOG_WARN and LOG_ERROR. If you identified a 'Primary Key Column' in the 'Action Execution' section of your Automation, then this value will be automatically logged for you whenever you call any of these APIs.
Whenever an Automation reaches its scheduled time, a record is logged into the table 'apex_automation_log'. Whenever you call one of the apex_automation logging APIs (log_info, log_warn or log_error), the log message is written to the table 'apex_automation_msg_log'.
Monitoring
You can view a log of each execution of your Automation in APEX Builder:
 You can then drill into each execution and see more detailed log messages:

You can also write SQL queries agains these log tables. For example, the below SQL queries all executions of the Automation 'Email Queue Processor' in the past 12 hours. It also brings back any error messages from the apex_automation_msg_log table:
SELECT alog.automation_name
,      alog.id   automation_log_id
,      alog.status overall_status
,      alog.successful_row_count
,      alog.error_row_count
,     (SELECT COUNT (1)
       FROM   apex_automation_msg_log logmsg
       WHERE  logmsg.automation_log_id = alog.id
       AND    logmsg.message_type_code = 'E') error_msg_count
,      alog.start_timestamp AT LOCAL start_time
,      EXTRACT(minute from alog.end_timestamp - alog.start_timestamp) duration_minutes
,      EXTRACT(second from alog.end_timestamp - alog.start_timestamp) duration_seconds
,     (SELECT LISTAGG (logmsg.message, ',') WITHIN GROUP (ORDER BY logmsg.message_timestamp)
       FROM   apex_automation_msg_log logmsg
       WHERE  logmsg.automation_log_id = alog.id
       AND    logmsg.message_type_code = 'E') error_messages
FROM   apex_automation_log  alog
,      apex_applications    aapp
WHERE  alog.application_id = aapp.application_id
AND    alog.automation_name = 'Email Queue Processor'
AND    alog.start_timestamp > CURRENT_TIMESTAMP - INTERVAL '12' HOUR
ORDER BY alog.start_timestamp DESC
What I often do is create a separate monitoring Automation that queries the automation log tables for failures and sends me a digest email of all automation errors in the past hour. This can be expanded to check all of your log tables (e.g. Logger) to provide a comprehensive Monitoring and Alerting solution.
Conclusion
Easy to use and feature rich scheduling capabilities are a key tenant of all enterprise application solutions. The Oracle database provides this functionality via the DBMS_SCHEDULER package. APEX goes the final step and brings this capability into APEX Builder, making it easier for developers to access this vital functionality. If you add to that the ability to base your automations on data in other systems via REST, you end up with a powerful and comprehensive code scheduling and automation tool.
I have been using Automations extensively since they came out in APEX 20.2, I hope you will give them a try too.