APEX & Office 365 Email Integration

Introduction
This is the fourth and final post in my APEX & Microsoft Office 365 Integration series. This post assumes you have at least read the first two posts in the series APEX & Office 365 Integration - Introduction and APEX & Office 365 Calendar Integration.
This post will discuss integrating MS Office 365 Email with Oracle APEX. Being able to process email from APEX has several potential uses, including:
- Support System Mailbox (support@example.com)
- Users email support requests to a support email inbox on Office 365
- An APEX Automation checks the support email inbox every 15 minutes
- If a new email is found, a support ticket is created
- Process Supplier Invoices (ap@example.com)
- Suppliers email their Invoice to a Payables email inbox on Office 365
- An APEX Automation checks the Payables email inbox every 15 minutes
- PL/SQL code calls OCI Document AI to OCR the attached Invoices
- Pre-populate Invoice data in your ERP to facilitate rapid entry of invoices in AP
Demo App
My Office 365 Demo App, which you can get from my Github Repository, has been updated to include the functionality described in this post, namely:
- View emails in a given users inbox
- View details of a specific email
- Download attachments for an email
MS Azure AD Configurations
This section assumes you have read the first post in the series APEX & Office 365 Integration - Introduction. It also assumes that you have already set up a Microsoft Active Directory App registration using 'Microsoft Entra'. Before proceeding, you will need to add the following permissions to your App registration:
Mail.Read(allows you to read email for all users)
⚠️ With the Mail.Read permission, the app registration can read anyone's email in the entire organization. Refer to the first post in the series for details on how to limit this access using access policies. For this demo, I created an access policy that restricted my AD App registration to only be able to access my account.
Test Email APIs with Postman
In this section, I will show you how to call the various MS Graph Email APIs we will use to list emails in a user's inbox, and download email attachments.
MS Graph API Access Token
Please refer to my previous post APEX & Office 365 Integration - Introduction for details on obtaining an MS Graph token using Postman. The token returned from this step will be used as a Bearer Token in the following steps.
List Inbox Emails for User
- 📖 MS Graph Resource Documentation
- 🔗 Endpoint:
https://graph.microsoft.com/v1.0/users/USER_ID/mailFolders/Inbox/messages. WhereUSER_IDis the useridoruserPrincipalNameof a specific user
First, we want to get a list of emails in an Inbox jon@cloudnueva.com:
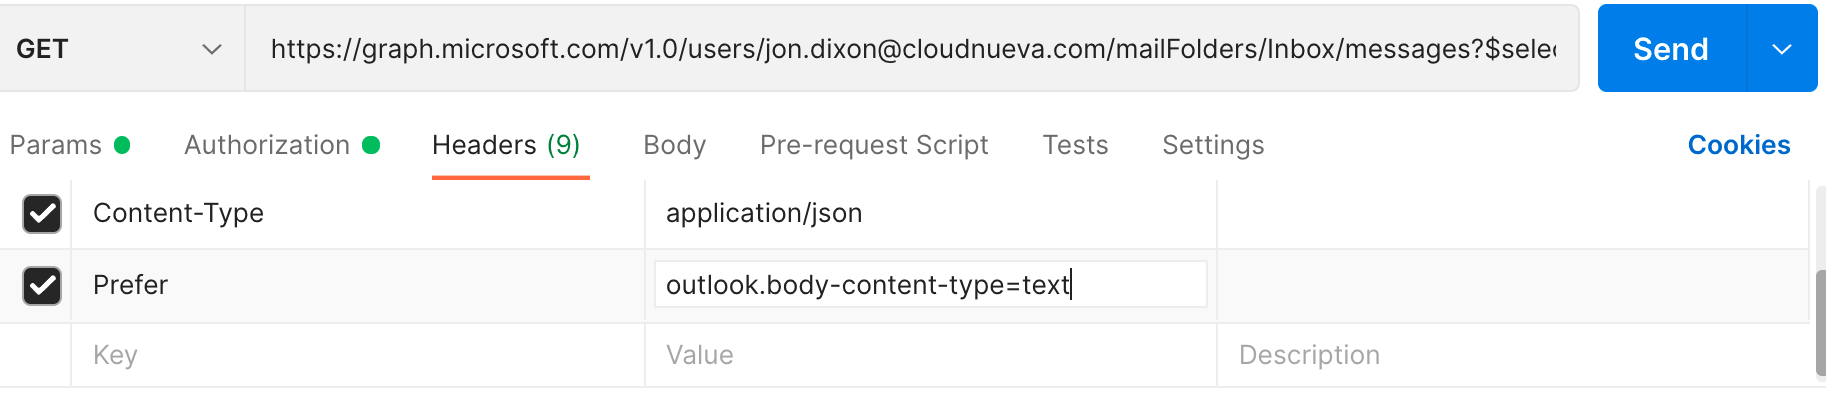
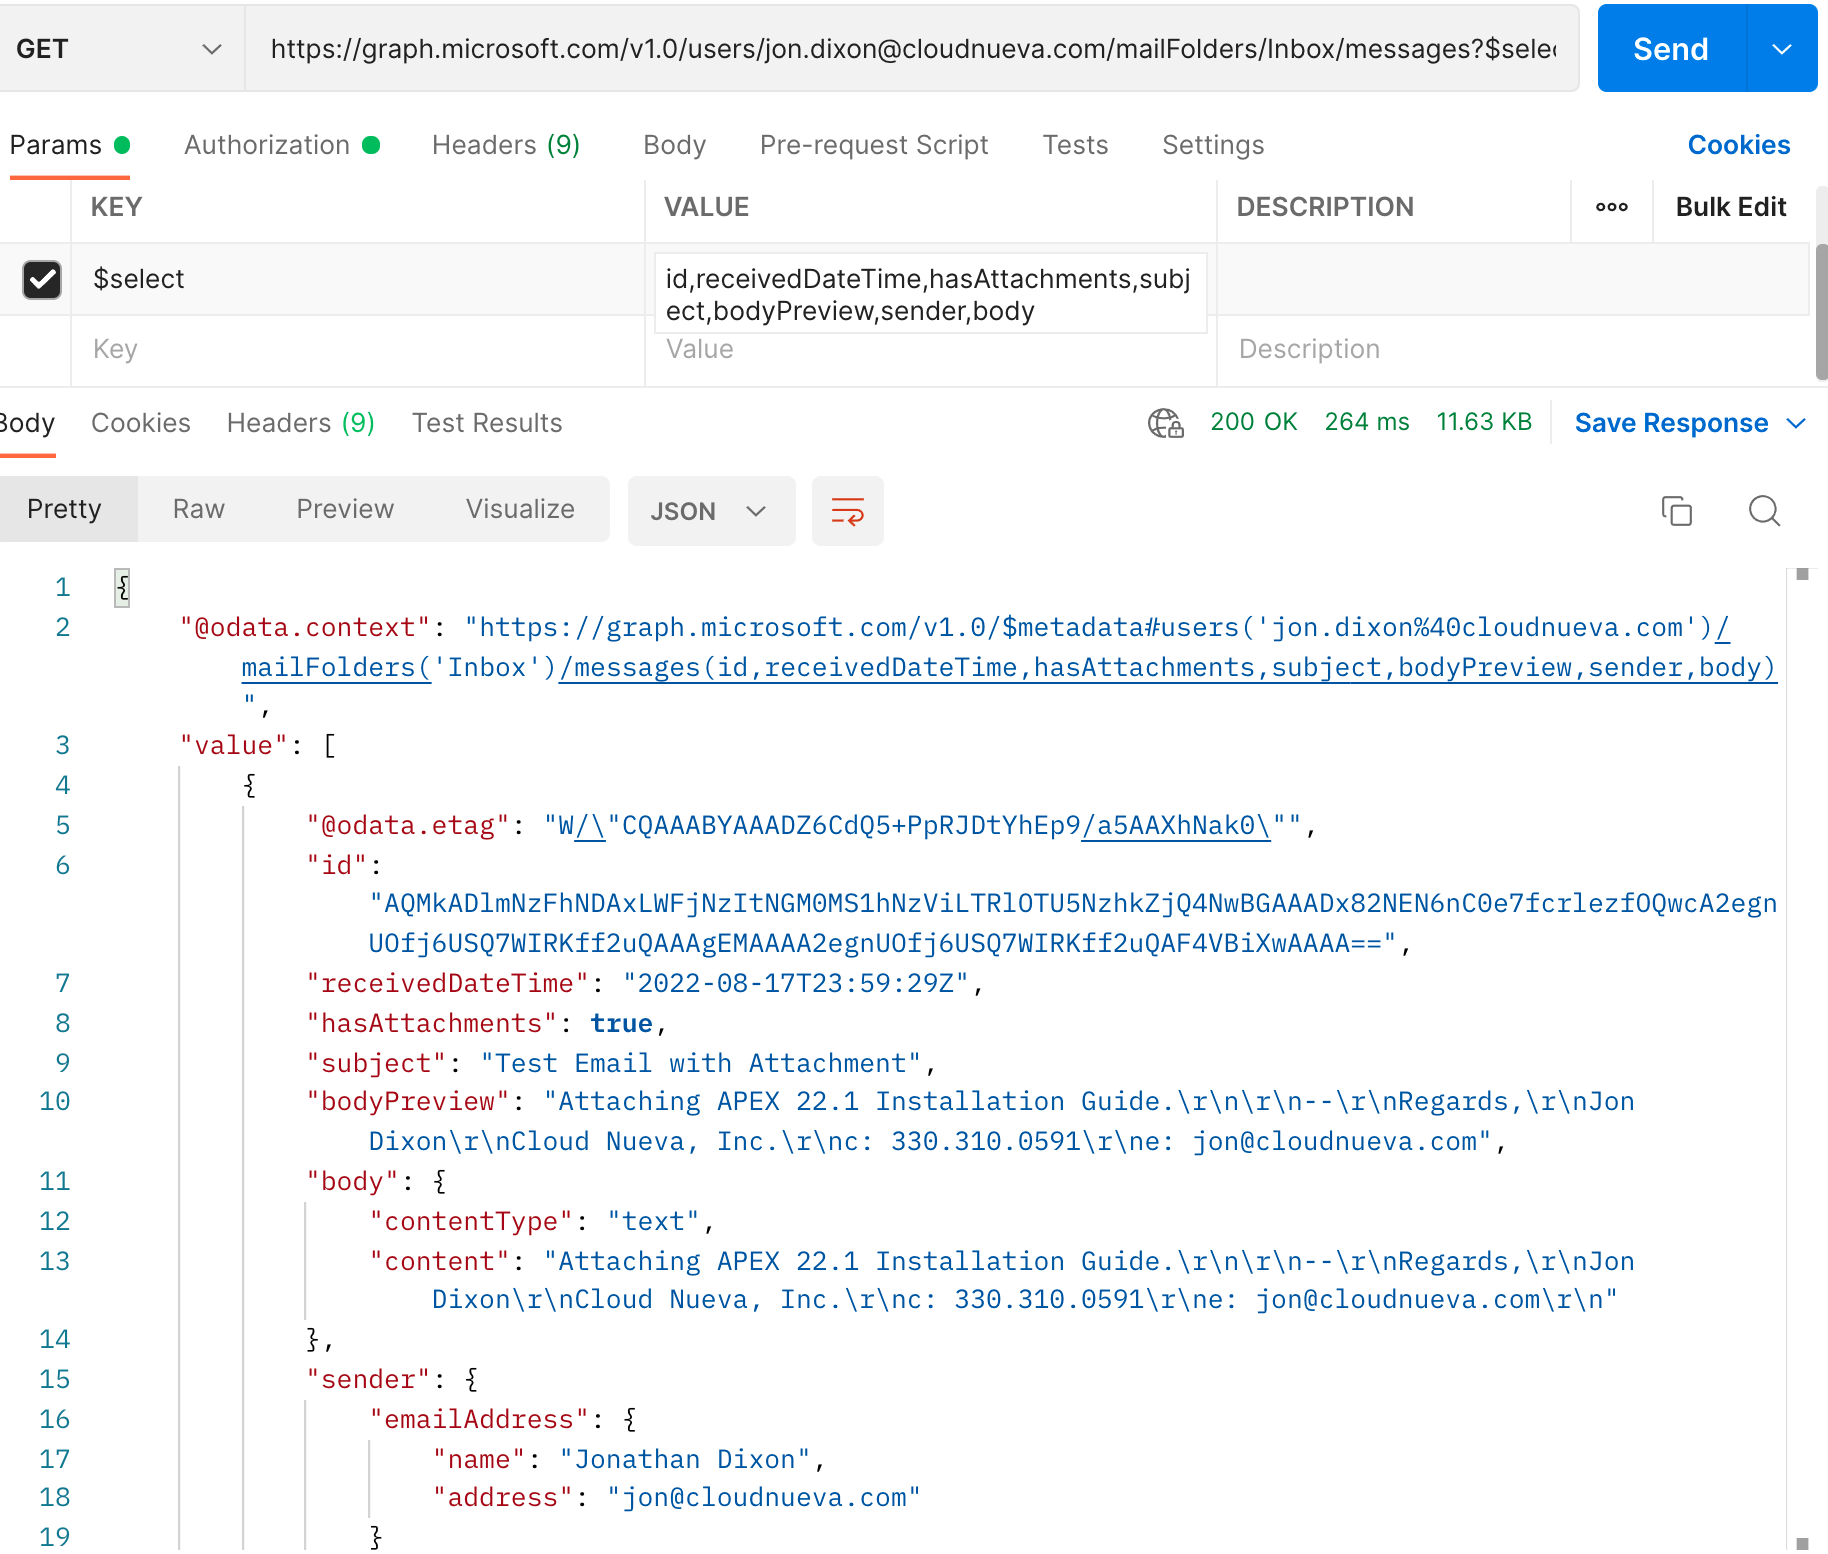
- I limited the fields using the
$selectparameter; there are more fields available bodyPreviewcontains just the first 255 characters of the body (in plain text)- The
Preferheader in my example returns plaintext for the emailbody.content(as opposed to html). Being able to return plain text can be useful if you need to parse the email body and take some action based on its content
List Attachments
- 📖 MS Graph Resource Documentation
- 🔗 Endpoint:
https://graph.microsoft.com/v1.0/users/USER_ID/mailFolders/Inbox/messages/MESSAGE_ID/attachments. WhereUSER_IDis the useridoruserPrincipalNameandMESSAGE_IDis theidof the message from the previous request.
In the above JSON response, we see that the first email has the value "hasAttachments": true. To get a list of the attachments for the email setup Postman as follows:
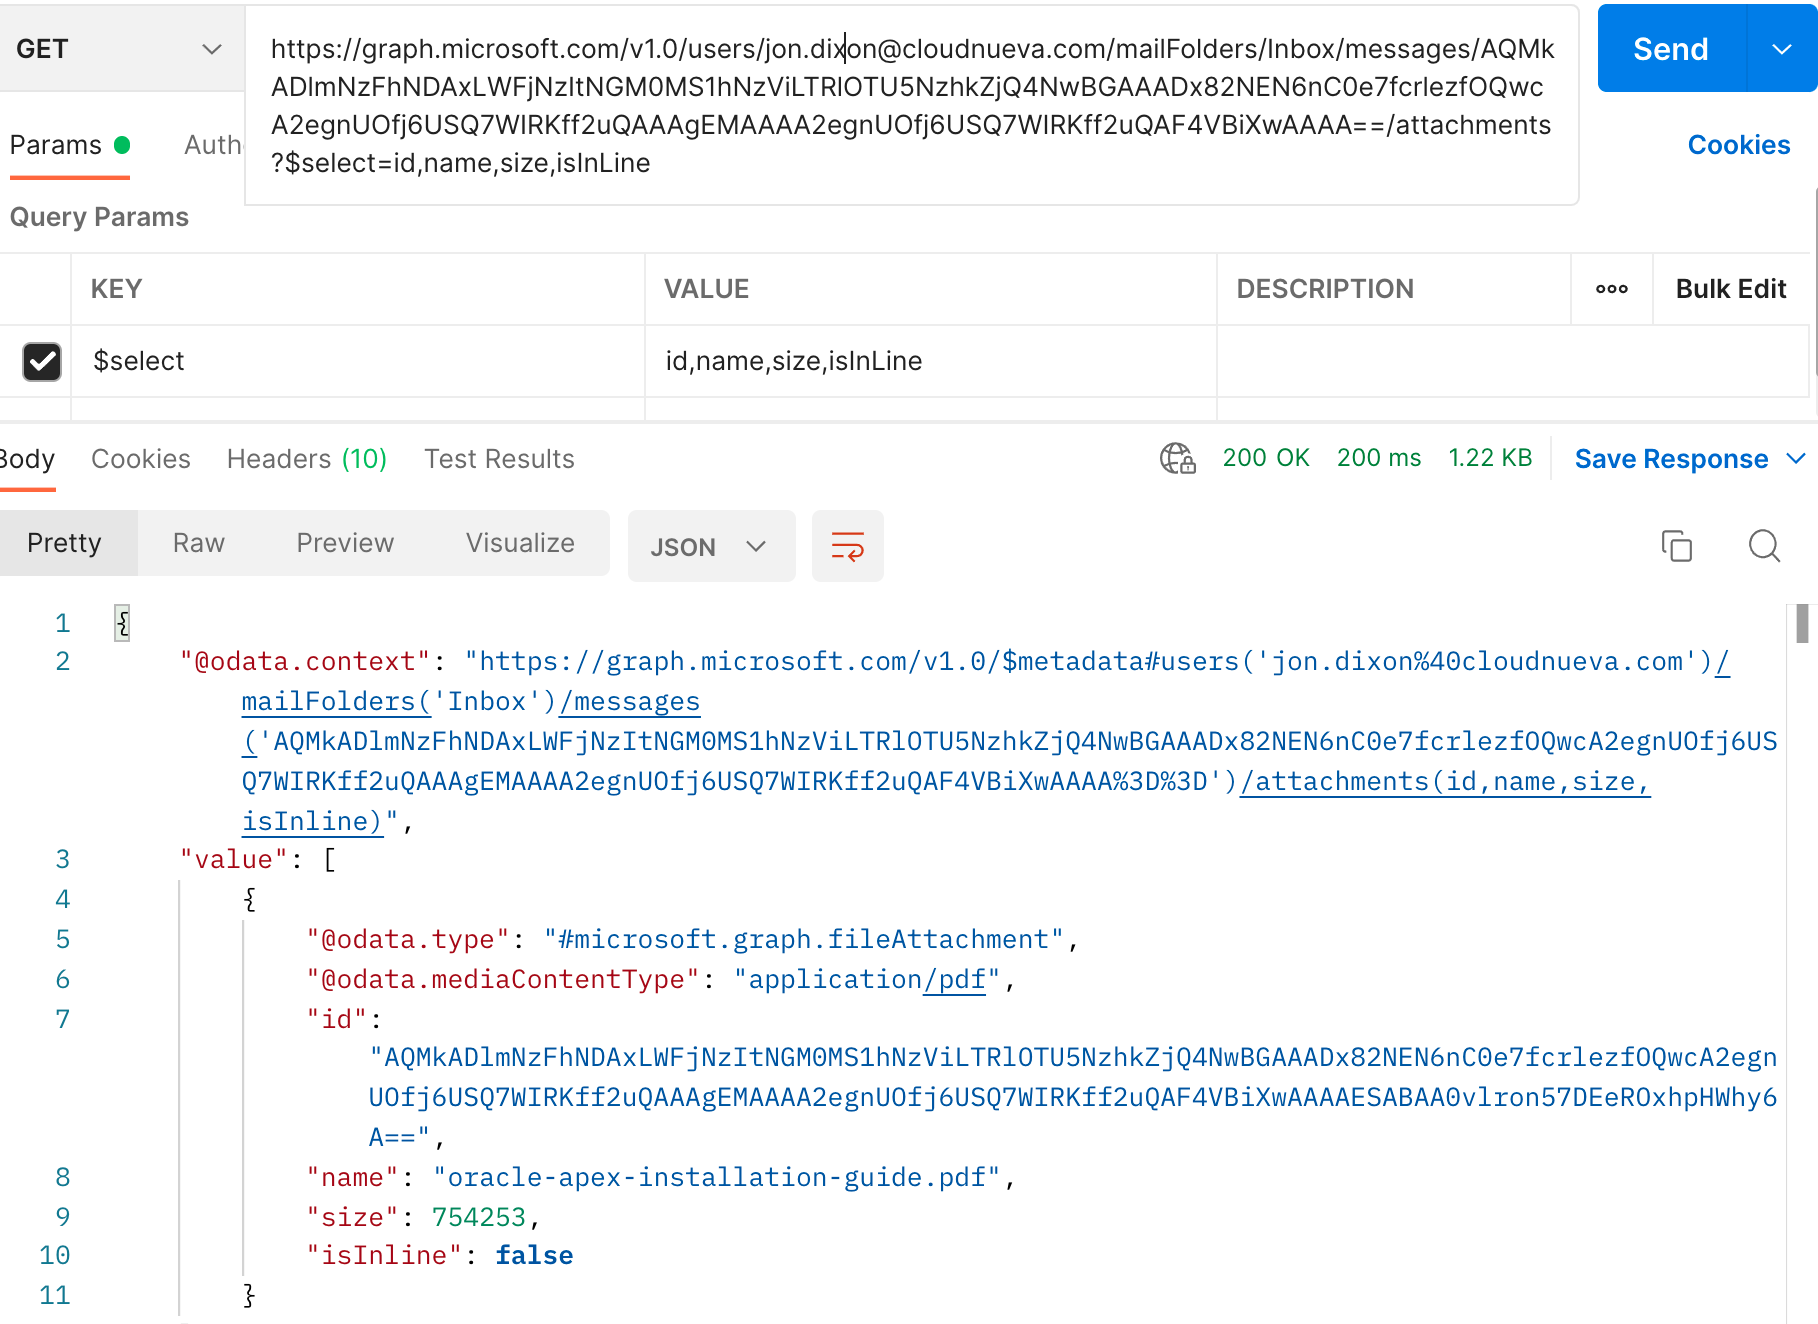
- I selected specific fields again using the
$selectparameter - If you include all fields, you will also get the
contentBytesfield which contains the actual bytes for the attachment. If you are looking for a list of attachments, the web service runs much faster if you exclude thecontentBytesfield.
Get Attachment
- 📖 MS Graph Resource Documentation
- 🔗 Endpoint:
https://graph.microsoft.com/v1.0/users/USER_ID/mailFolders/Inbox/messages/MESSAGE_ID/attachments/ATTACHMENT_ID/$value. WhereUSER_IDis the useridoruserPrincipalName,MESSAGE_IDis theidof the message, andATTACHMENT_IDis theidof the attachment from the previous request.
The final step is to get the attachment BLOB. Setup Postman as per the screenshot below:
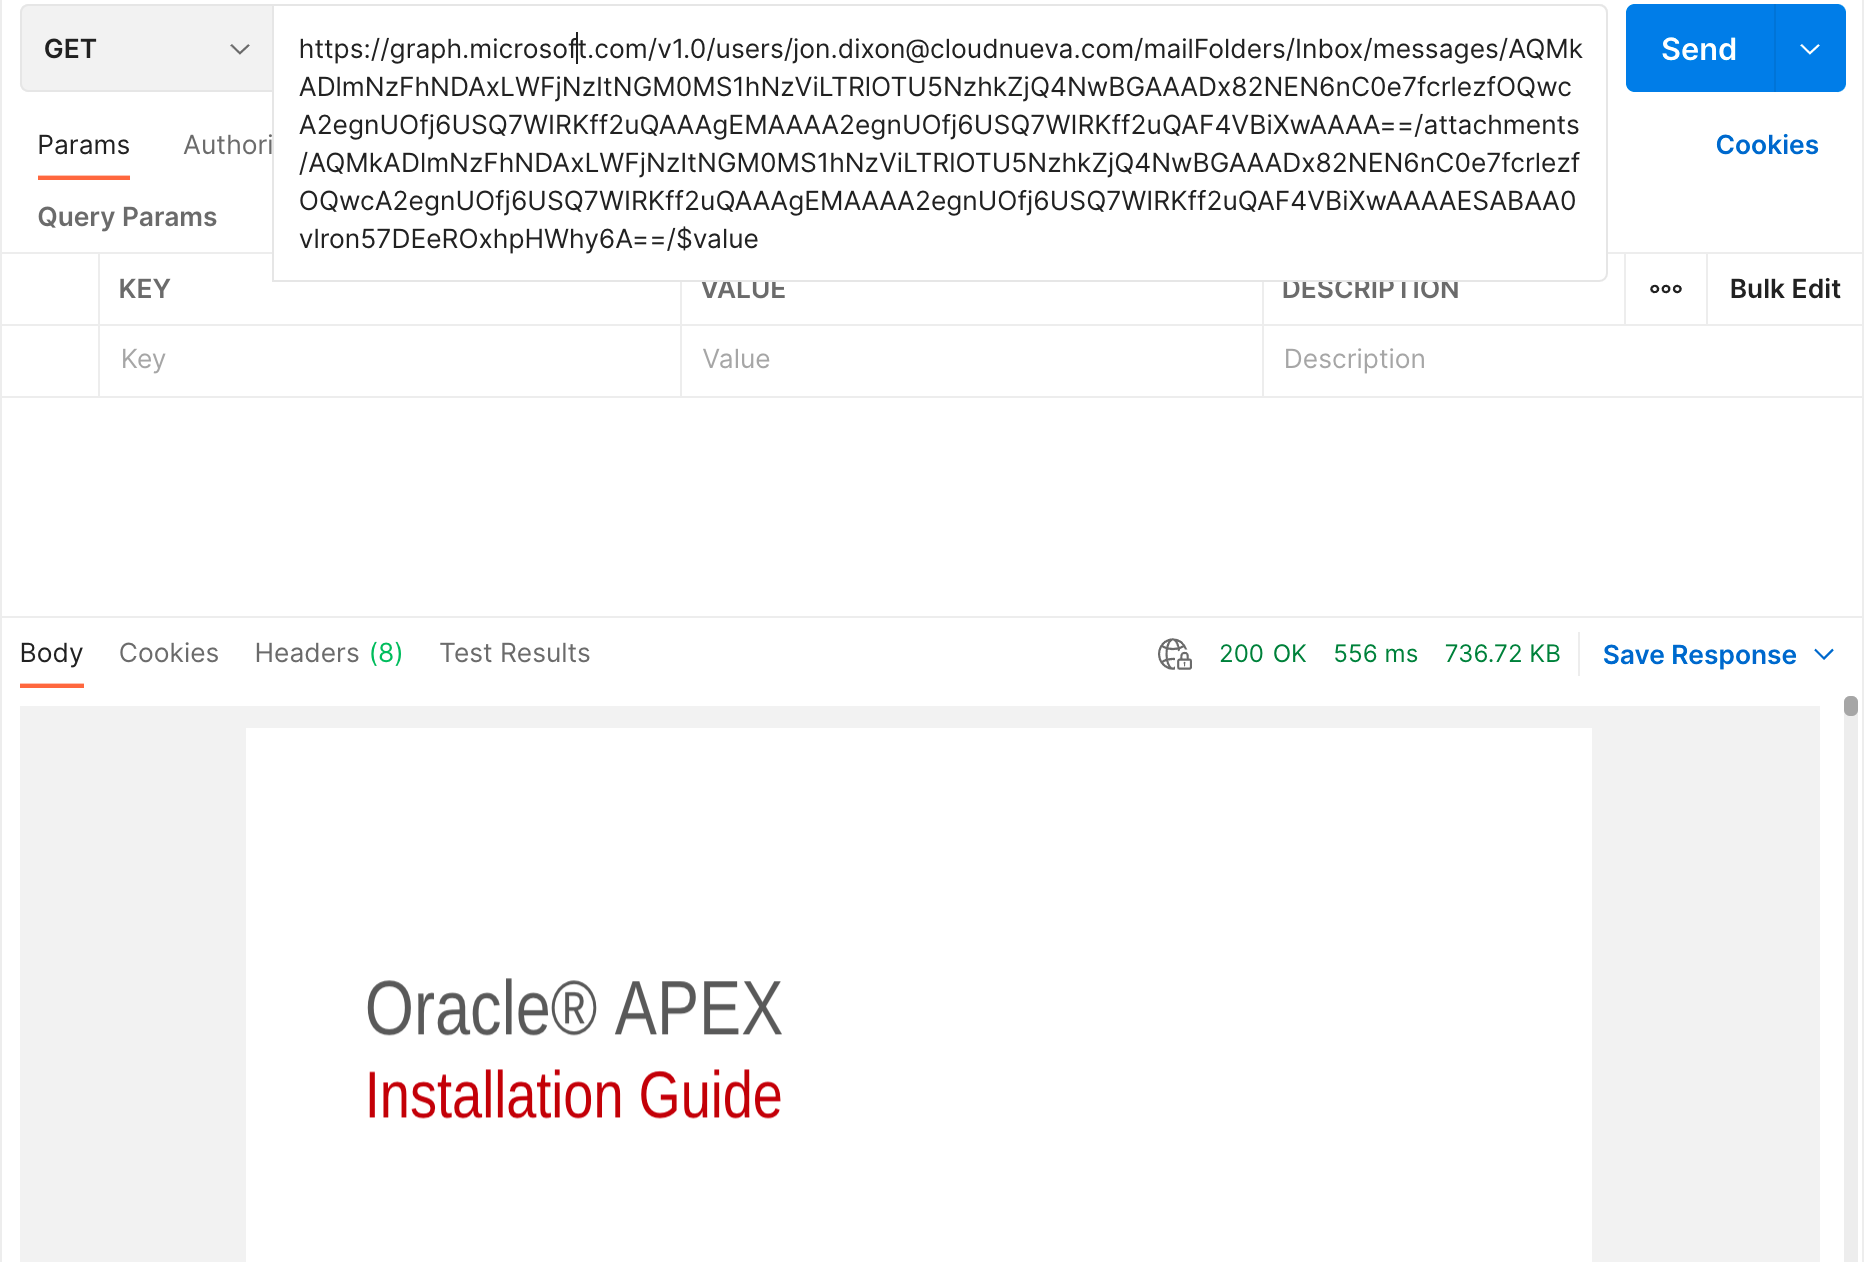
- Note
/$valueappended to the URL; this gets the attachment BLOB instead of details about the attachment
APEX Integration
Now that we understand how the MS Graph Email APIs work, we can start integrating them with APEX. I developed a demo APEX App to show how this integration can be done. You can download the demo App from my Github Repository. In this section, I will highlight some critical aspects of the demo App.
Rest Data Sources
We will need to create two REST Data Sources, one to get a list of emails in a particular user's inbox and a second to get a list of attachments for a specific email message.
REST Data Source - Messages
- Login to APEX Application Builder
- 🧭 Application > Shared Components > REST Data Sources > Click 'Create'
- Select 'From Scratch' then click 'Next'
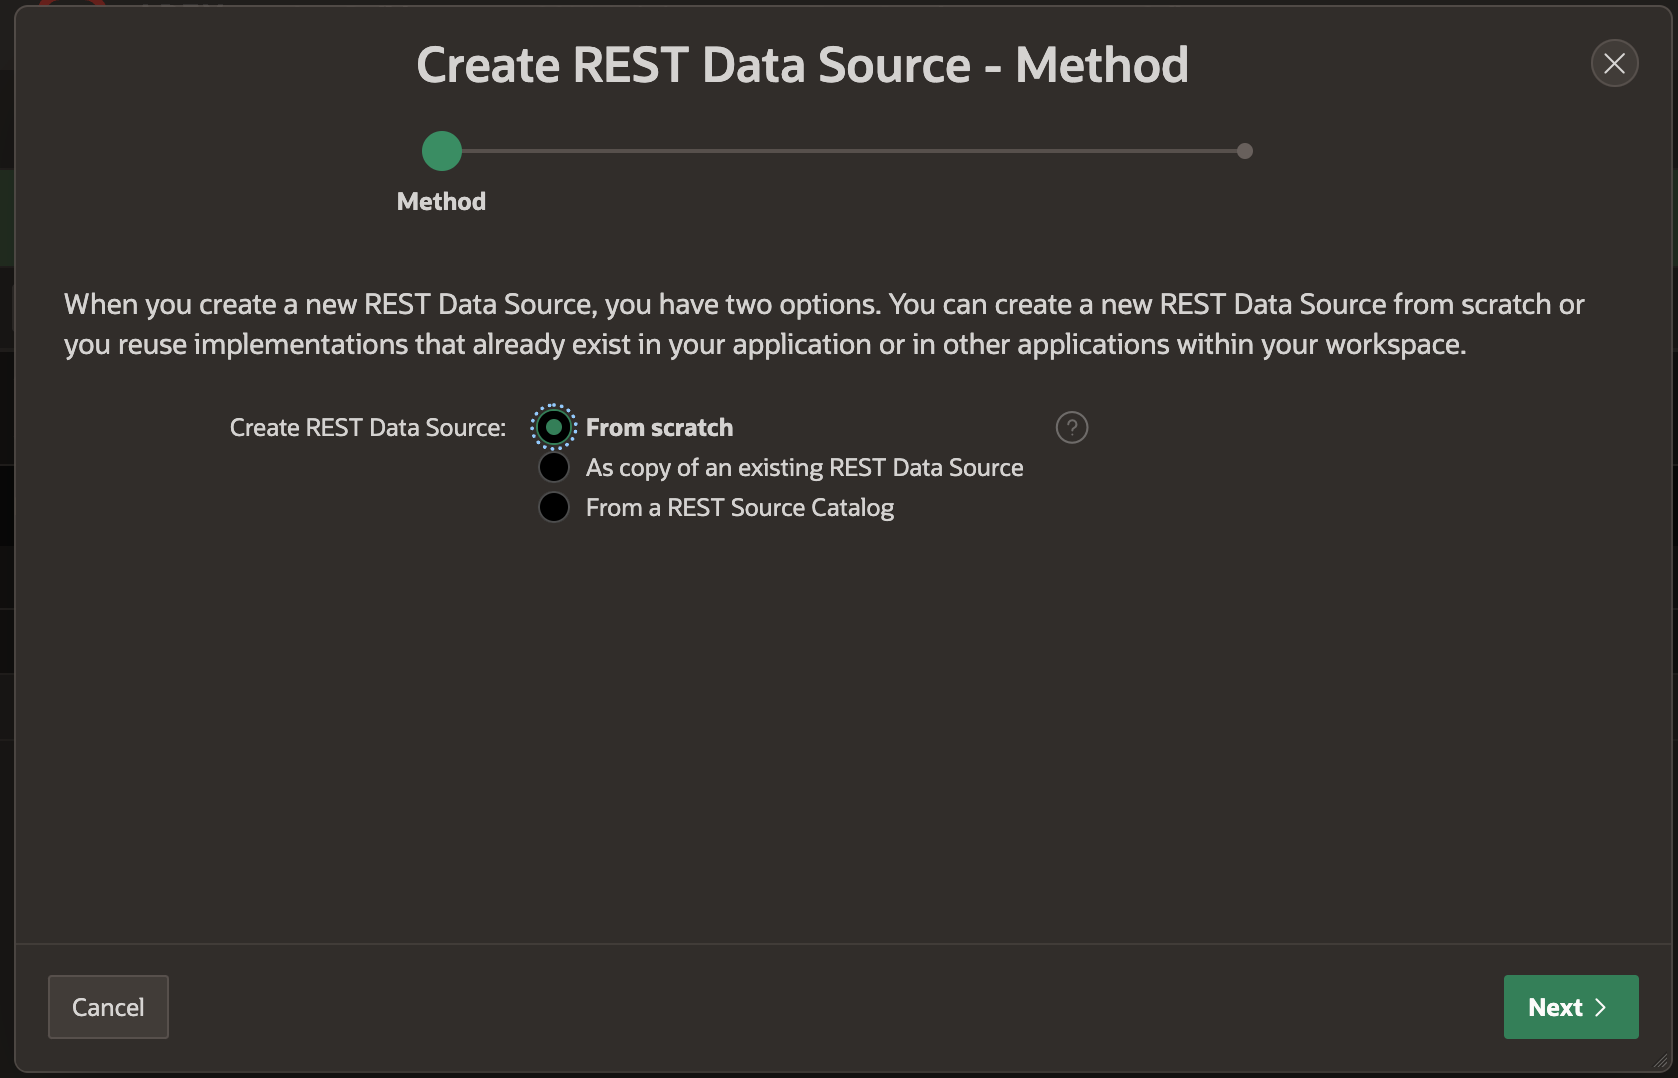
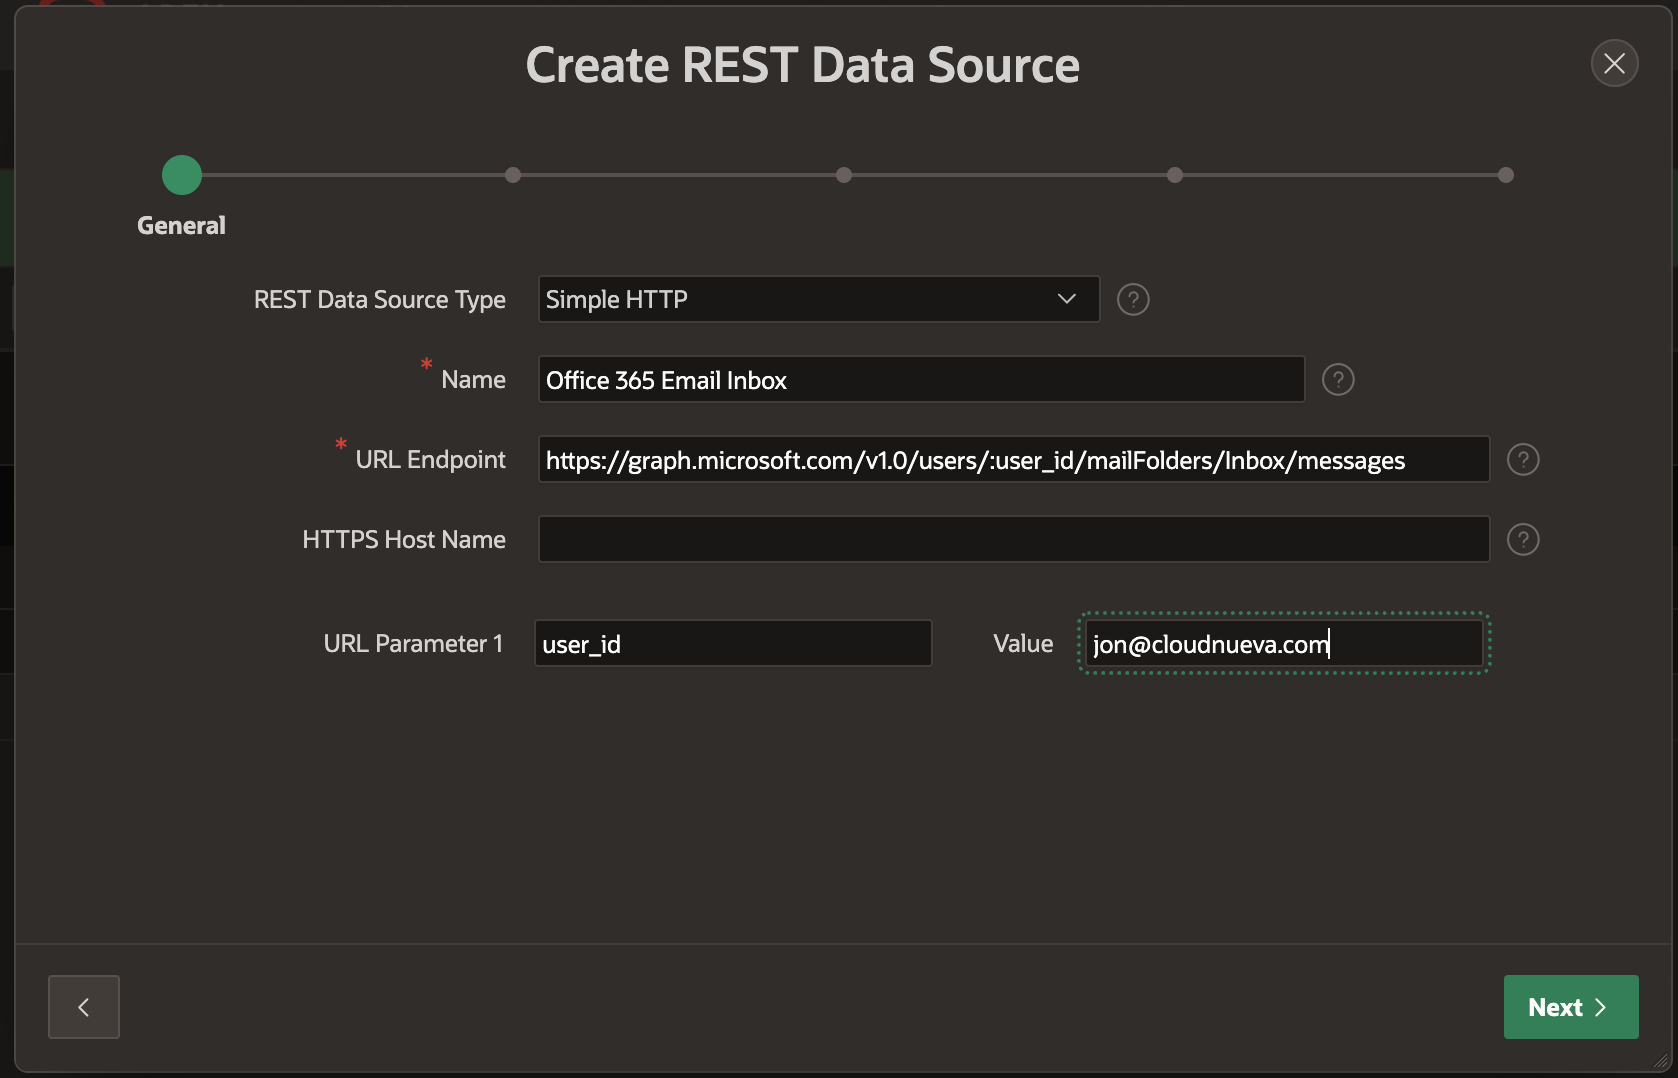
- Enter the details shown in the screenshot below
- Make sure you enter a valid value for
user_idvalue; this will help when 'Discovering' the data profile later on - Click 'Next' three times
- Make sure you enter a valid value for
- Select the Web Credential you have been using for these MS Graph API posts and enter the complete URL for the MS Graph Token API. e.g.,
https://login.microsoftonline.com/YOUR_TENANT_ID/oauth2/v2.0/token. SubstituteYOUR_TENANT_IDwith your MS Office 365 Tenant ID.- When complete, click 'Create REST Source Manually'. Note: 'Discover' will not work at this stage because Microsoft uses a different 'Row Selector' than the APEX default
items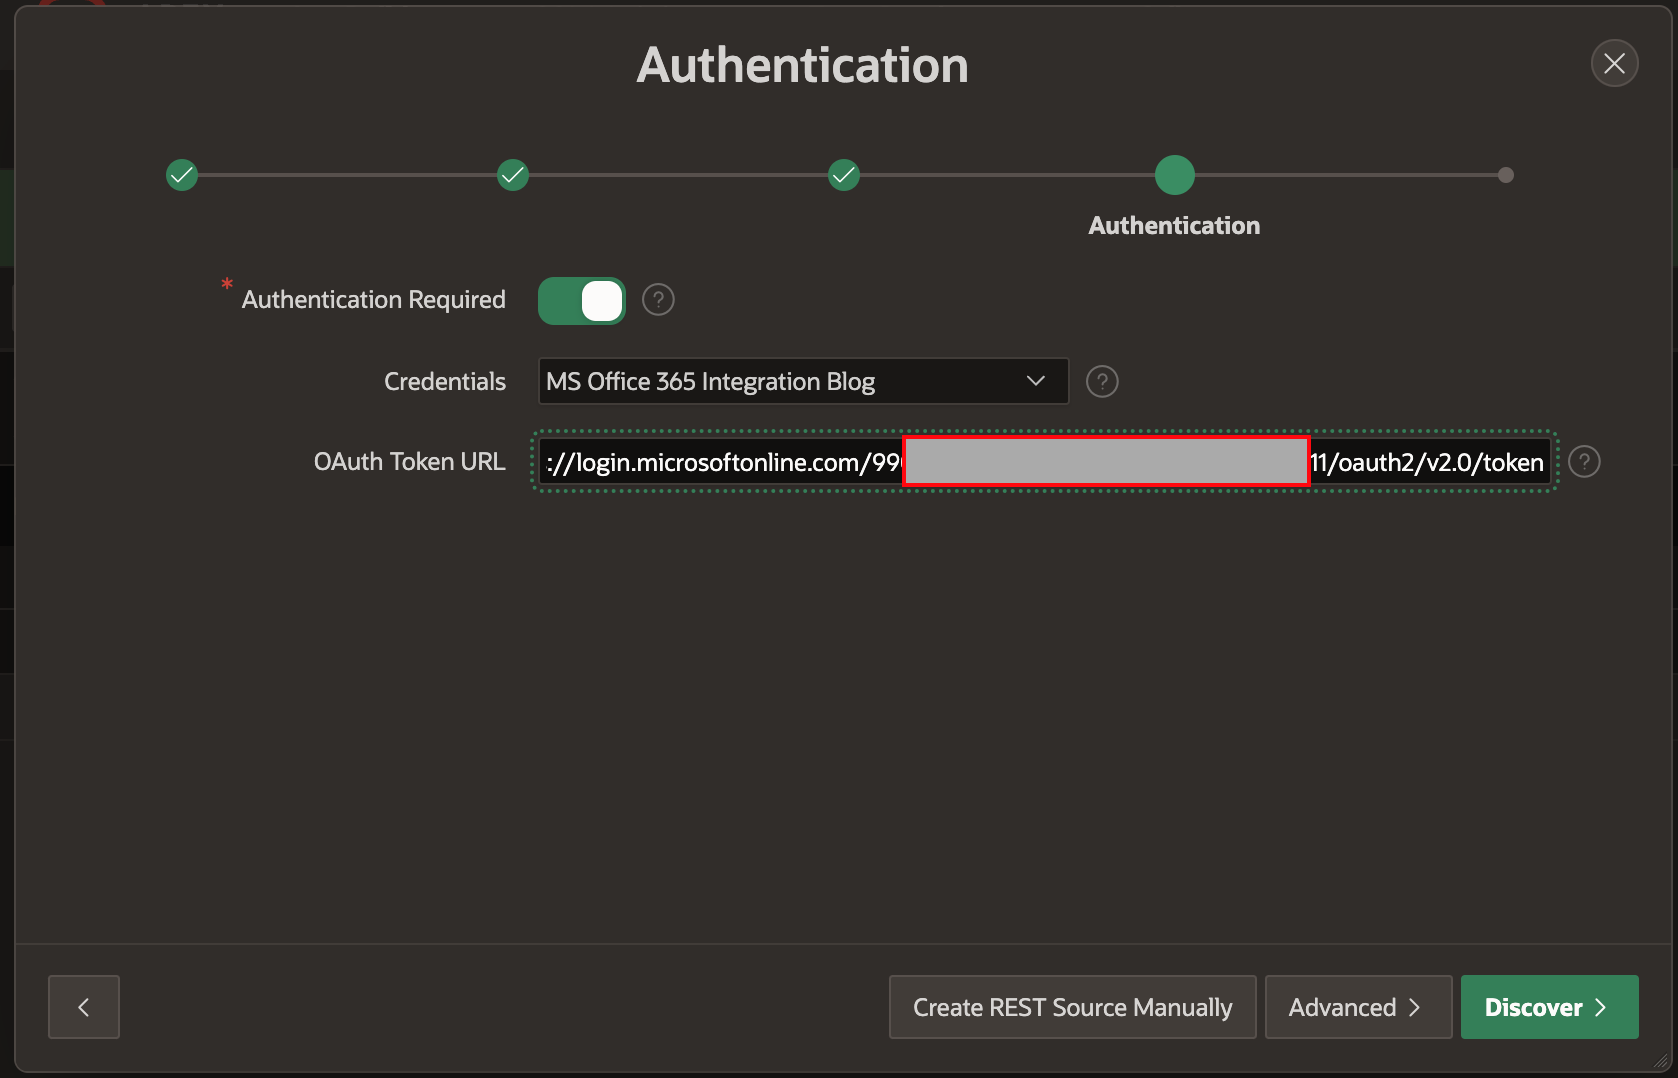
- When complete, click 'Create REST Source Manually'. Note: 'Discover' will not work at this stage because Microsoft uses a different 'Row Selector' than the APEX default
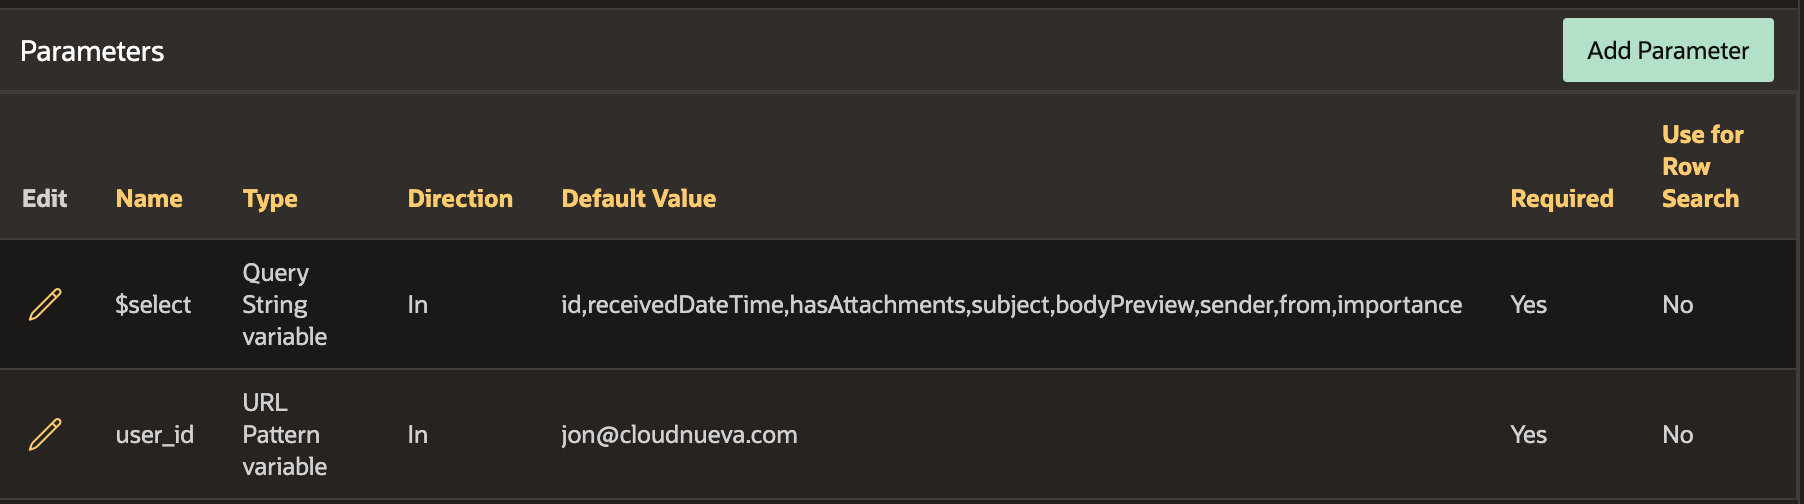
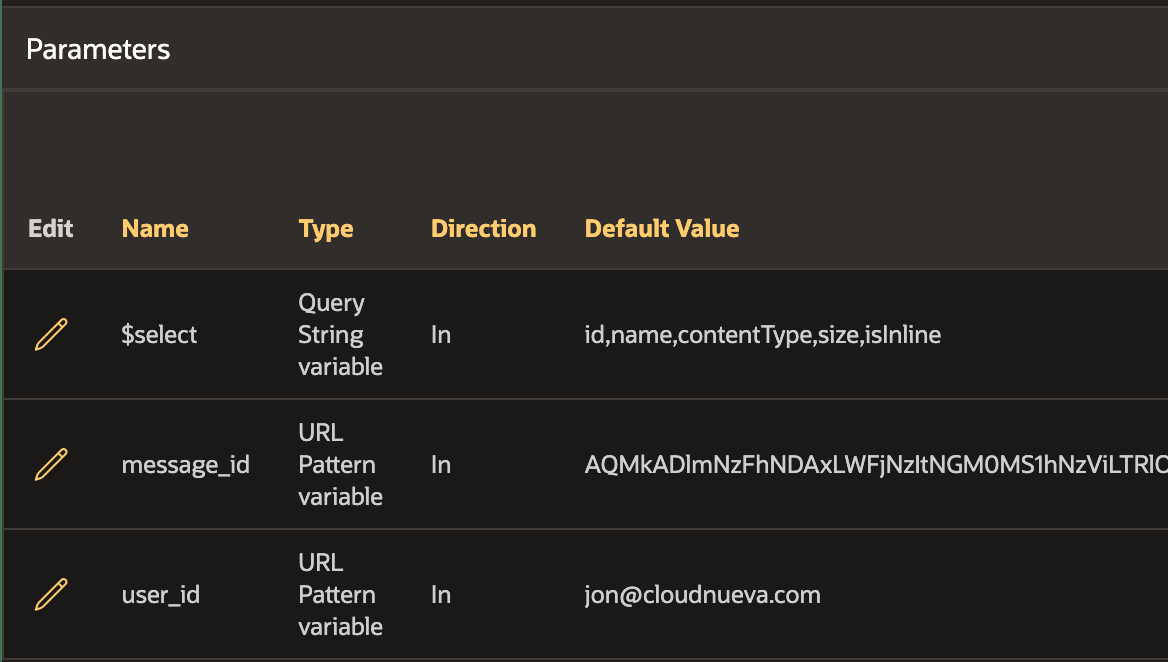
- Edit the REST Data Source you just created and adjust the Parameters as per the below screenshot
- Click 'Edit Data Profile'
- Change the value of 'Row Selector' to
valueand click 'Apply Changes'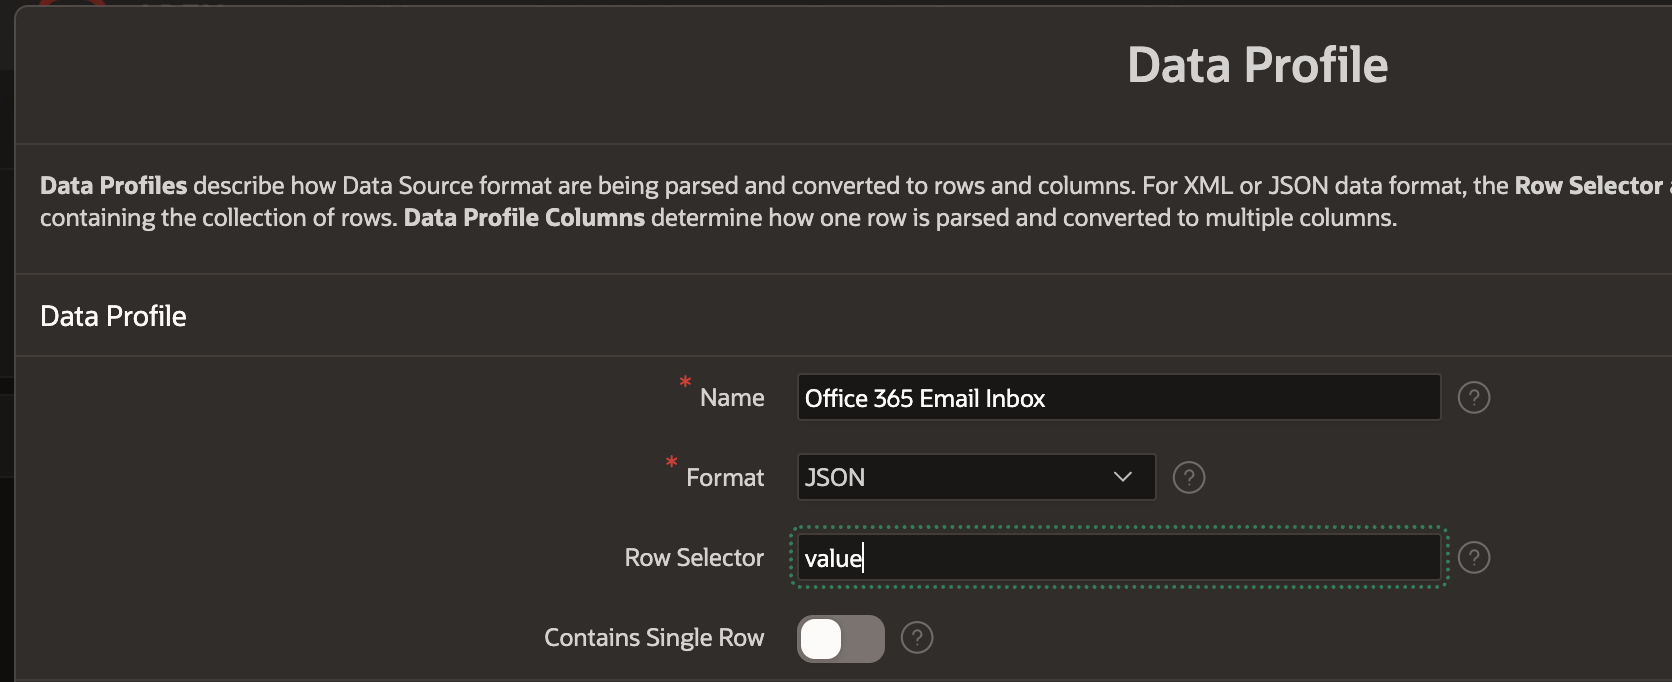
- Click 'Edit Data Profile' again, then scroll down and Click 'Rediscover Data Profile'. After you see a response similar to the screenshot below, click 'Replace Data Profile'
- APEX will call the REST Service and fetch the response
- It will then replace the existing data profile with just the fields we identified in the
$selectparameter above. Selecting specific fields makes the response smaller and faster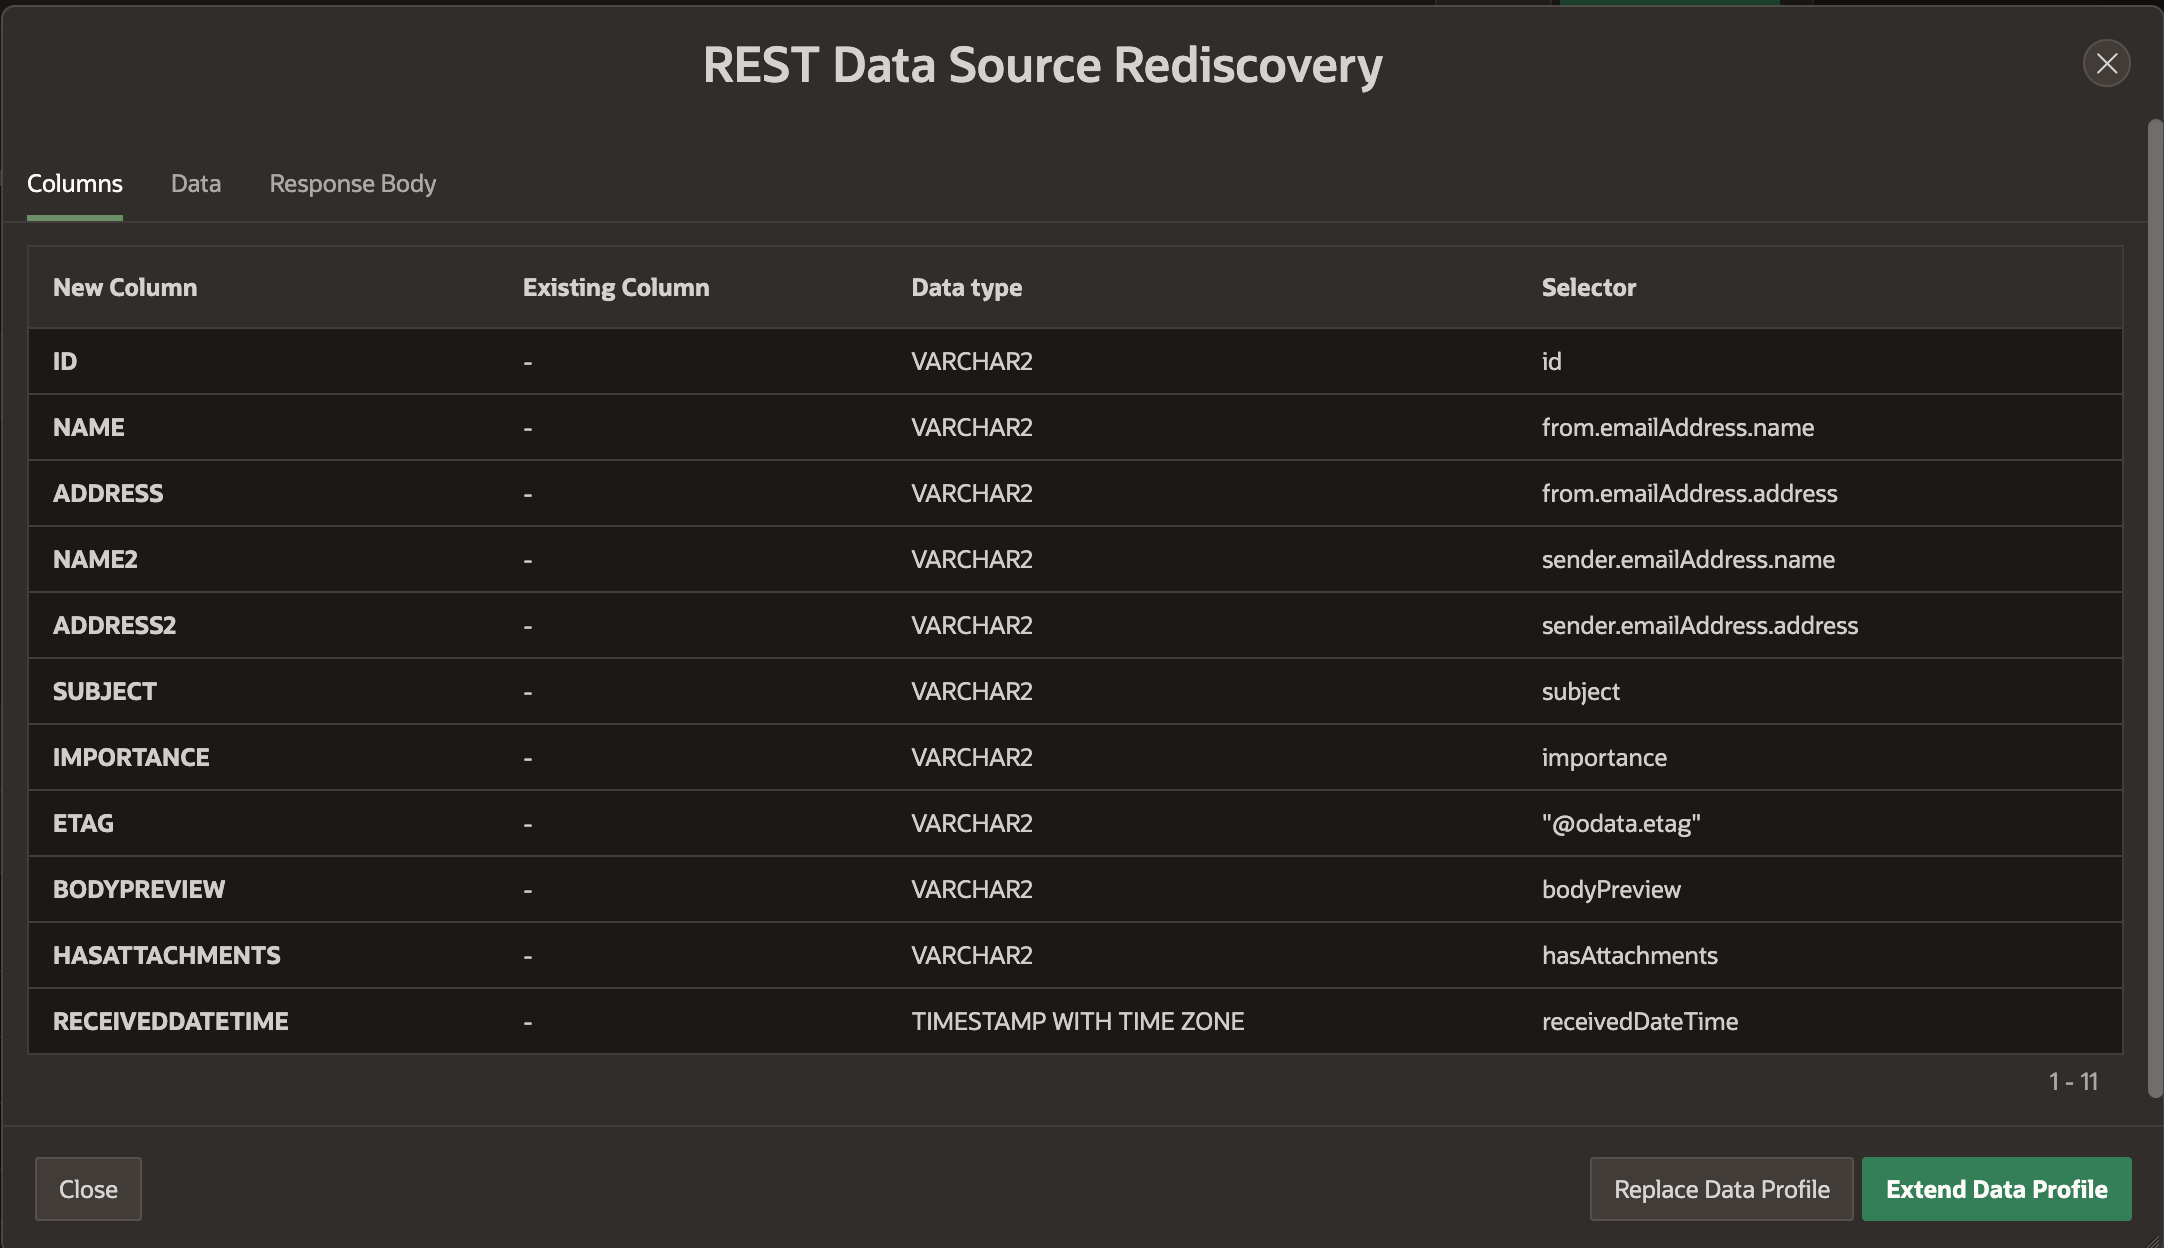
That completes the creation of the REST Data Source to get email messages in a Users Inbox. This REST Data Source is being used on page 40 of the Demo App.
REST Data Source - List Attachments
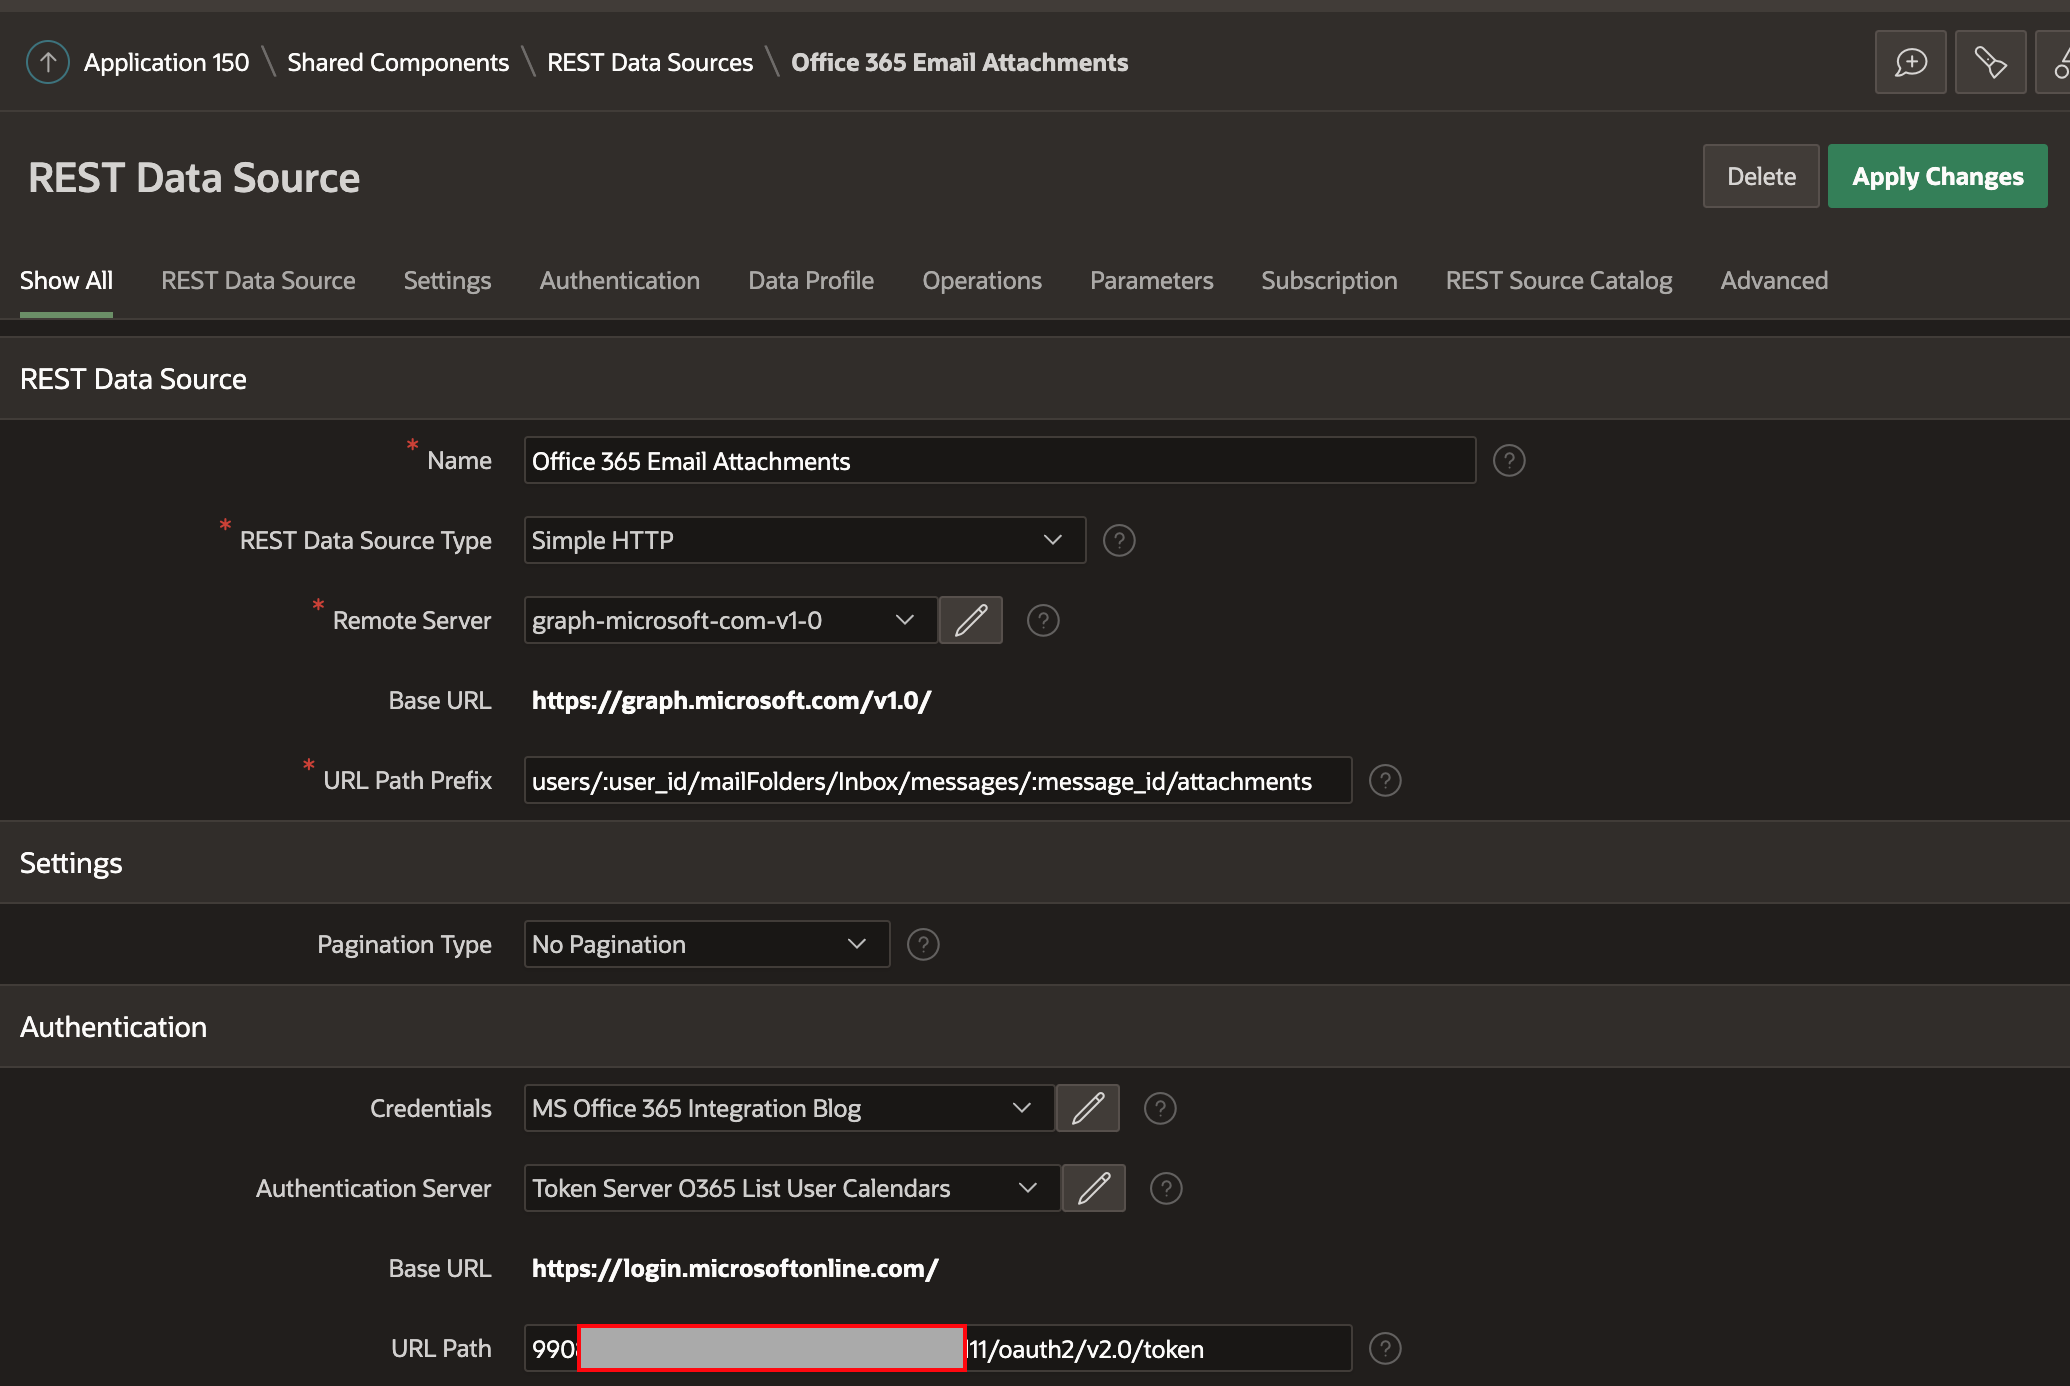
The steps for creating the REST Data Source to list attachments for a given message are very similar to the steps described in the previous section. Instead of going through each step, I have included three necessary screenshots below. You can also look at the REST Data Source 'Office 365 Email Attachments' in the Demo App.
REST Source Definition
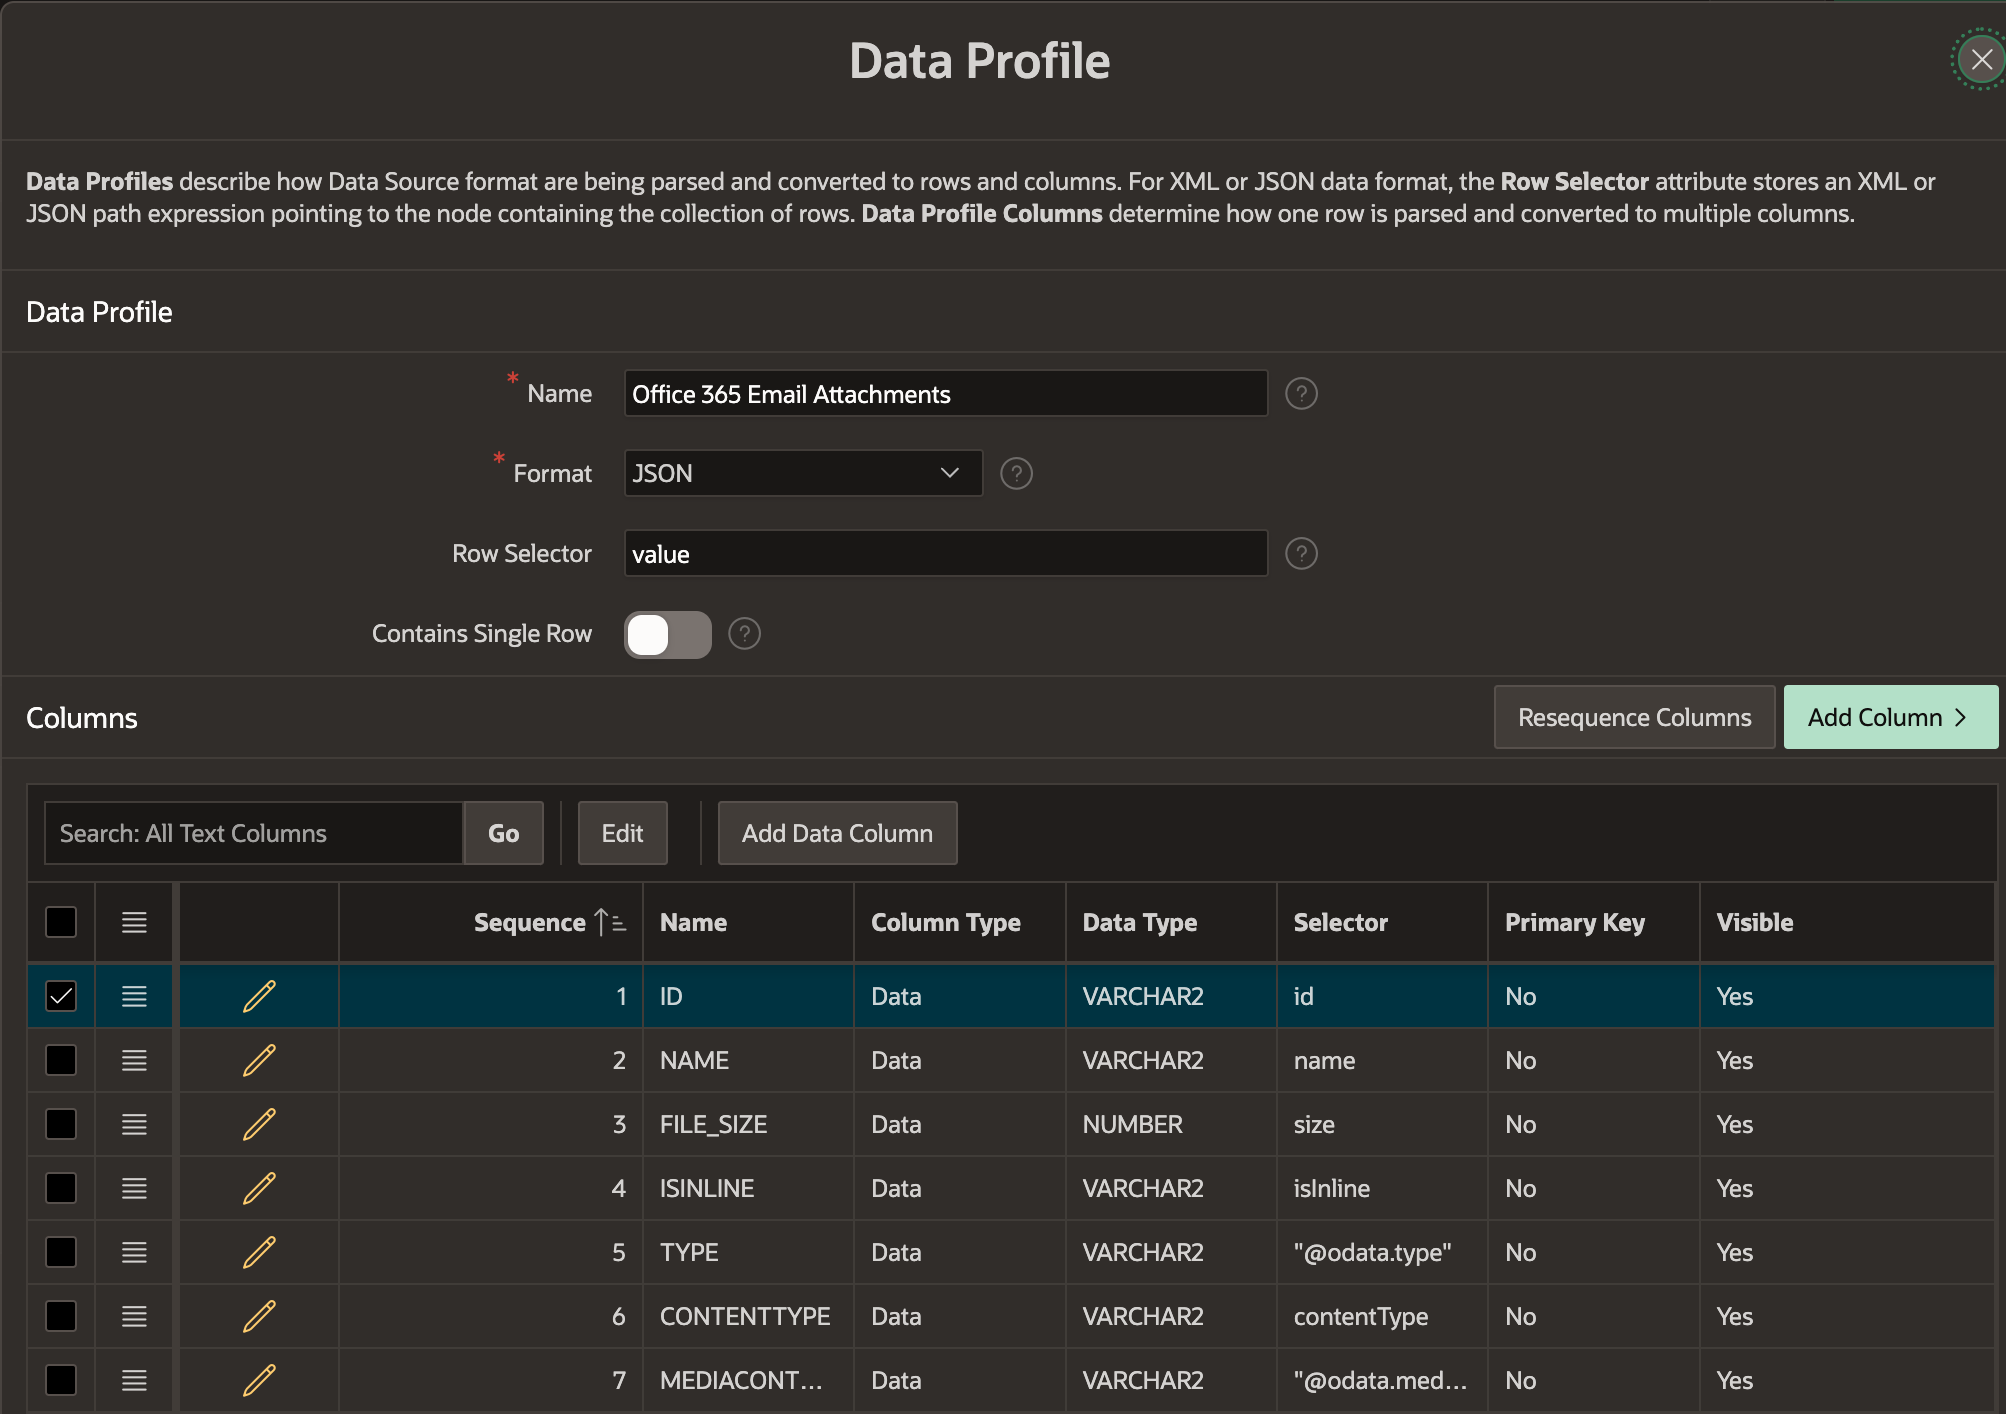
REST Source Data Profile
REST Source Parameters
PL/SQL Get Attachment API
So far in this post, we have used REST Data Sources to handle fetching the inbox and message attachments. To fetch the BLOB for a specific attachment, we will switch to PL/SQL.
The procedure dl_email_attachment fetches an attachment and uses apex_data_export to download it. Here are the essential parts of this procedure:
PROCEDURE dl_email_attachment
  (p_user_id       IN VARCHAR2,
   p_email_id      IN VARCHAR2,
   p_attachment_id IN VARCHAR2,
   p_file_name     IN VARCHAR2,
   p_mime_type     IN VARCHAR2)  IS

  l_file_size      PLS_INTEGER;
  l_export         apex_data_export.t_export;
  l_url            VARCHAR2(4000);

BEGIN
  -- Build URL with Parameters.
  l_url := 'https://graph.microsoft.com/v1.0/users/#USER_ID#/mailFolders/Inbox/messages/#MESSAGE_ID#/attachments/#ATTACHMENT_ID#/$value';
  l_url := REPLACE(l_url, '#USER_ID#', p_user_id);
  l_url := REPLACE(l_url, '#MESSAGE_ID#', p_email_id);
  l_url := REPLACE(l_url, '#ATTACHMENT_ID#', p_attachment_id);

  -- Set HTTP Headers
  apex_web_service.clear_request_headers;
  apex_web_service.set_request_headers
   (p_name_01   => 'Content-Type',
    p_value_01  => 'application/x-www-form-urlencoded');

  -- Call MS Graph Web Service.
  -- token_url is a function that build the MS Graph Token URL, see the Demo package for details
  -- option_value is s function that gets the name of the APEX Web Credential for our MS Graph Credentials
  l_export.content_blob := apex_web_service.make_rest_request_b
    (p_url                  => l_url,
     p_http_method          => 'GET',
     p_token_url            => token_url,
     p_credential_static_id => option_value (p_option_code => 'WEB_CREDENTIAL_STATIC_ID'));

    -- Download the File.
    l_export.file_name := p_file_name;
    l_export.mime_type := p_mime_type;
    apex_data_export.download( p_export => l_export );

END dl_email_attachment;
Conclusion
In this post I showed you how you can take advantage of MS Graph APIs to process emails in Office 365. This functionality provides you with even more options for building APEX applications that interact with your users in ways that are convenient to them.
I hope you enjoyed my series on integrating MS Office 365 with APEX!