APEX & Office 365 Integration - Introduction

Introduction
This blog post is the first in a series covering integrations between Oracle APEX and Microsoft Office 365. These integrations are made possible using Microsoft Graph APIs. Being able to integrate with Office 365 opens up a world of possibilities. In upcoming posts, I will cover integrating APEX with the following Office 365 Services:
- Calendars
- Sharepoint
There are many other Office 365 services that you can integrate with, including:
- Users and Groups
- Contacts
- Application registrations
- Notes
- To Do
This first post will cover background information and configurations that underpin the remaining ones. These include MS Active Directory configurations, testing the MS Graph API calls with Postman, and creating APEX Web Credentials.
This post assumes you have administrator access to Microsoft Azure for your Office 365 Tenant.
Azure AD App registration
Before we can start accessing Office 365 services, you need to create an App registration using Azure Active Directory. App registrations control permissions for which MS Graph APIs we have access and generate credentials we can use for authentication and authorization.
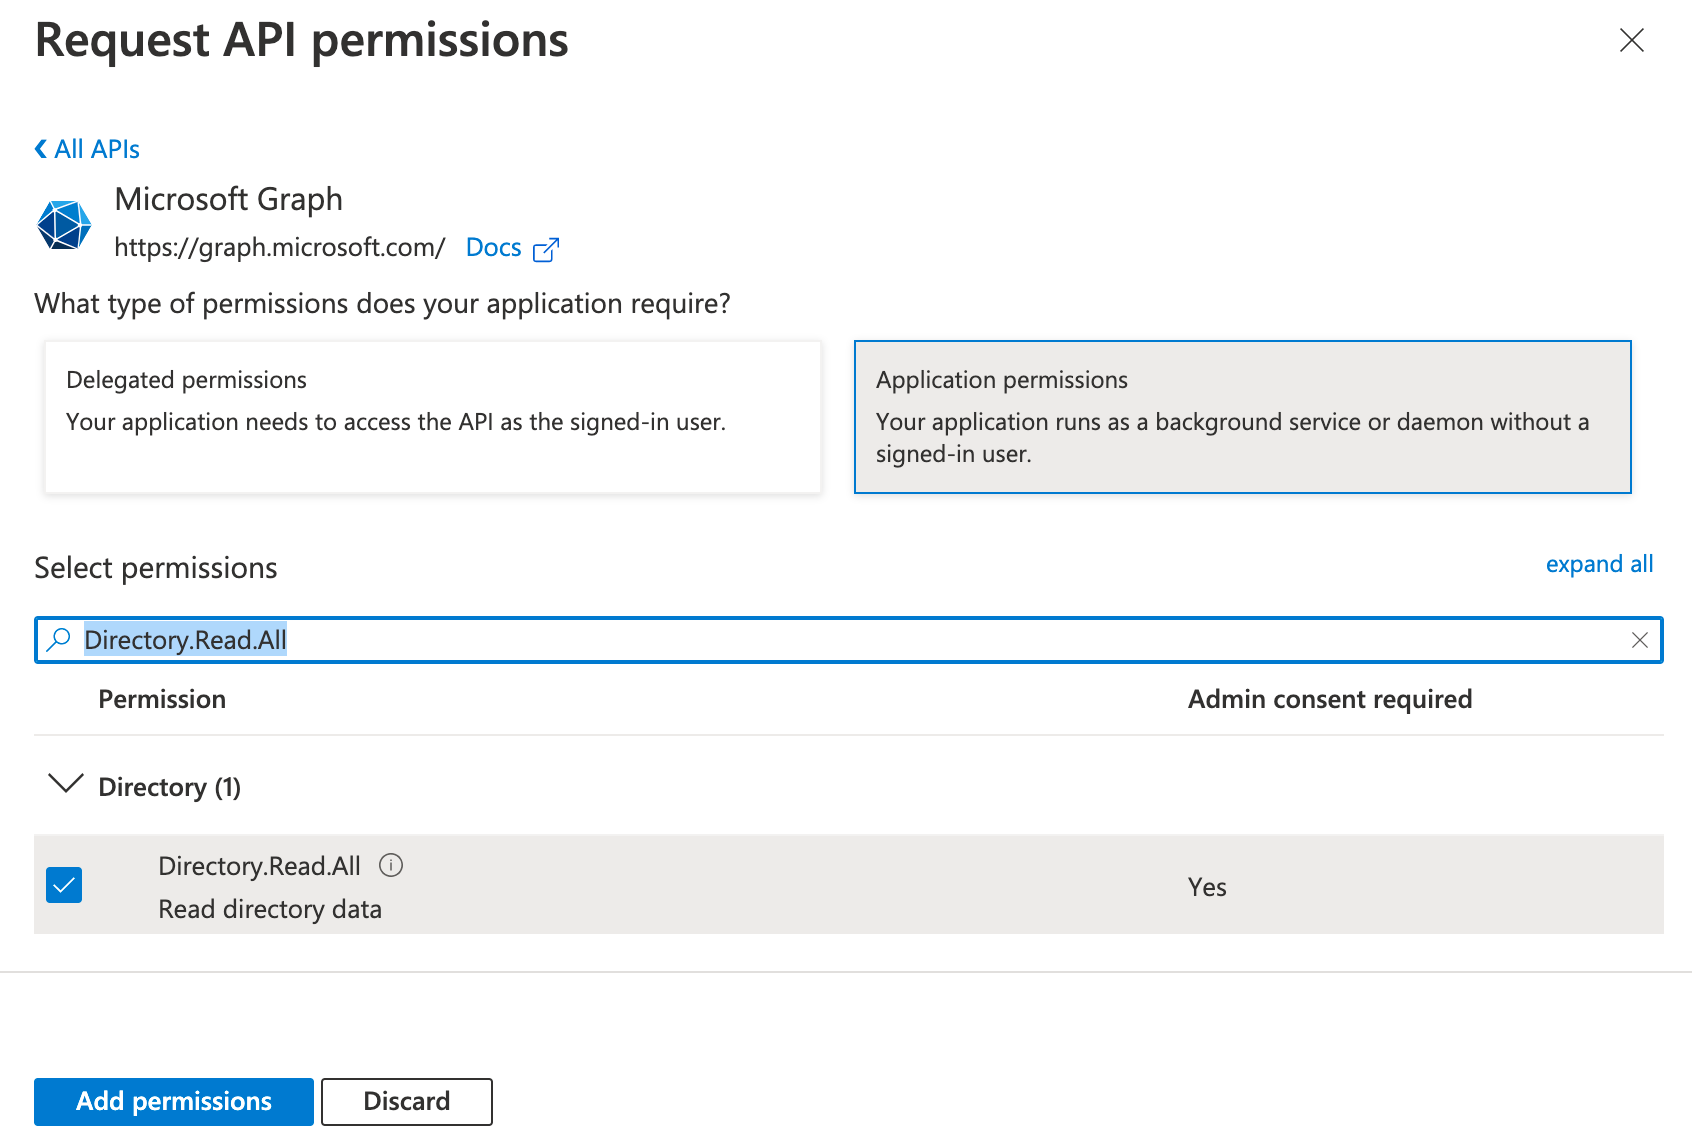
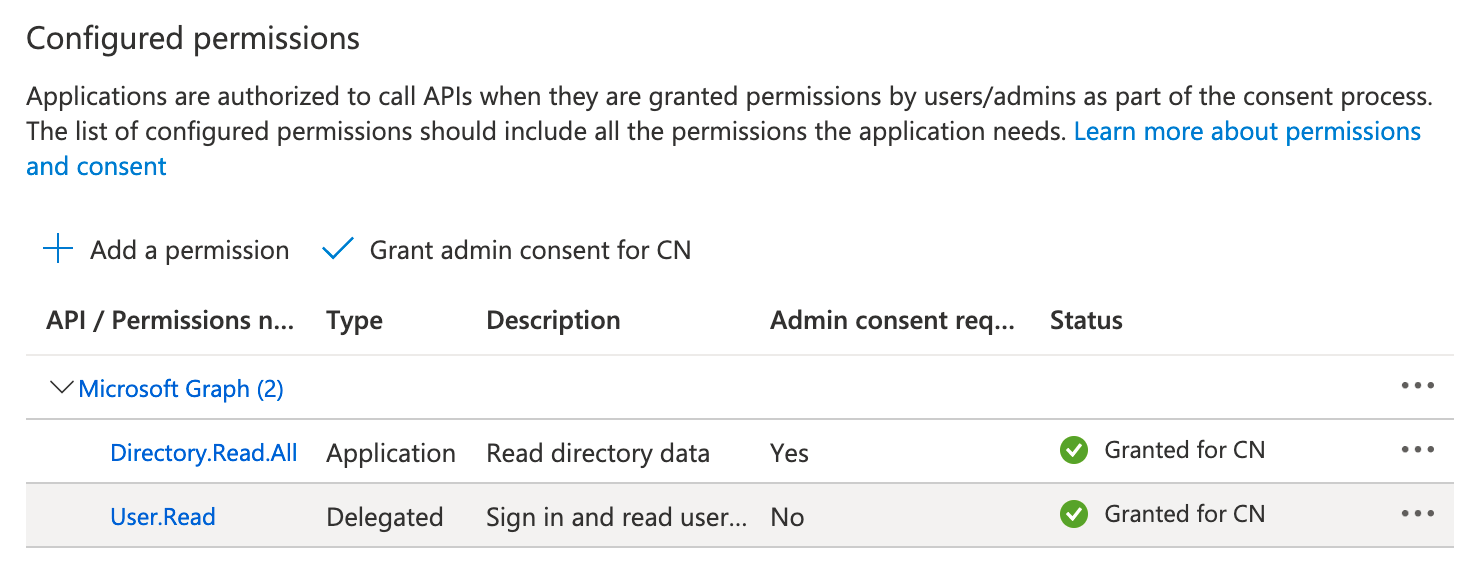
❗In the below configuration, we will assign the 'Directory.Read.All' permission. This configuration gives us access to fetch a list of users from our Office 365 tenancy. We will utilize different permissions in subsequent posts.
- Login to the Microsoft Entra Admin Center
- 🧭 Azure Active Directory > Applications > App registrations
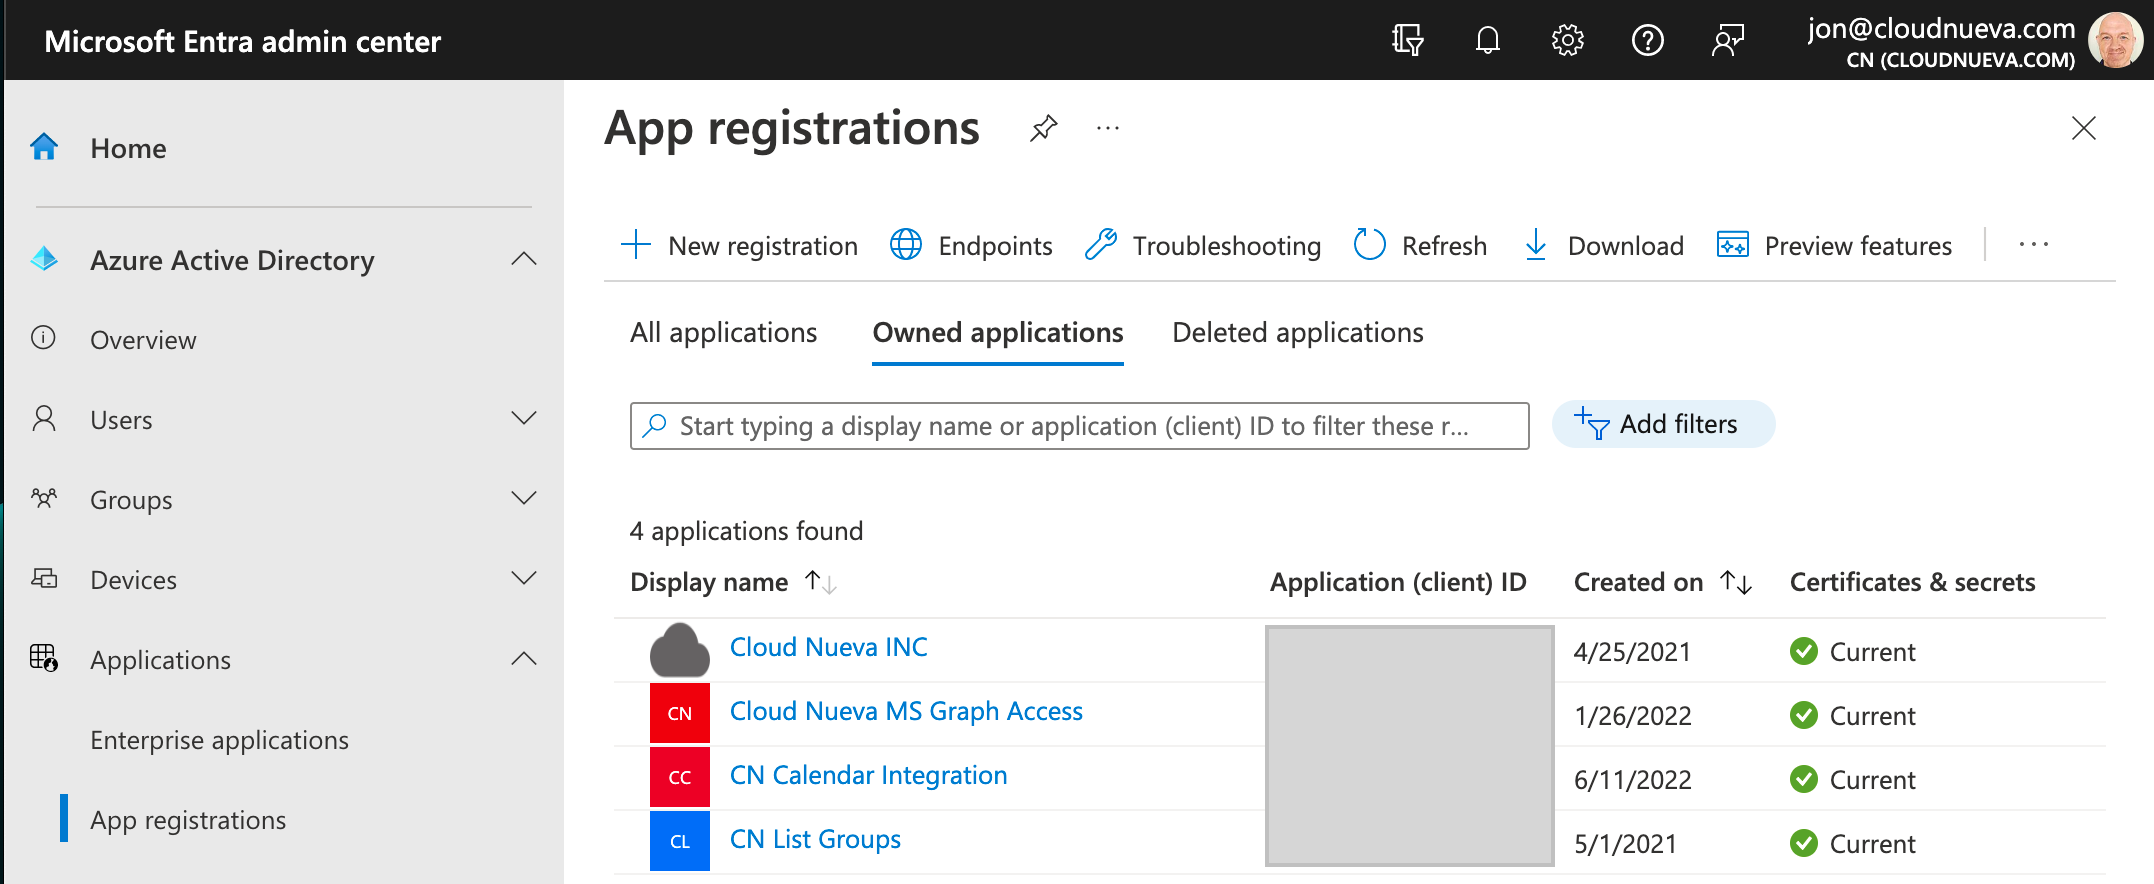
- Click '+ New registration'
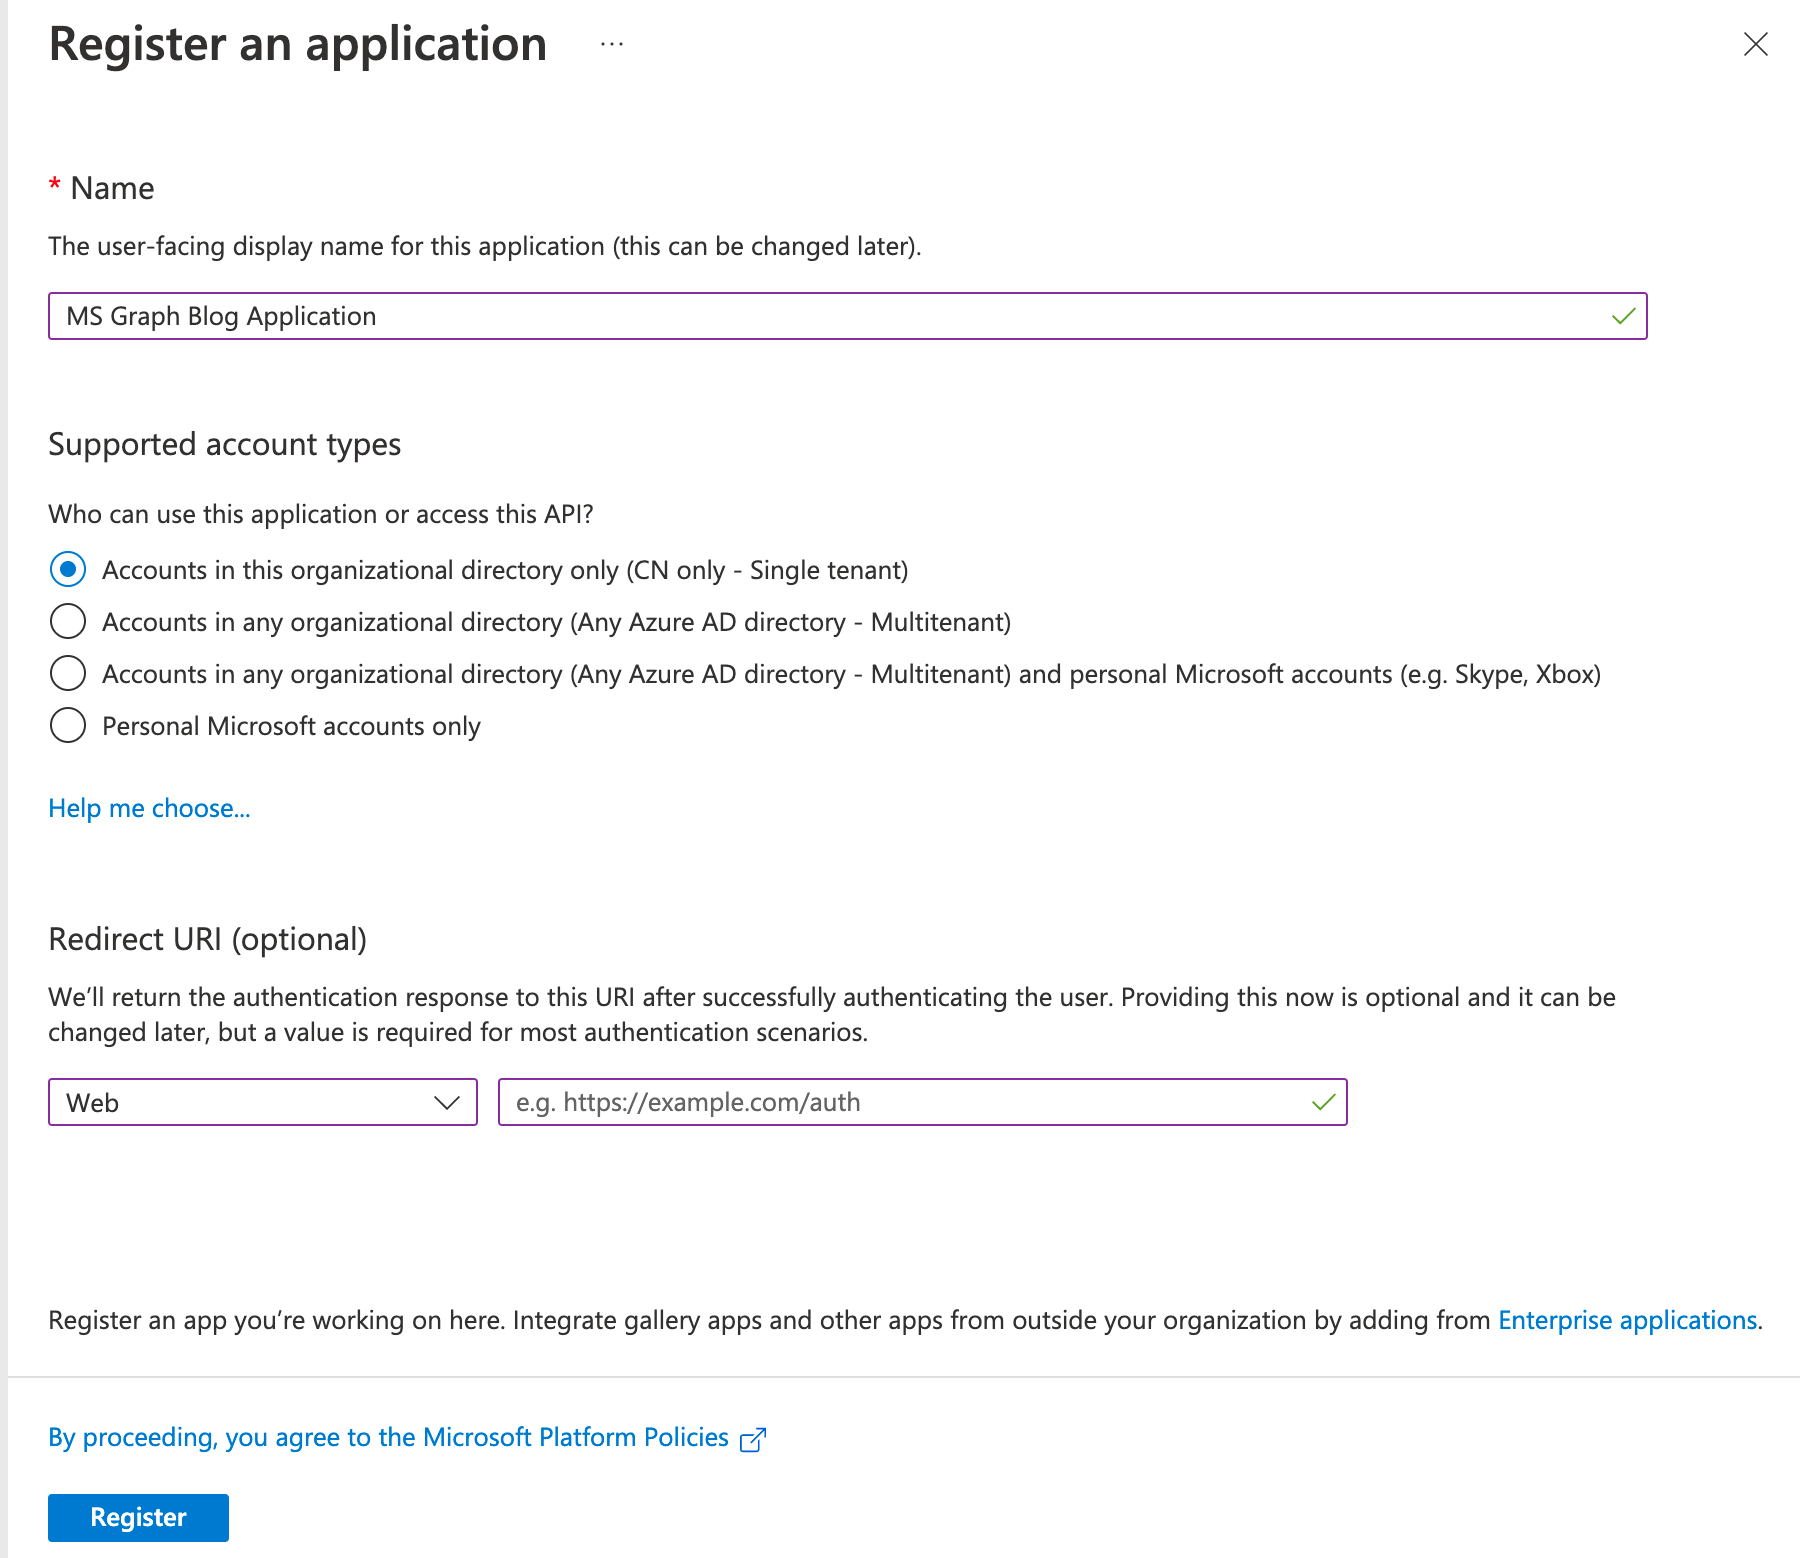
- Enter a name for the application and click 'Register'
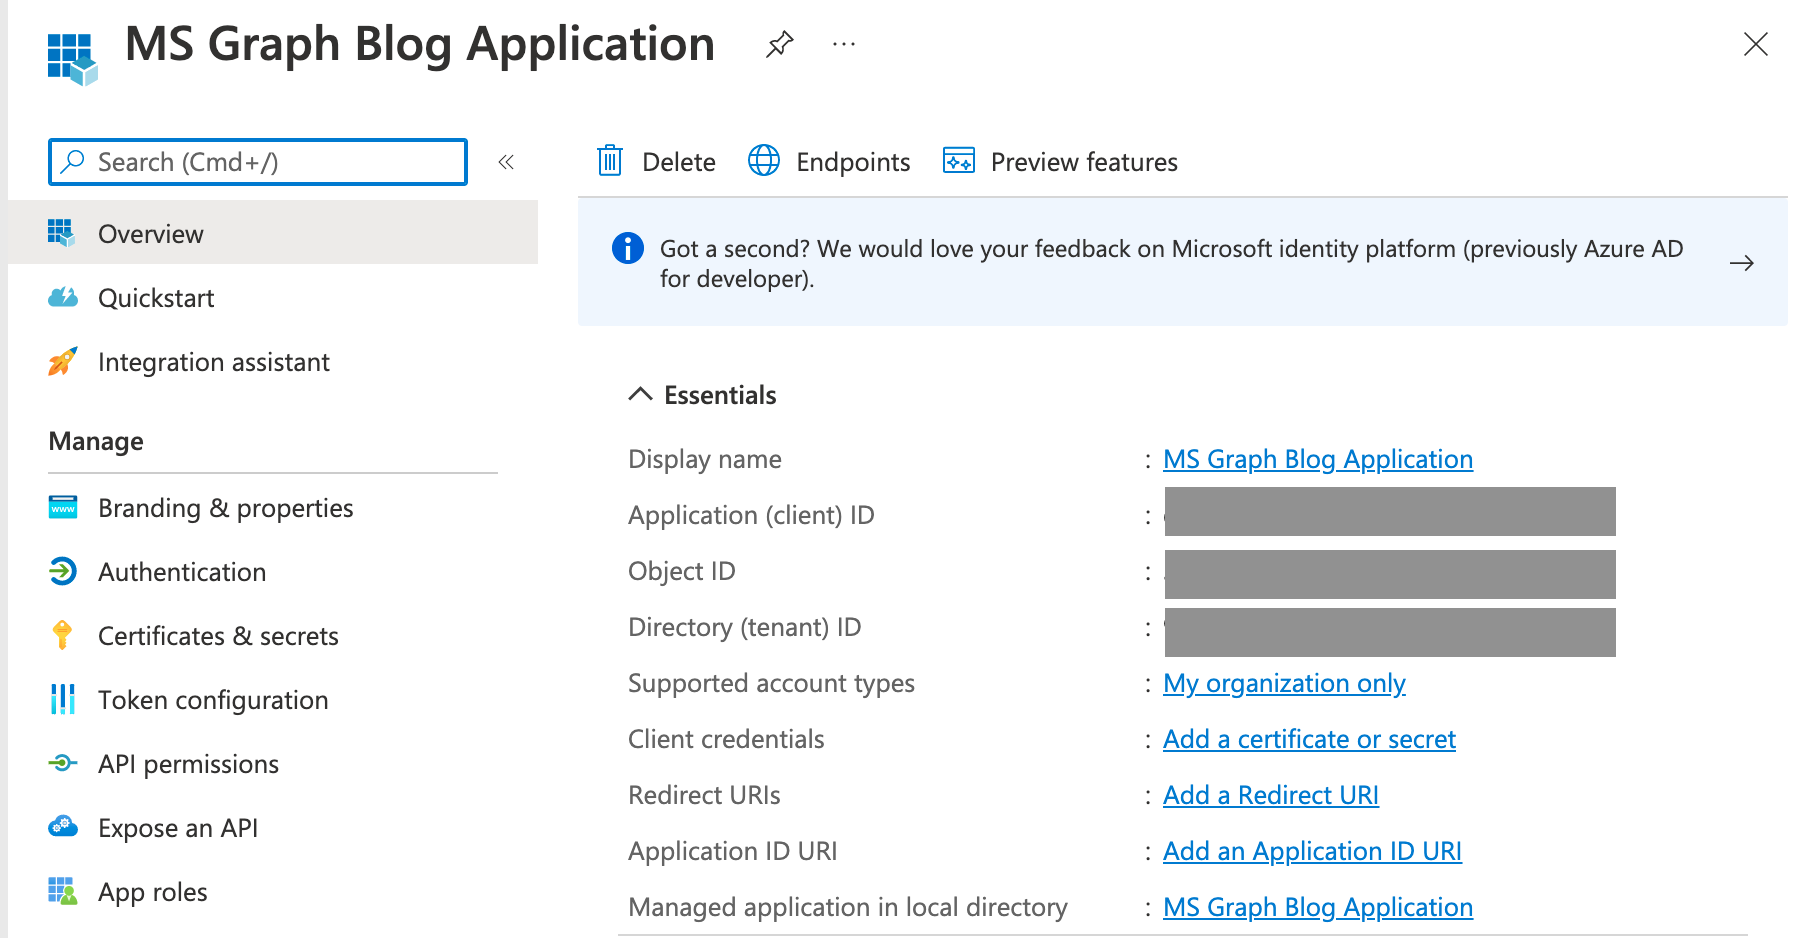
- ✏️ Note the
Application (client) IDand theDirectory (tenant) ID - Click on API Permissions, then click '+ Add permission'
- Click 'Microsoft Graph'
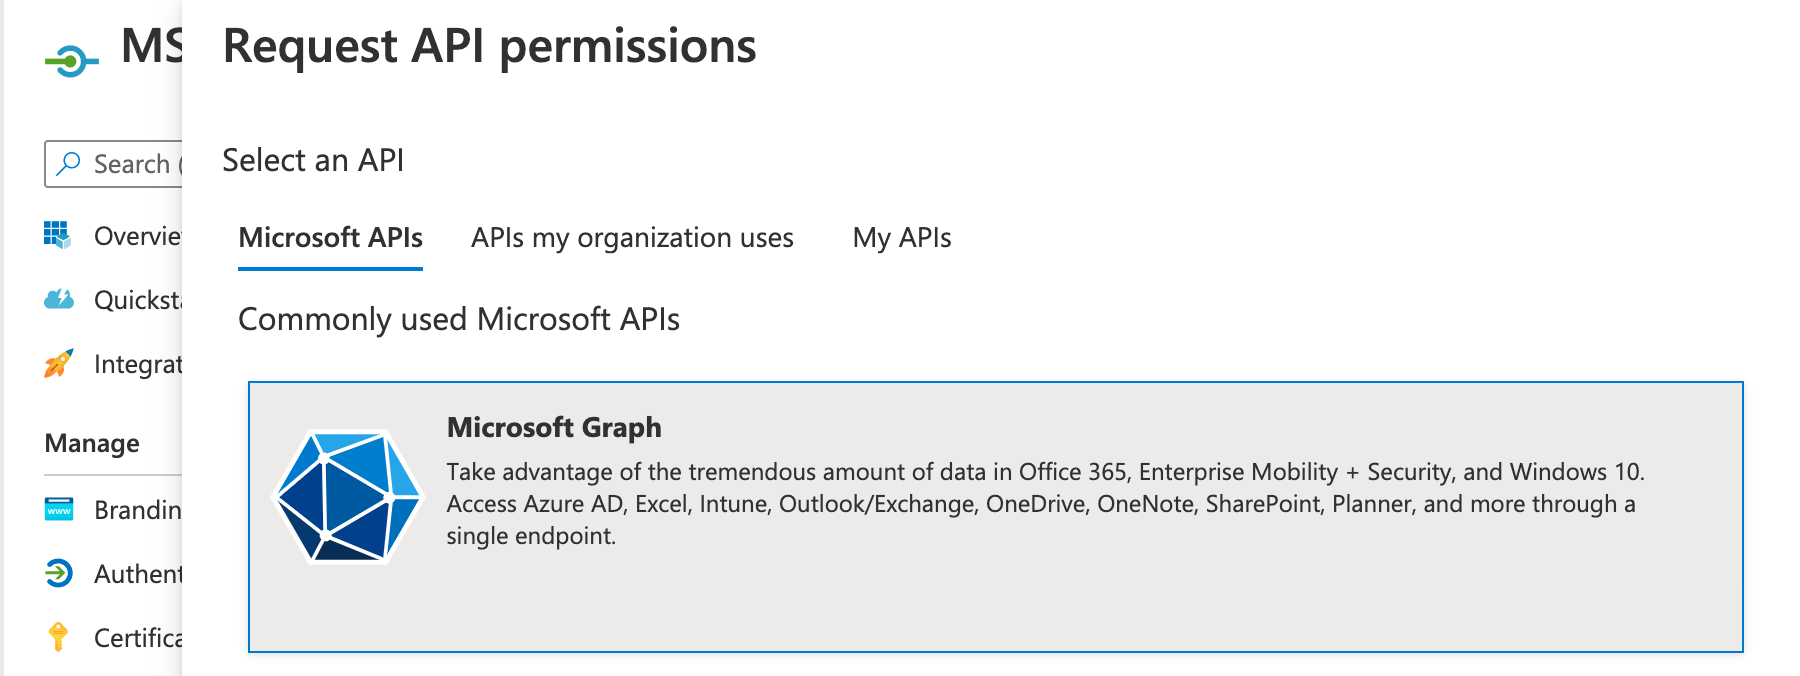
- Search for 'Directory.Read.All', select it and click 'Add permissions'
- Navigate to 'Certificates & secrets' then click '+New client secret'
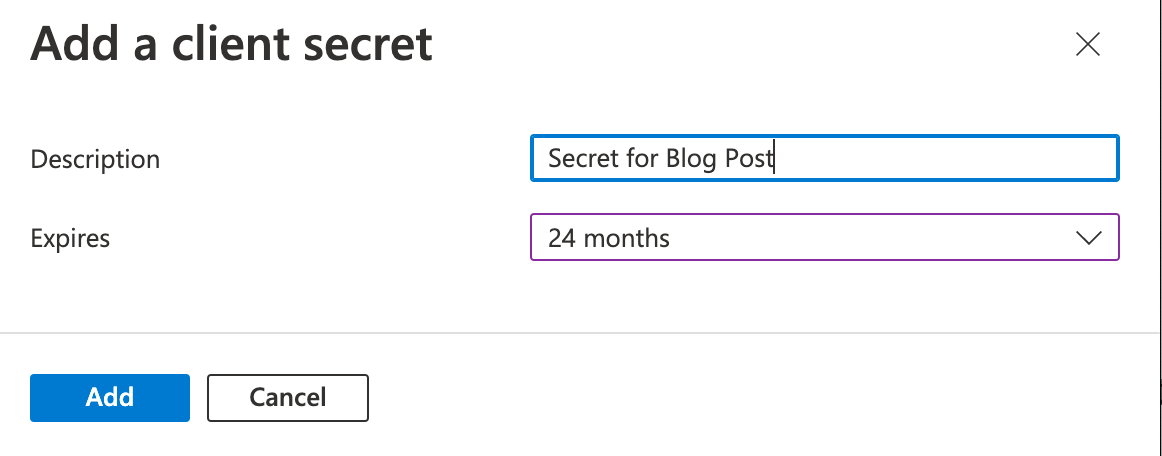
- Enter a name, select an expiration period and then click 'Add'
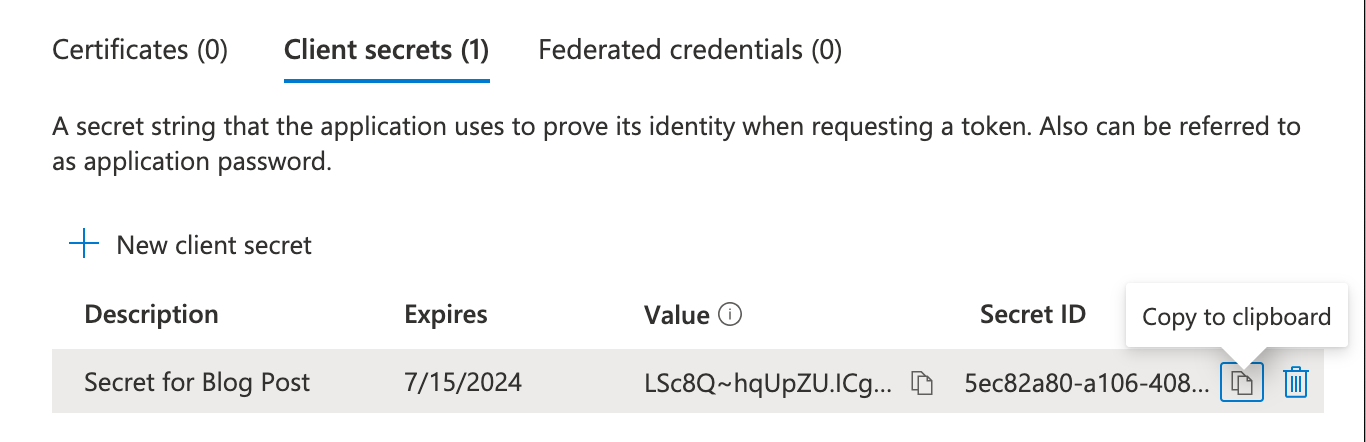
- ✏️ Note of the Secret
Value(not the Secret ID) - 📅 Note the
Expiresdate; you will need to create a new credential before this one expires - The final step is to Grant Admin consent for the App registration to access the 'Directory.Read.All' permission on behalf of the Tenant. Click the 'API permissions' menu option, then click 'Grant admin consent for XXXX' where 'XXXX' is your tenant name
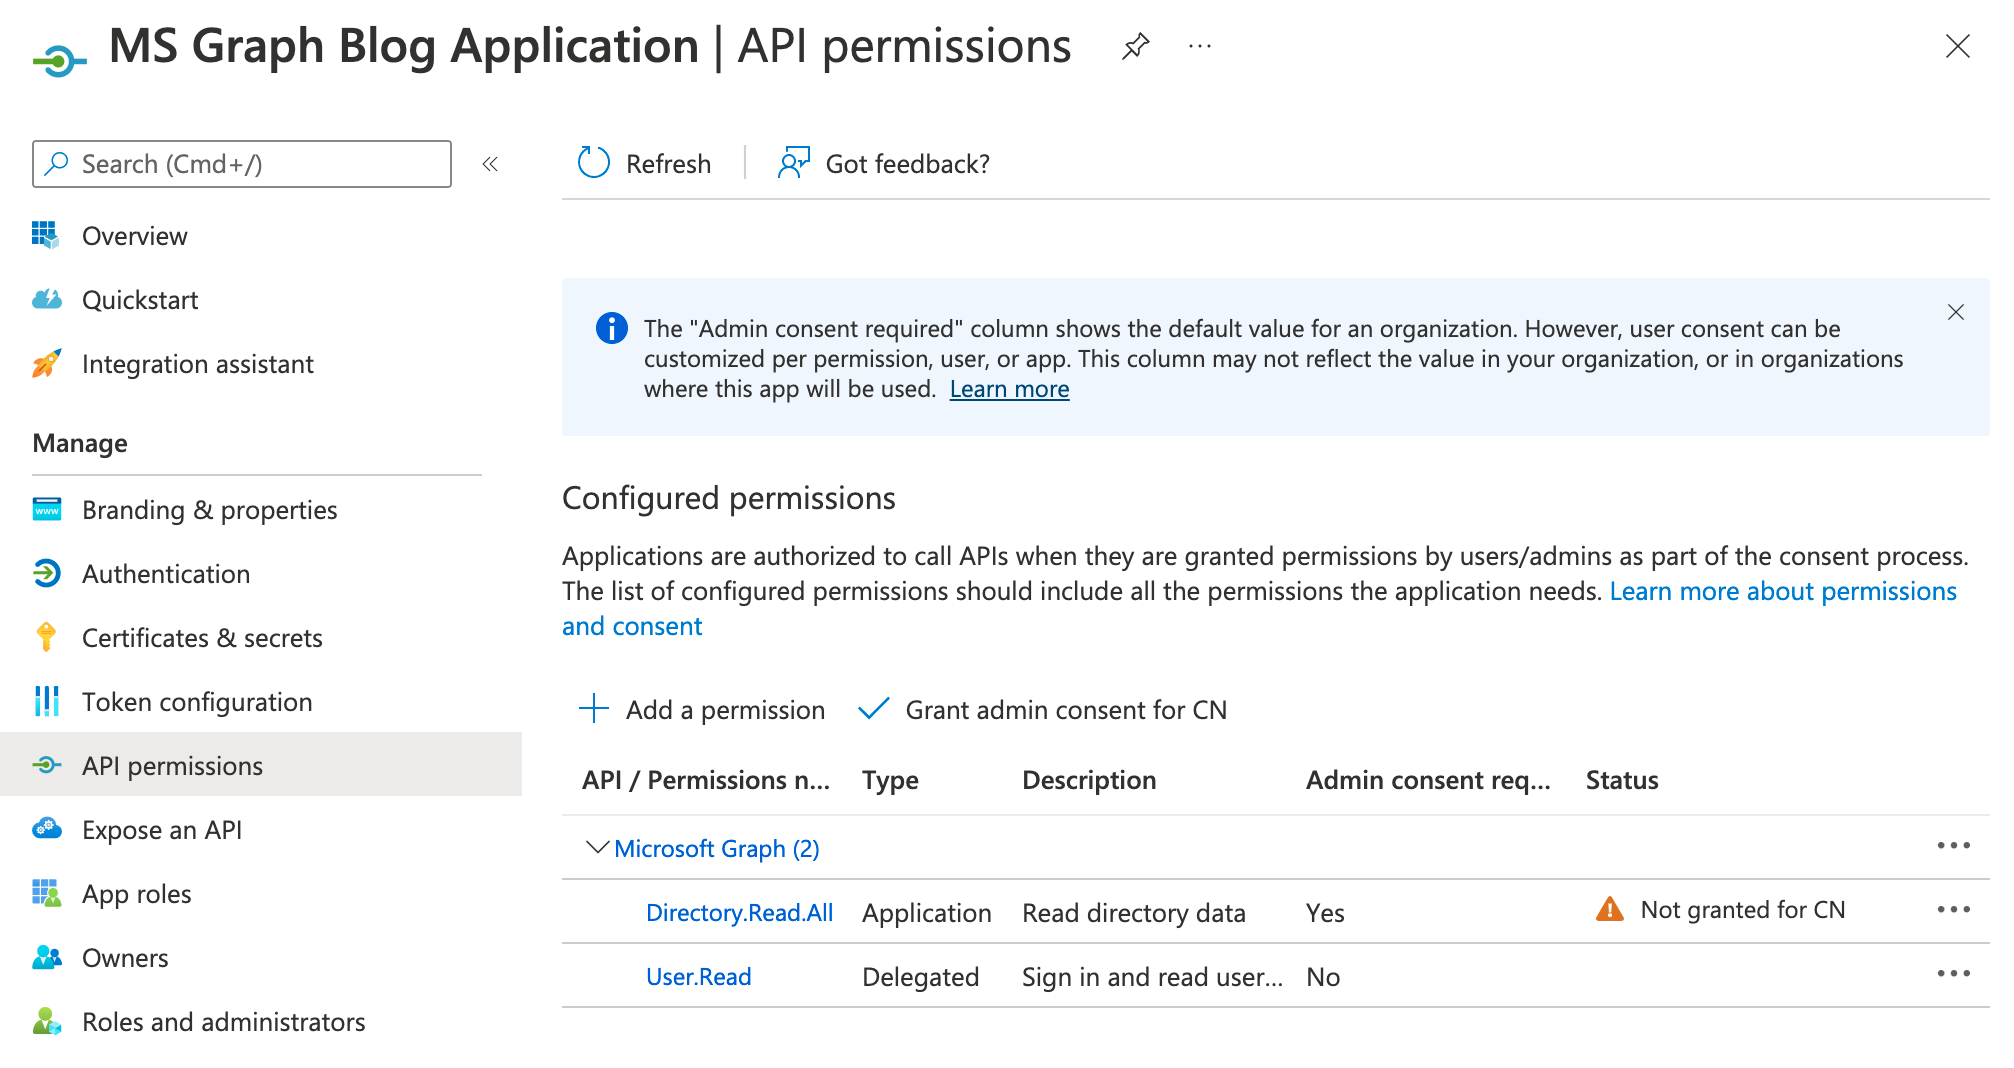
- You should now see a green check next to the permission
Top Tip: Use the MS Graph List Applications API to get the expiration dates for client secrets. Combine this with an APEX Automation and send an email ten days before secrets expire.
Securing AD App registrations
At this point, we should recognize that the App registration we just created can list all users in the entire organization. This may be OK for users, but having an App registration with credentials that allow it to read (or write) anyone's email or calendar would not be good.
The good news is you can limit access to specific users (or groups) using Exchange online access policies. This document provides additional details. Note: You need a free Azure Portal Subscription before you can apply access policies.
Unfortunately, access policies only apply to the following MS Graph API Permissions:
- Mail.Read, Mail.ReadBasic, Mail.ReadBasic.All, Mail.ReadWrite, Mail.Send
- MailboxSettings.Read, MailboxSettings.ReadWrite
- Calendars.Read, Calendars.ReadWrite
- Contacts.Read, Contacts.ReadWrite
An access policy applies to all of the above permissions assigned to a given App registration. Unfortunately, they don't help with other services like Users, SharePoint and OneDrive.
Example Access Policy
This section will cover the basics of creating an access policy. Again, access policies only cover specific permissions (see list above), so this will not impact the users API that I am demoing in this post. They will come in handy when we get to the calendar and email integrations. The following steps assume you have an Azure Portal Subscription setup.
- Login To: https://admin.microsoft.com/AdminPortal/Home
- Start Powershell (click the highlighted icon in the navigation bar). Note: You will need to provision Azure storage to run Powershell. The cost is pennies per week

- Once the PowerShell session has started, run the following command:
connect-exopssession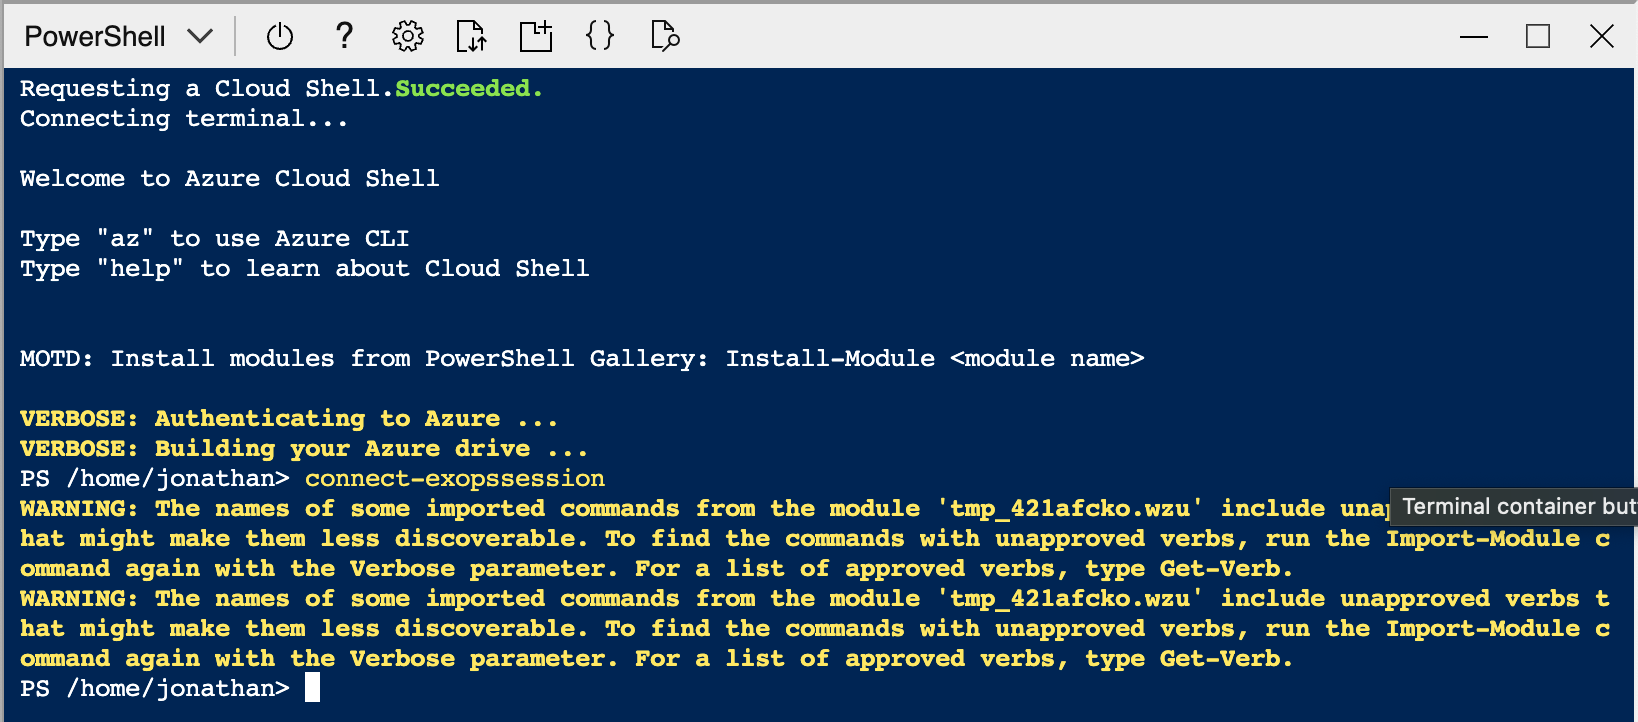
- Run the following command to verify you have access to Create Policies:
Get-ManagementRole -Cmdlet New-ApplicationAccessPolicy
- You should see the following:
PS /home/jonathan> Get-ManagementRole -Cmdlet New-ApplicationAccessPolicy
Name                       RoleType
----                       --------
Organization Configuration OrganizationConfiguration
- Run the command to create the policy:
New-ApplicationAccessPolicy -AccessRight RestrictAccess -AppId "e5920b6c-r43f-4314-5dc5-a9d4182d3435" -PolicyScopeGroupId jon.dixon@cloudnueva.com -Description "Restrict access to jon.dixon"
- The value for
AppIdis theApplication (client) IDon the 'App registration' - The value for
PolicyScopeGroupIdis the useridor theuserPrincipalNameof the user you want to restrict access to - In the above example, I am limiting the App registration
e5920b6c-r43f-4314-5dc5-a9d4182d3435to only be able to access email or calendars forjon.dixon@cloudnueva.com - See here for additional parameters available for
New-ApplicationAccessPolicy
You should see something like this when you run the New-ApplicationAccessPolicy command:
RunspaceId       : cae4b4e5-fea9-4b7e-b13f-f2bc500b450f
ScopeName        : Jonathan Dixon
ScopeIdentity    : jon.dixon
Identity         : 990876cd-77d9-4fab-8cd2-57020376ed11\e5920b6c-r43f-4314-5dc5-a9d4182d3435:S-1-5-21-4112488020-863137326-2000415224-44886207;fd205ba6-0a65-4c53-8b2b-e0a185ea624e
AppId            : e5920b6c-r43f-4314-5dc5-a9d4182d3435
ScopeIdentityRaw : S-1-5-21-4112488020-863137326-2000415224-44886207;fd205ba6-0a65-4c53-8b2b-e0a185ea624e
Description      : Restrict access to jon.dixon
AccessRight      : RestrictAccess
ShardType        : All
IsValid          : True
ObjectState      : Unchanged
- Finally, run the following command to check the policy was created OK:
Get-ApplicationAccessPolicy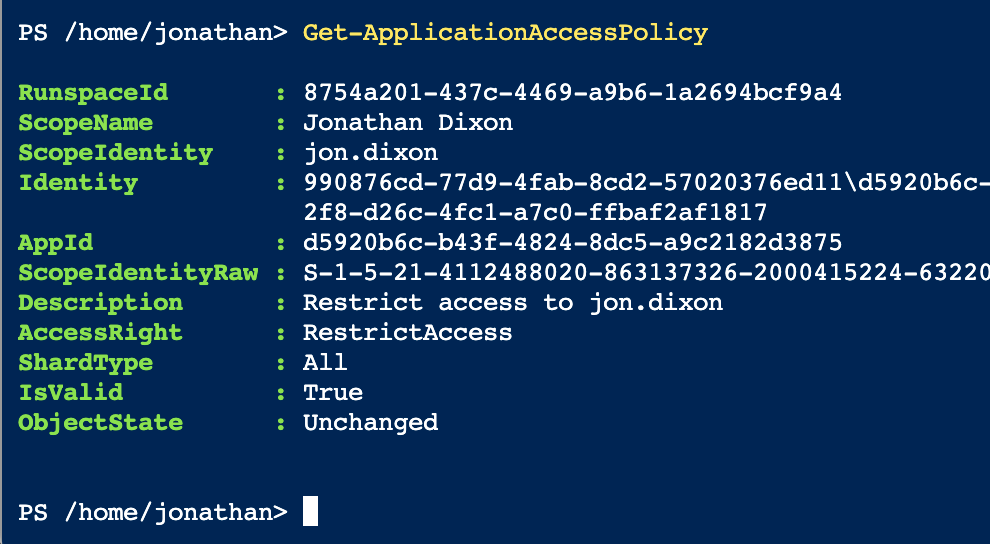
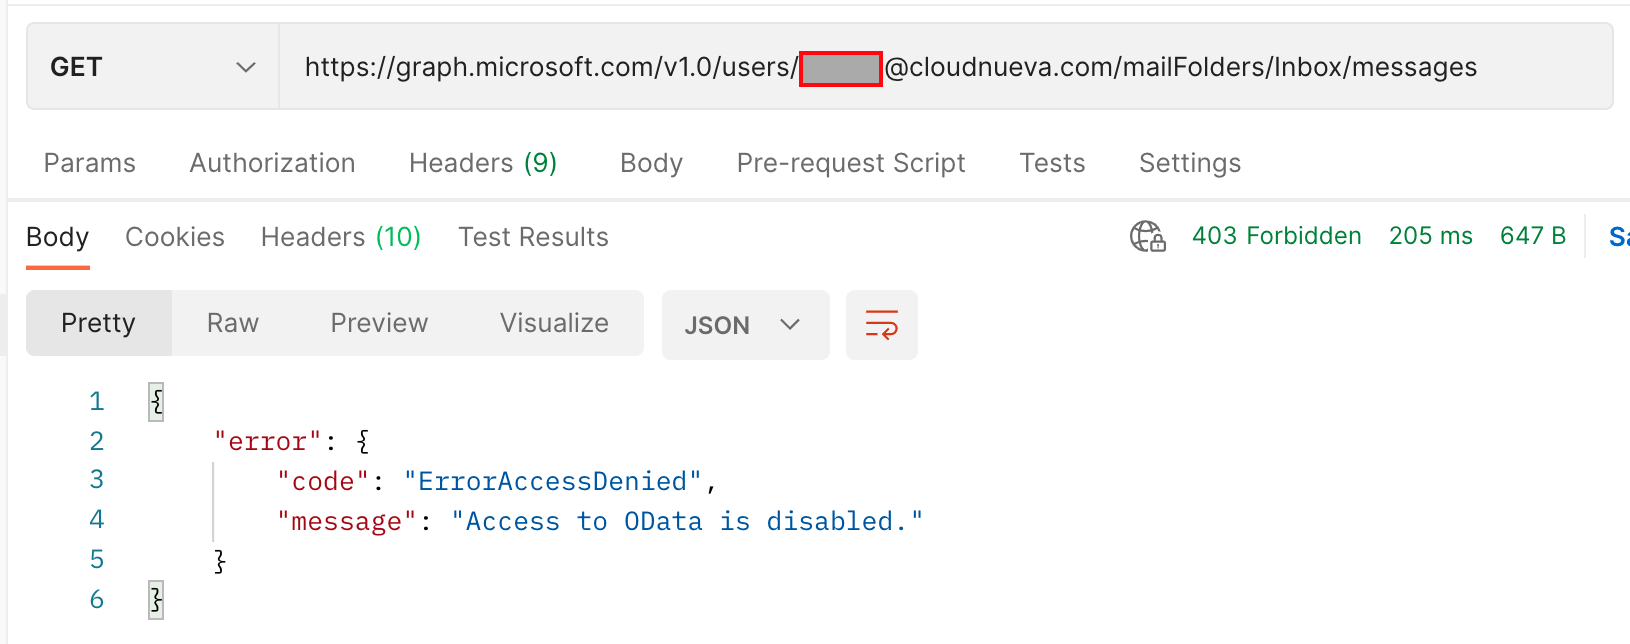
❗It can take up to an hour for the policy to take effect on the Graph APIs. Once the policy has taken effect (remember it could be an hour later), you will get the below error if you try and access a mailbox that does not conform to the policy:
Testing with Postman
Now that we have credentials that can access Office 365 users, we can test them using Postman (or a similar tool).
MS Graph API Access Token
The first thing we need to do is get an access token. We can use the access token to run the MS Graph APIs.
Setup a POST request just like the following screenshot:
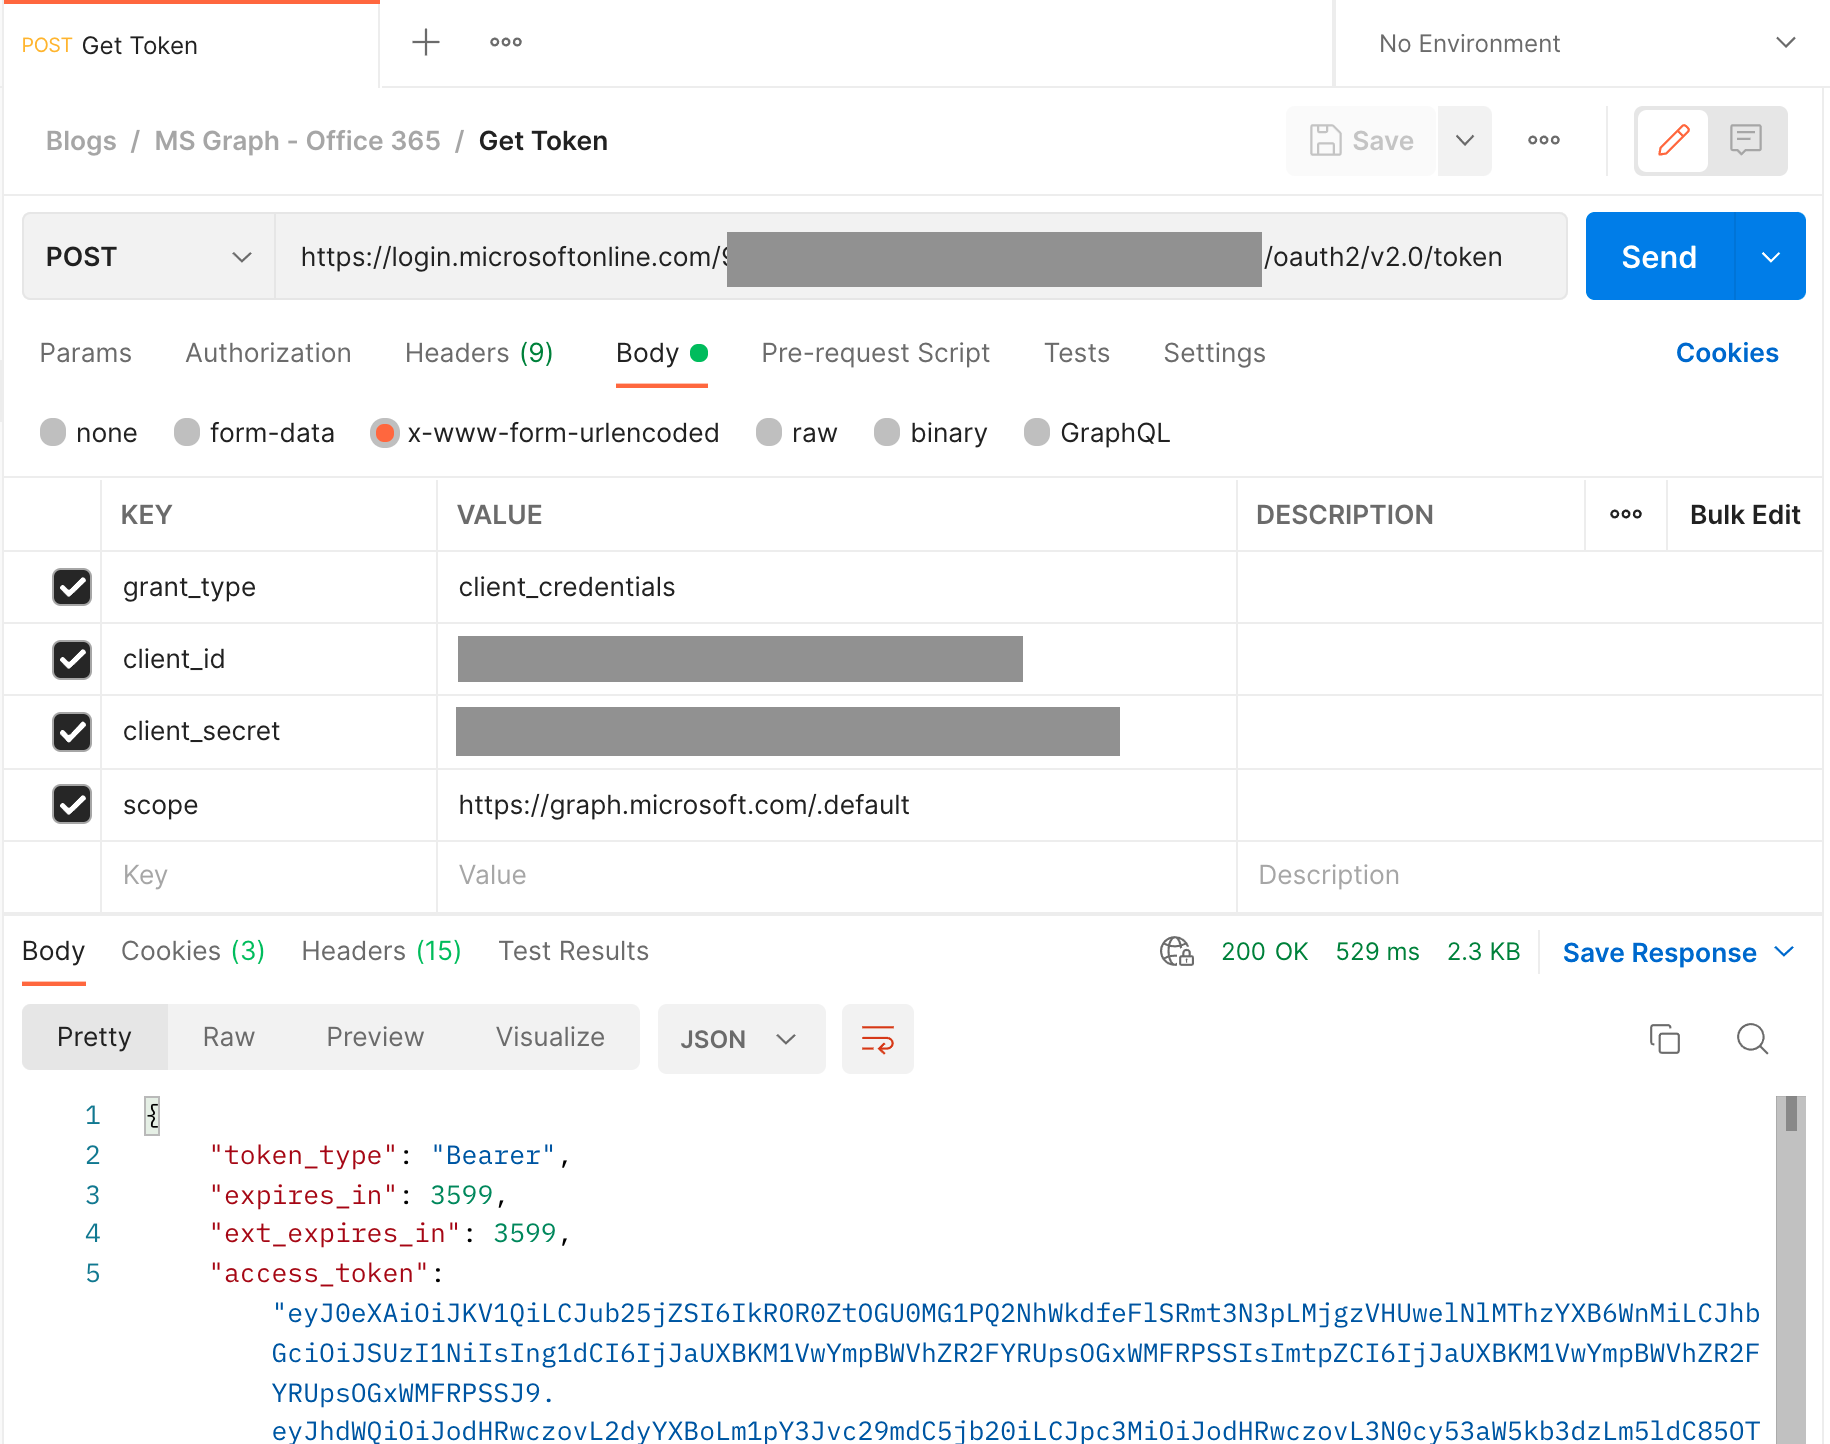
- Request Type:
POST - URL =
https://login.microsoftonline.com/<Directory (tenant) ID>/oauth2/v2.0/token, where<Directory (tenant) ID>is theDirectory (tenant) IDfrom the App registration - Body Type =
x-www-form-urlencoded - Body >
grant_type=client_credentials - Body >
client_id=Application (client) IDfrom the App registration - Body >
client_secret=Secret Valuefrom the App registration - Body >
scope=https://graph.microsoft.com/.default
You should get a 200 OK response when you call the API.
The access_token in the JSON response is a JSON Web Token (JWT). If interested, you can decode the JWT by going to https://jwt.ms/ and pasting the token value.
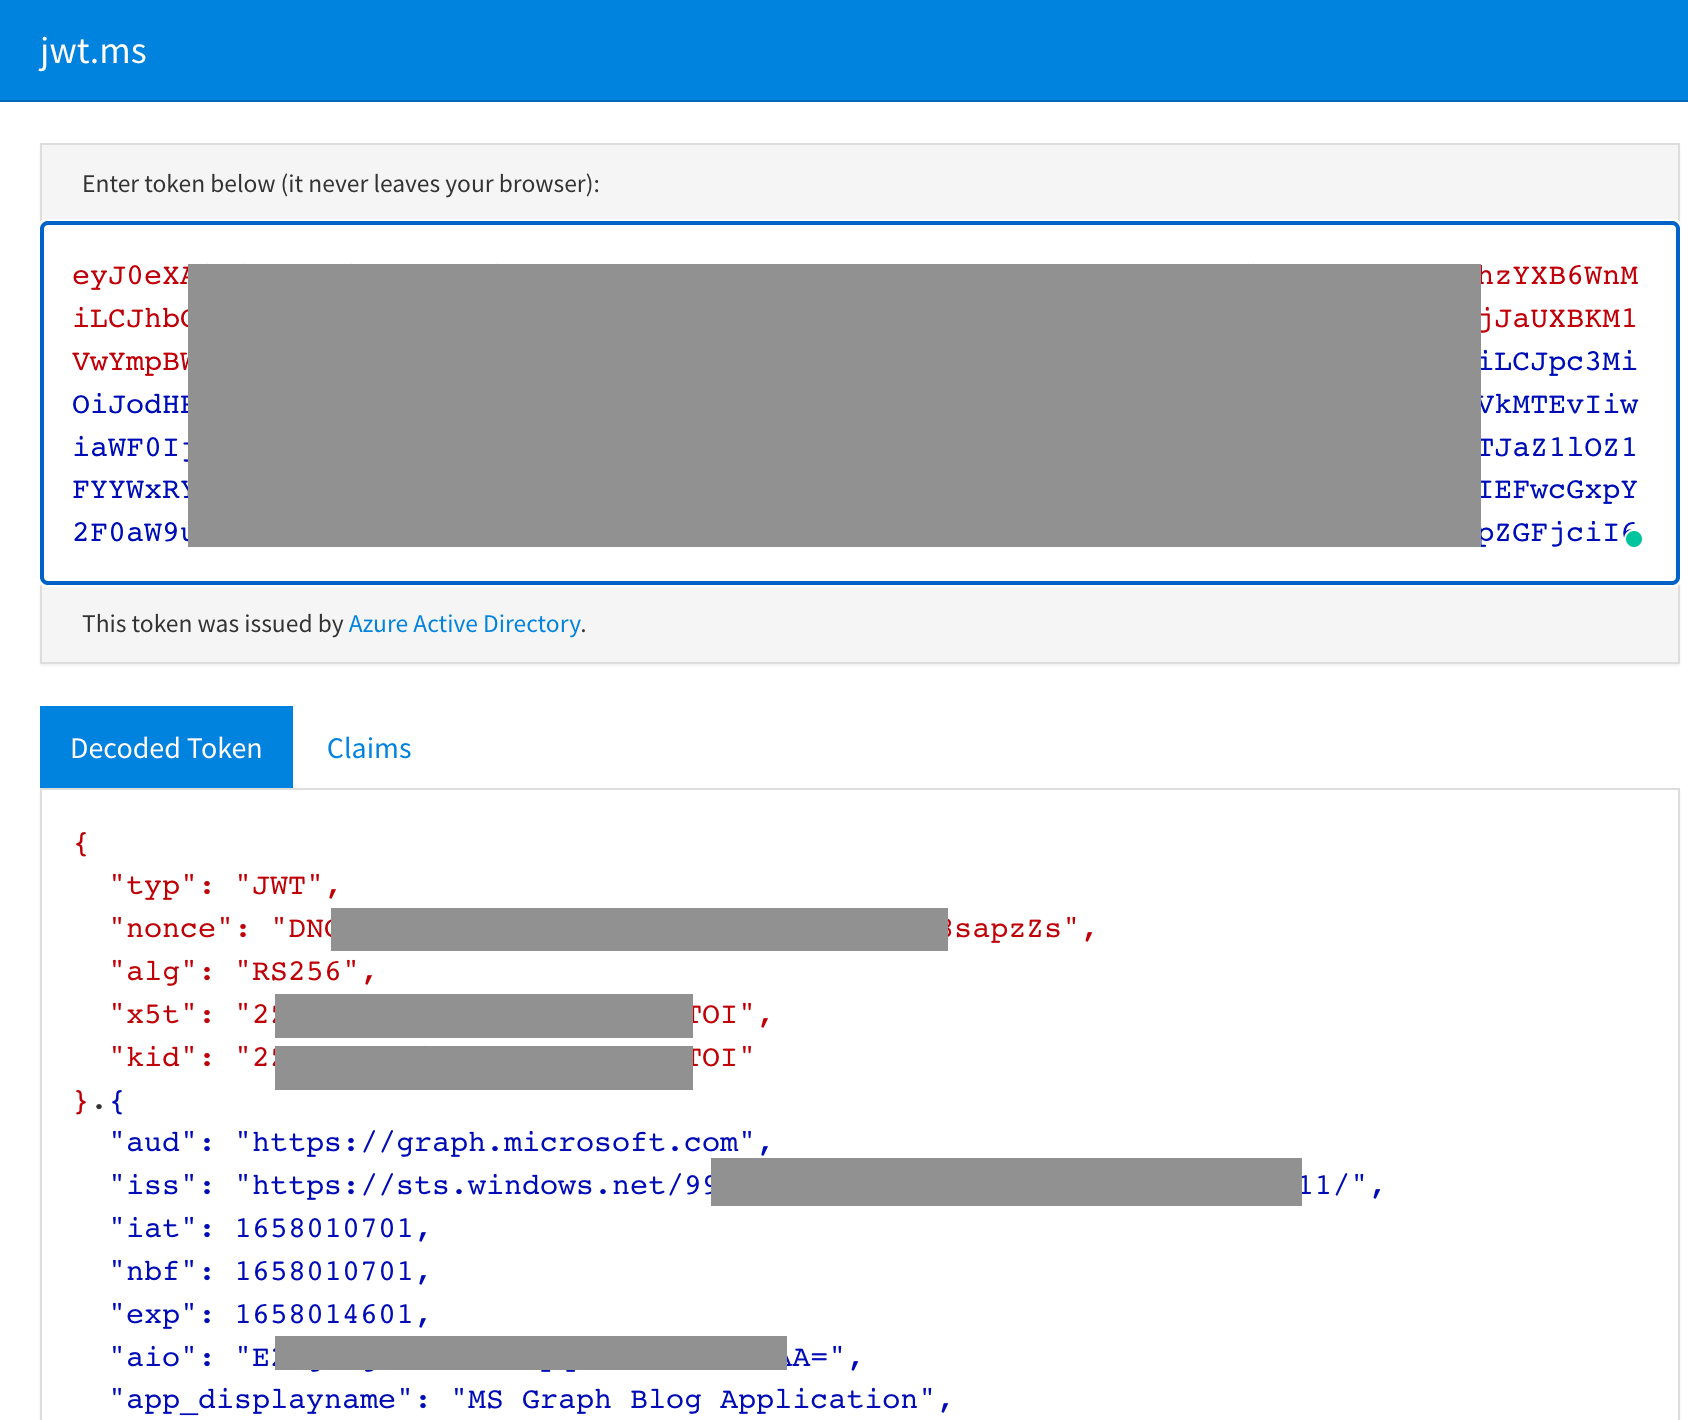 Note the
 app_displayname field and roles array in the below excerpt from the decoded JWT.
{
  "app_displayname": "MS Graph Blog Application",
  "roles": [
    "Directory.Read.All"
  ]
MS Graph Users API
Now that we have an access token with permissions to run the Users API, we can test it with Postman. Setup Postman as follows:
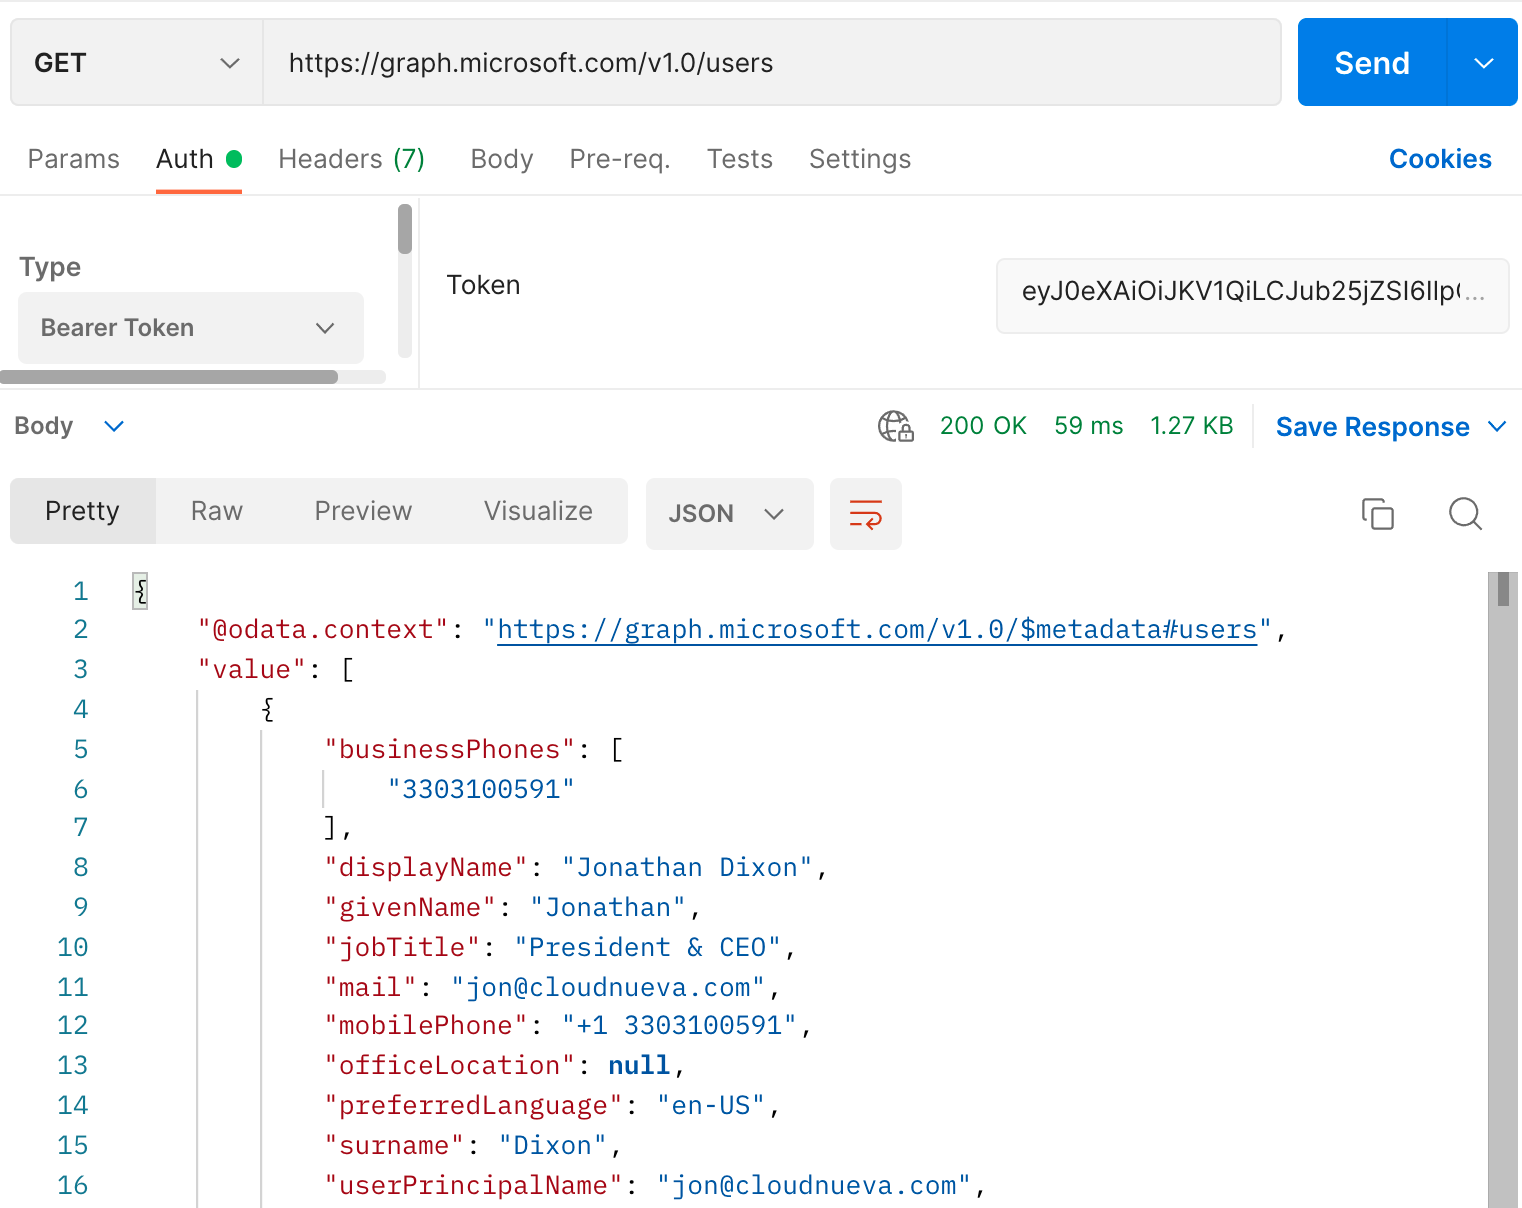
- Request Type:
GET - URL =
https://graph.microsoft.com/v1.0/users - Authorization Type:
Bearer - Token = The
access_tokenobtained from the token API above
Oracle APEX Web Credential
The final step in this post is to create APEX Web Credentials, which we can use to Authenticate from APEX.
Create the APEX Web Credential
- Login to APEX Builder
- 🧭 Application Builder > Workspace Utilities > Web Credentials > Click 'Create'
- Enter the details below:
- Authentication Type =
OAuth2 Client Credentials - OAuth Scope =
https://graph.microsoft.com/.default - Client ID or Username =
Application (client) IDfrom the App registration - Client Secret or Password & Verify Client Secret or Password = Secret
Valuefrom the App registration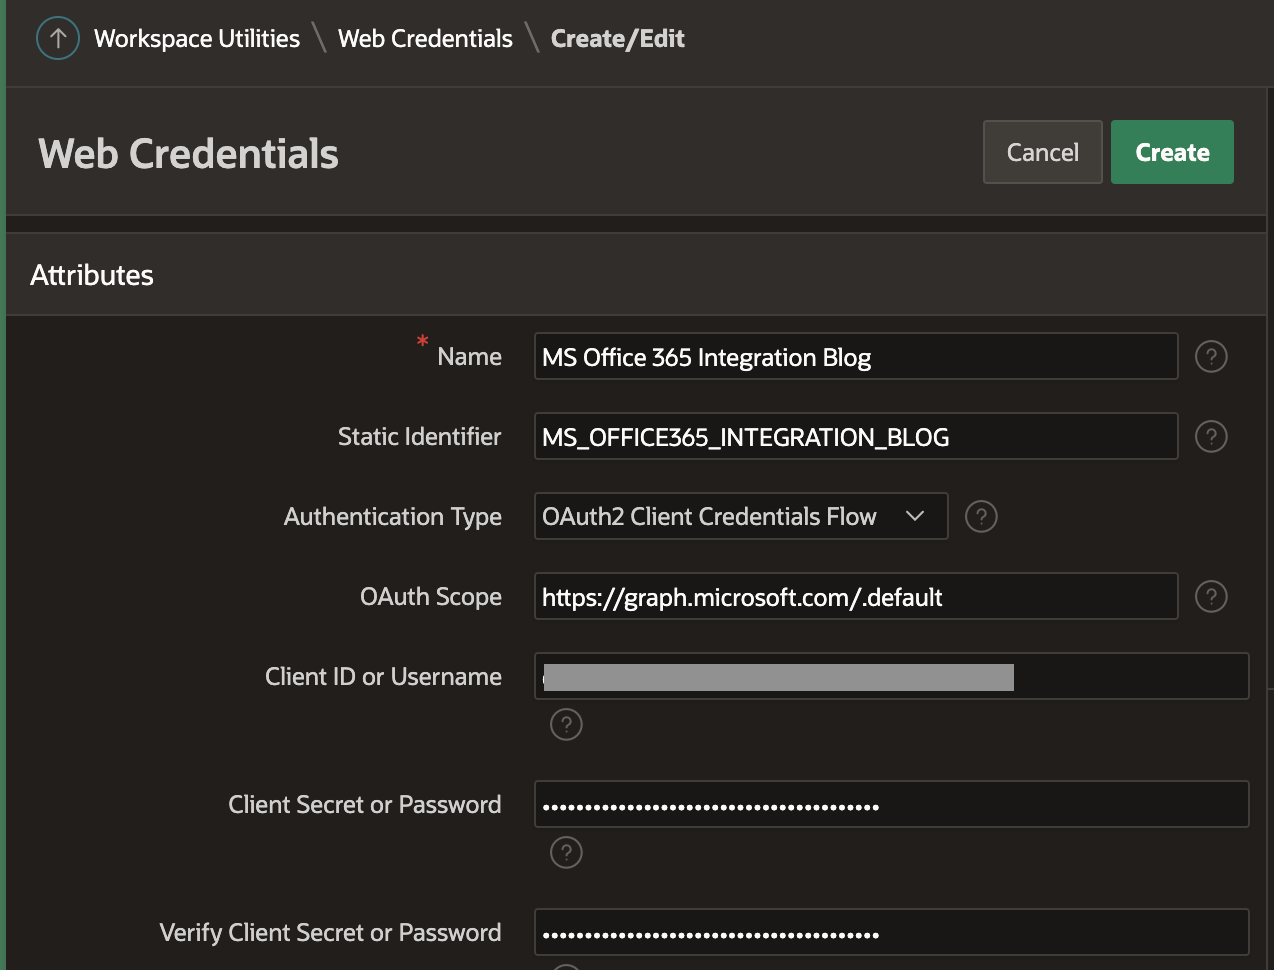
- Authentication Type =
- Click 'Create'
Test the APEX Web Credential
Let's test we can access the users API by creating a REST Data Source.
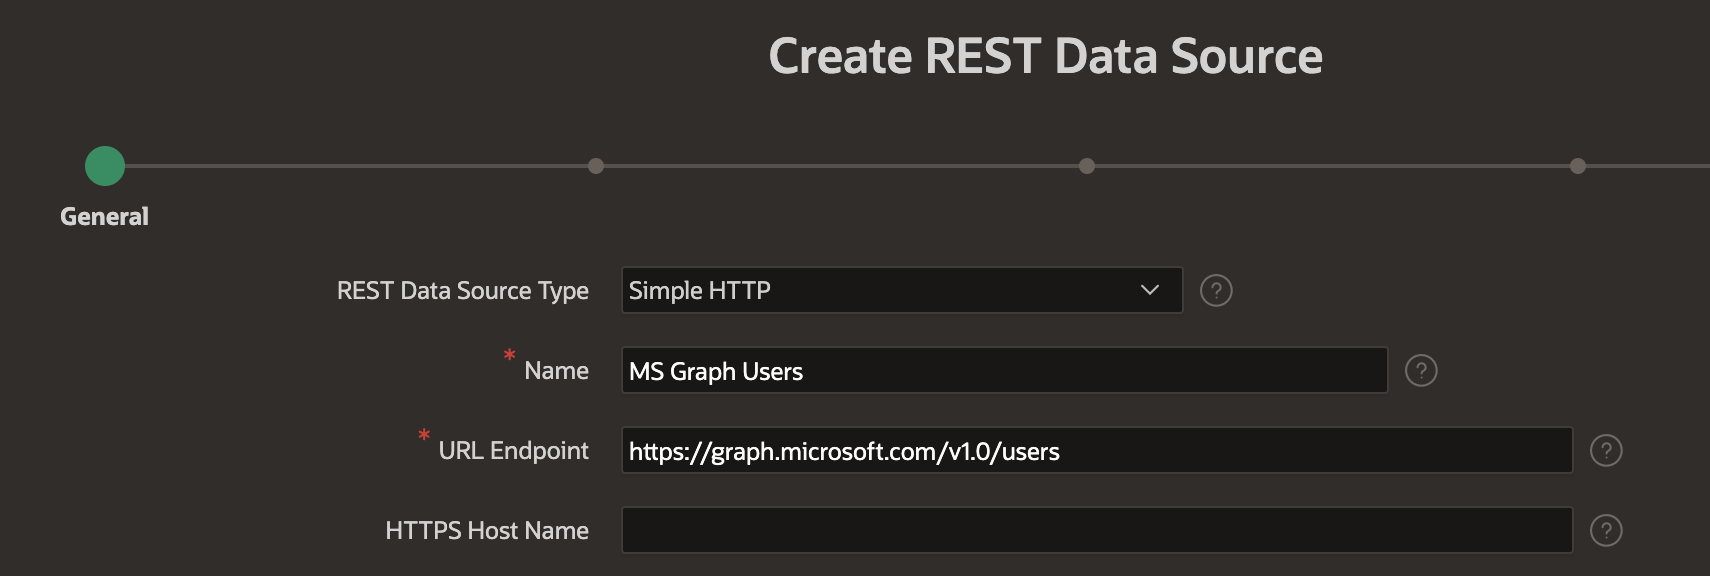
- Login to APEX Builder
- 🧭 Application Builder > Application > Shared Components > REST Data Source
- Click 'Create' > Select 'From scratch' > Click 'Next'
- Enter the Name and URL Endpoint as shown in the below screenshot
- Click 'Next' twice without changing any values
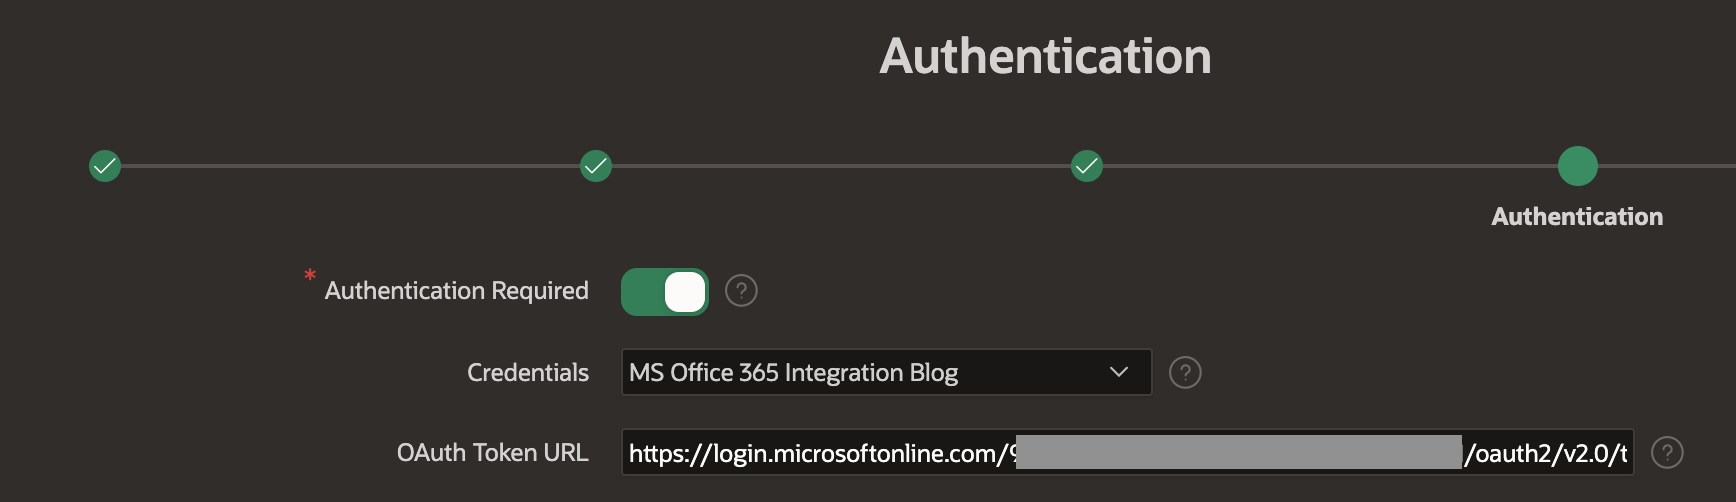
- Enter the authentication details as shown in the below screenshot. Note: The 'OAuth Token URL' is the same URL you used in the Postman Access Token request above
- Click 'Create REST Source Manually'
- Note: Unfortunately, if you click 'Discover' at this point, you will get an Authentication error, so you have to complete the setup manually
- Edit the newly created REST Source, then click the 'Edit Data Profile' button
- We are testing our configuration, so we will only configure three columns. Change the three default columns as follows. Note that 'Row Selector' must be changed to
value. When complete, click 'Apply Changes'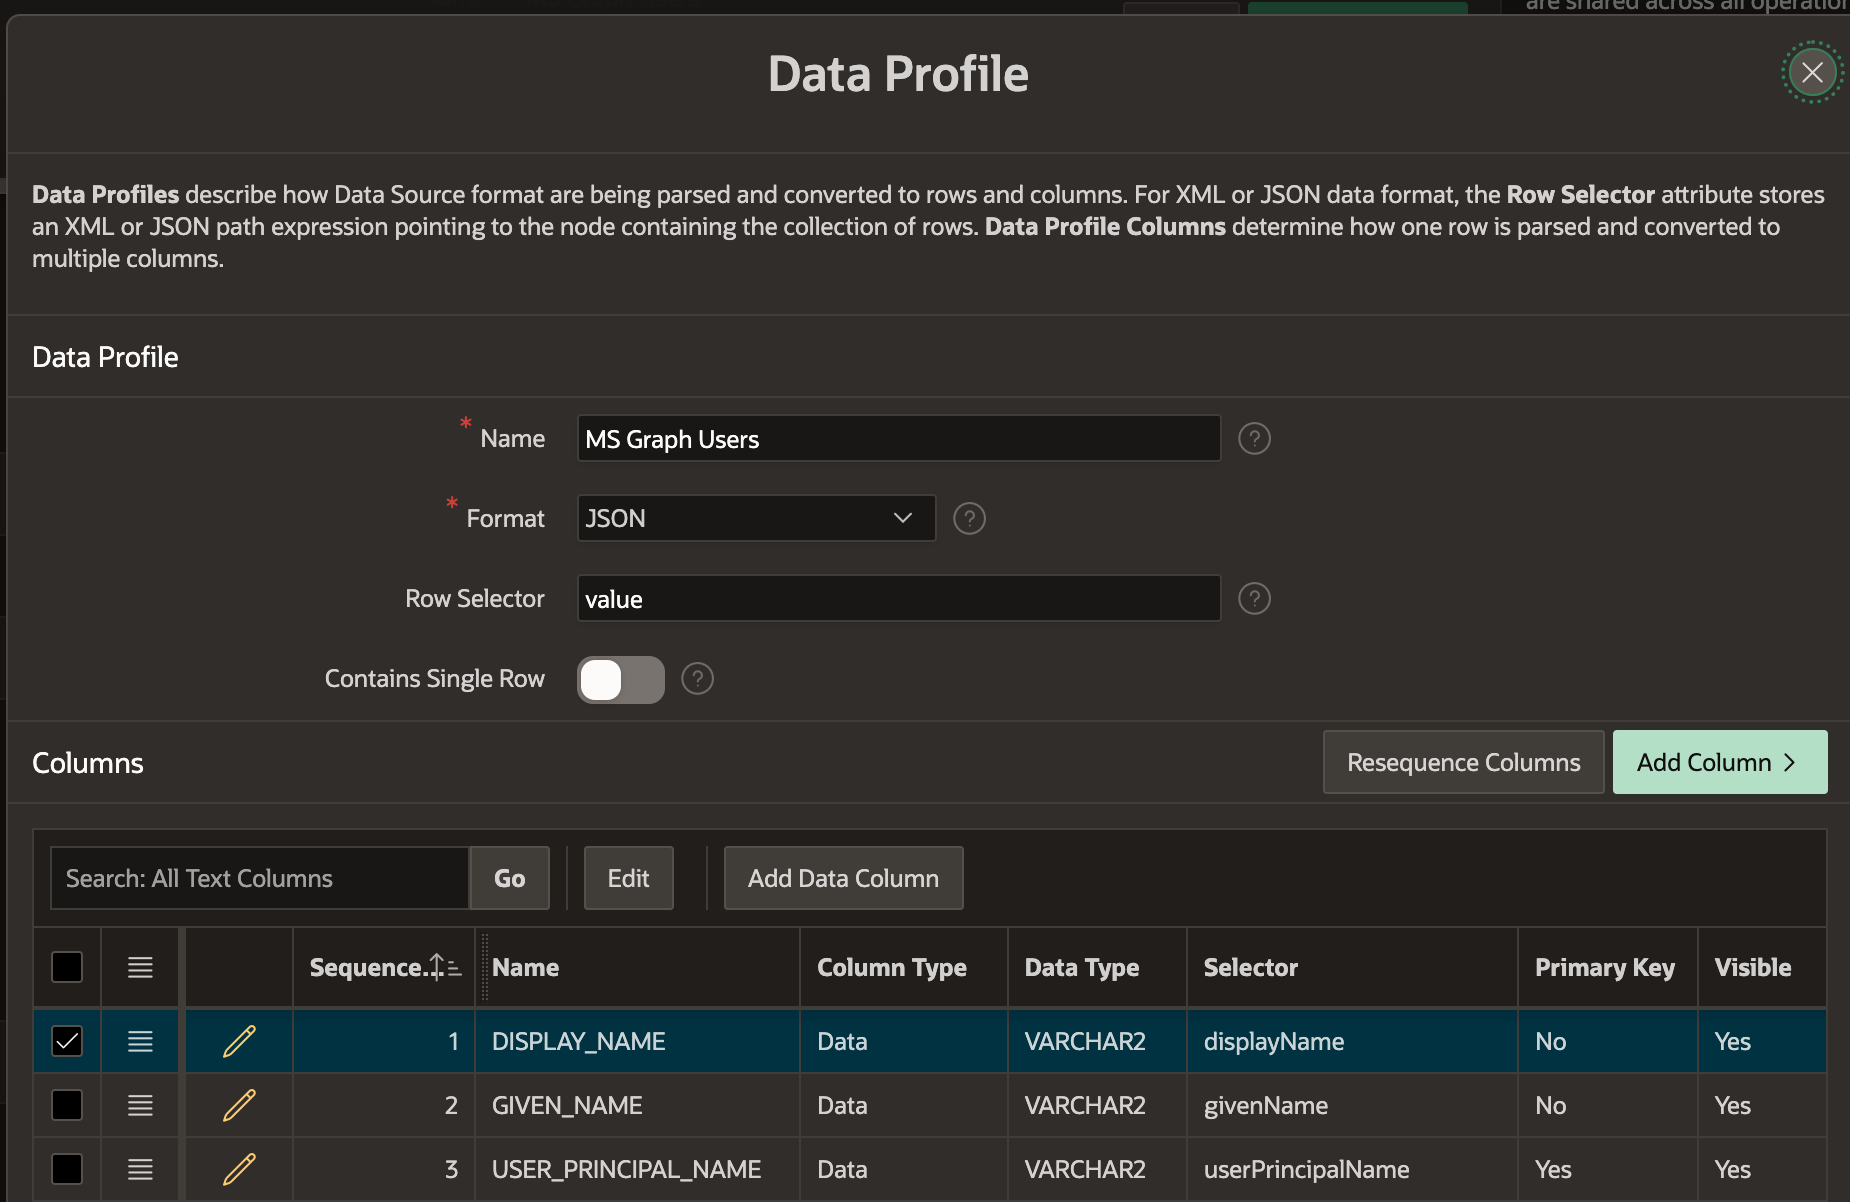
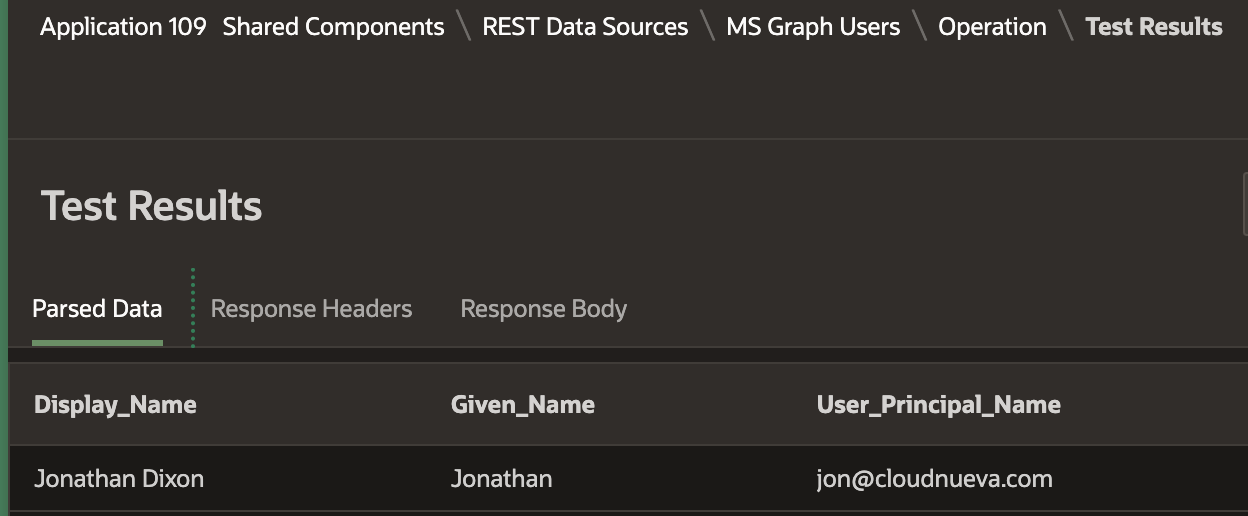
- Click the Play icon in the 'Test Operation' column
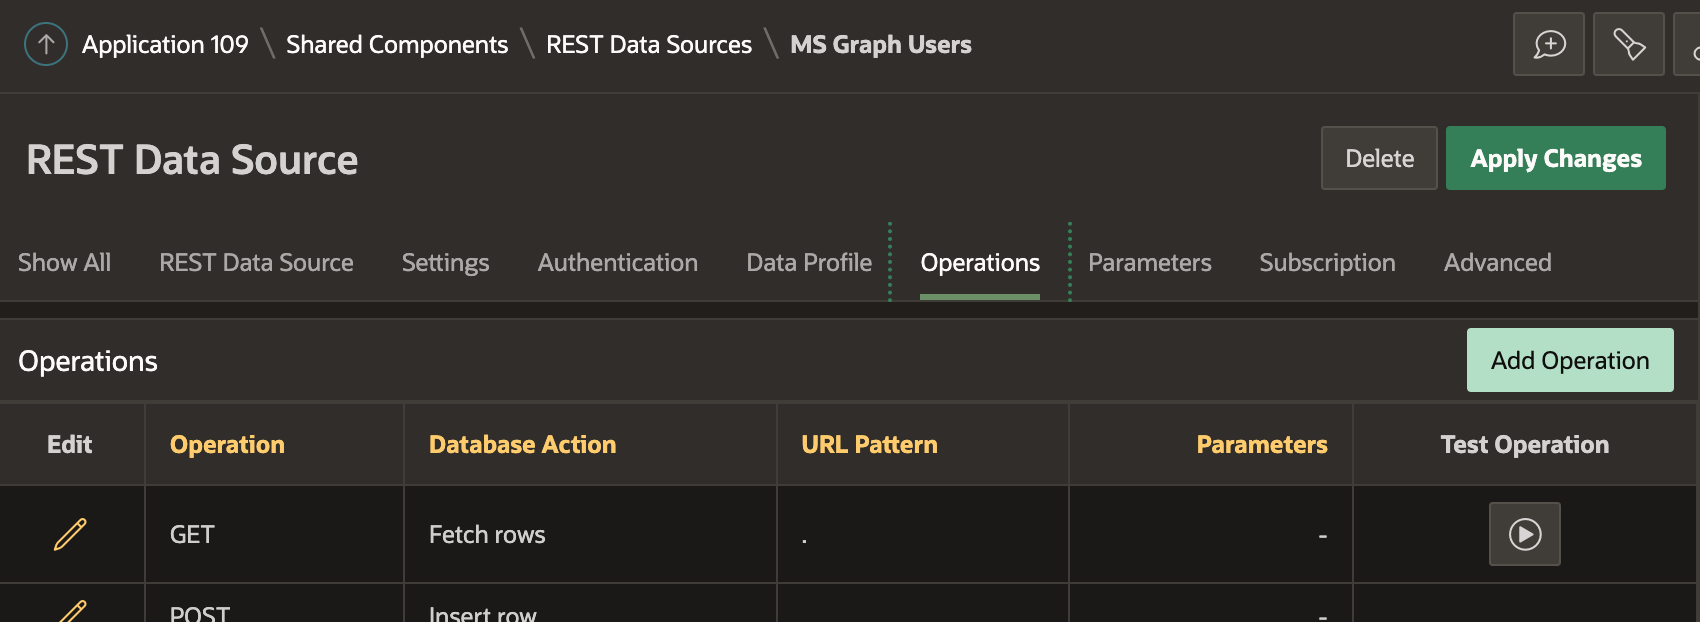
- You should see something like the following if everything is working:
Conclusion
We have successfully configured an Active Directory App registration, an APEX Web Credential, and run a test call to the Users MS Graph API. These are the fundamental steps to interacting with any Microsoft Office 365 service. I promise the remaining posts in this series will be much more fun!