Introduction
The Oracle Cloud Infrastructure (OCI) Vision Service brings AI capabilities in the form of image classification, object detection, and Document AI. This post will focus on integrating Oracle APEX with OCI Document AI services.
Document AI provides the following capabilities; Optical Character Recognition, Document Classification, Key/Value extraction, Table extraction, Language classification, and Searchable pdf. The good news for APEX developers is that you can utilize OCI Document AI features by calling the Document AI AnalyzeDocument REST Web Service.
Use Case
In this post, I am going to focus on a demo APEX app to allow users to automatically categorize expense receipts and extract key values from each receipt. The demo app is available in this Github Repository. I suggest you download the code as it will help when following along. ❗The code in the demo app is not production ready.
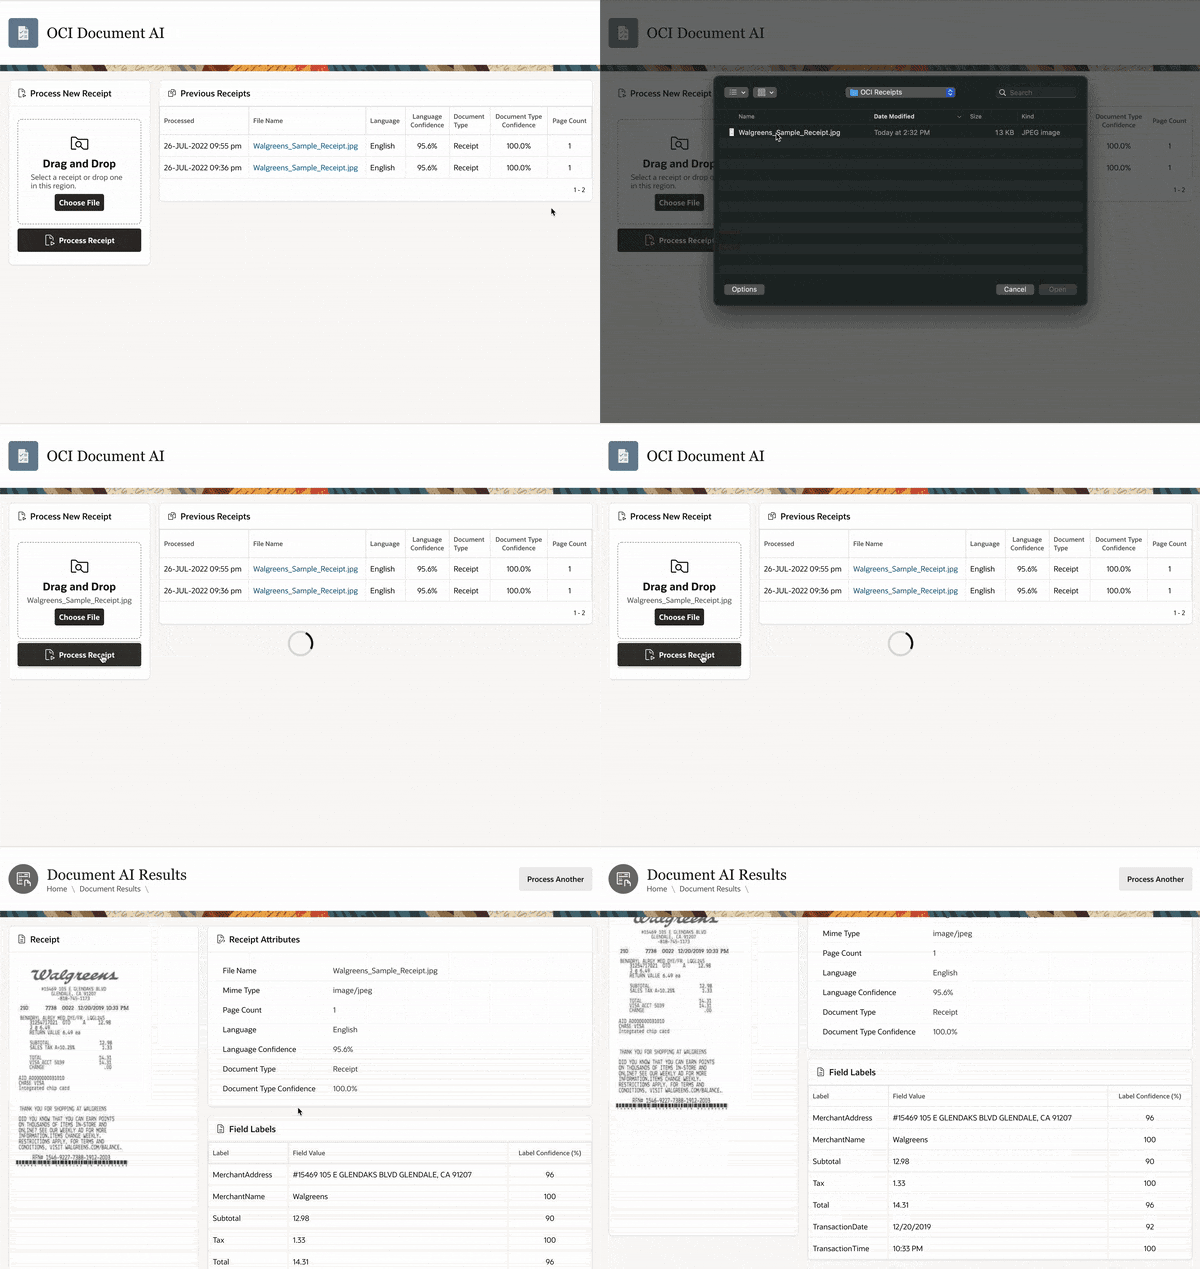
The flow for processing a receipt in the demo app is as follows:
- The user uploads a receipt from an APEX page
- APEX sends the receipt to OCI Object Storage
- APEX calls the Document AI REST Service, referencing the receipt uploaded to Object Storage
- OCI Document AI analyzes the receipt and returns key fields in a JSON response
- APEX parses the response and creates DB records with metadata about the document
- APEX displays the document along with the captured document metadata
Here is a quick video showing what the app looks like in action:

OCI Configurations
We need to complete the following OCI configurations from the OCI console before we can start calling the Document AI REST Service:
- Create an OCI User Account
- Create API Keys for the User Account
- Create a Security Group and Add the User Account to the Security Group
- Create a Security Policy to allow the Security Group access to Object Store and Vision Services
- Create Object Store Bucket to write documents that we want to analyze
Please refer to my blog Secure APEX Access to OCI Object Storage, which describes how to complete the above steps. For step 4 (Create Security Policy), use the below Policy Statement instead of the one mentioned in the Blog Post.
Allow group APEX_DOCUMENT_AI_BLOG to read buckets in compartment APEX_OCI_BLOG
Allow group APEX_DOCUMENT_AI_BLOG to manage objects in compartment APEX_OCI_BLOG where all {target.bucket.name='APEX_OCI_BLOG_FILES', any {request.permission='OBJECT_CREATE', request.permission='OBJECT_INSPECT', request.permission='OBJECT_READ',request.permission='OBJECT_OVERWRITE'}}
allow group APEX_DOCUMENT_AI_BLOG to manage ai-service-vision-family in compartment APEX_OCI_BLOG
Note the last policy, which allows members of the security group APEX_DOCUMENT_AI_BLOG to manage ai-service-vision-family in the APEX_OCI_BLOG compartment.
- APEX_OCI_BLOG is the name of the OCI Compartment I created
- APEX_DOCUMENT_AI_BLOG is the name of the OCI Security Group I created
- APEX_OCI_BLOG_FILES is the name of the OCI Object Store Bucket I created
OCI Document AI AnalyzeDocument REST Service
In this section, we will learn more about the OCI Document AI Service and how to utilize it via the AnalyzeDocument REST service. The documentation for the AnalyzeDocument REST Service can be found here.
Postman Configuration
The best way to become familiar with the AnalyzeDocument REST service is to try it out using Postman. This A-Team Blog Post provides details on how to configure Postman to call any OCI REST API from Postman. These steps include importing a Postman Environment and two Postman collections.
Postman Environment
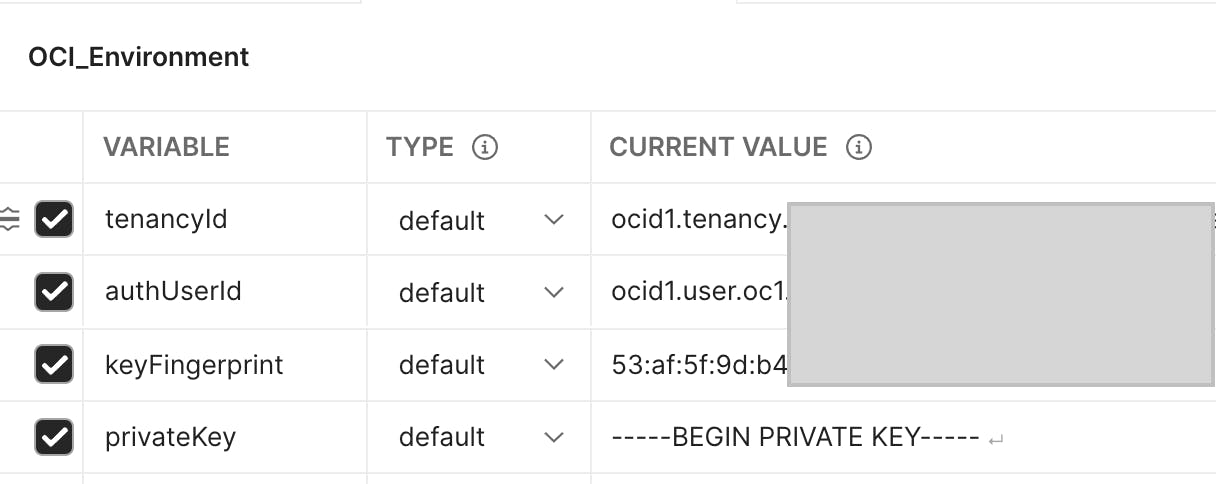
You will need to configure four Postman Environment variables per the screenshot below. The values for these variables come from the OCI setup steps outlined in the blog post 'Secure APEX Access to OCI Object Storage' mentioned above.

Postman Example
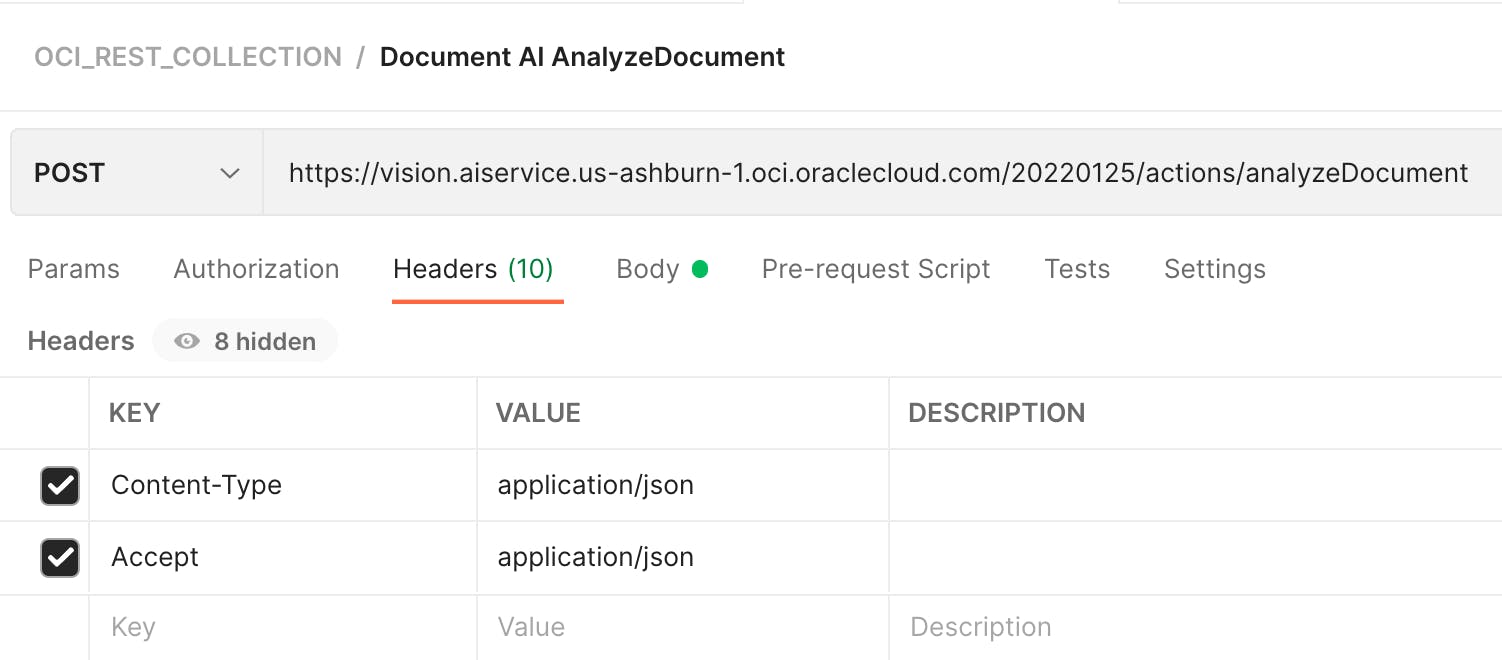
Once you have completed the steps from A-Team Blog Post, you can create a request to call the AnalyzeDocument REST Service as follows:


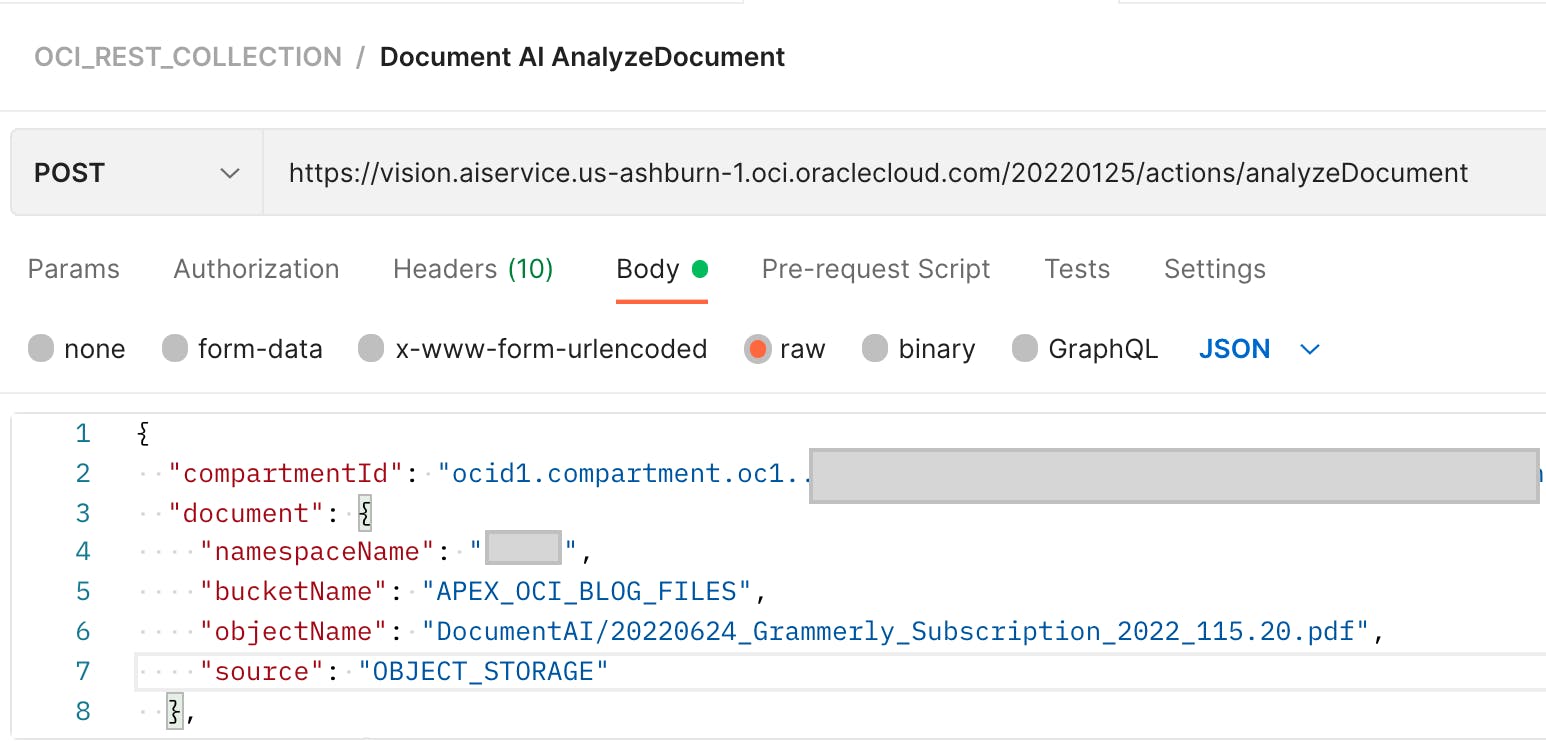
JSON Payload
You must pass a JSON payload in the request body, which contains options for the AnalyzeDocument REST Service. The definition for this JSON payload can be found here. The JSON sample below was used in the above Postman example.
{
  "compartmentId": "XXXX",
  "document": {
    "namespaceName": "YYYY",
    "bucketName": "APEX_OCI_BLOG_FILES",
    "objectName": "DocumentAI/Walgreens_Sample_Receipt.jpg",
    "source": "OBJECT_STORAGE"
  },
  "features": [
    {
      "featureType": "TEXT_DETECTION"
    },
    {
      "featureType": "DOCUMENT_CLASSIFICATION",
      "maxResults": 5
    },
    {
      "featureType": "LANGUAGE_CLASSIFICATION",
      "maxResults": 5
    },
    {
      "featureType": "KEY_VALUE_DETECTION"
    },
    {
      "featureType": "TABLE_DETECTION"
    }
  ]
}
In the above JSON, the document object specifies that we want OCI to analyze the document DocumentAI/Walgreens_Sample_Receipt.jpg from the APEX_OCI_BLOG_FILES OCI Object Store Bucket, which exists in the XXXX compartment which is part of the YYYY namespace. The features array allows us to specify which types of analysis we want Document AI to perform on the document, e.g., TEXT_DETECTION, DOCUMENT_CLASSIFICATION, etc.
The following features are supported; see here for additional details.
- LANGUAGE_CLASSIFICATION: Detect the language.
- TEXT_DETECTION: Recognize text.
- TABLE_DETECTION: Detect and extract data in tables.
- KEY_VALUE_DETECTION: Extract form fields.
- DOCUMENT_CLASSIFICATION: Identify the type of document.
It is also possible to pass a Base64 encoded representation of the file to be analyzed instead of referencing the file in an object store bucket. See the DocumentDetails Reference for details.
Regional Endpoints
There are different Document AI endpoints for each OCI region. In my examples, I will use the Ashburn endpoint, https://vision.aiservice.us-ashburn-1.oci.oraclecloud.com. See this link for a complete list.
Service Limits
The following document file types are supported: JPG, PNG, PDF, and TIFF. See this link for details on other limits.
Service Pricing
The first 1,000 requests per month seem to be free. See this link for details on pricing.
JSON Response
The REST Service returns a JSON document in the AnalyzeDocumentResult format. You can download the complete response from the example above by clicking this link.
Analyzing Key Values in the Response
The documentFields array in the JSON response contains a list of fields that Document AI found in the analyzed document. Here is an excerpt showing one field:
    "documentFields" : [ {
      "fieldType" : "KEY_VALUE",
      "fieldLabel" : {
        "name" : "MerchantName",
        "confidence" : 0.9999986
      },
      "fieldName" : null,
      "fieldValue" : {
        "valueType" : "STRING",
        "text" : null,
        "confidence" : null,
        "wordIndexes" : [ 0 ],
        "value" : "Walgreens"
      }
For the above example, Document AI found a field that it is 99.99986% sure is the MerchantName, and the field value is Walgreens. The fact that Document AI identified a label MerchantName means we can search for this label in the JSON and pull it out. This is the same for other receipt fields, e.g., MerchantAddress, TransactionDate, and Total.
Calling the AnalyzeDocumentResult Service from APEX
In this section, I will outline the key pieces of code (from the demo app) that allow us to post a file to OCI Object Storage, call the OCI Document AI REST Service and parse the JSON response. Note: I have simplified the code in the snippets below to make it easier to read; see the demo app for the complete code.
APEX Web Credential
We must create an APEX Web Credential to authenticate our requests to the OCI Object Store and OCI Document AI REST Services.
APEX Web Credentials hide the complexity inherent in securely accessing OCI REST Web Services.
Refer to my post Secure APEX Access to OCI Object Storage for details on how to set up an APEX Web Credential to access OCI REST Services. In the following sections, I refer to an APEX Web Credential I created called APEX_OCI_BLOG_CREDENTIAL.
Post File to Object Storage
The first step in the process I outlined in the use case at the start of this blog is to post the file to OCI Object Storage. The below procedure calls the OCI Object Storage Service and posts the provided BLOB to the DocumentAI folder in the APEX_OCI_BLOG_FILES Bucket. XXXX should be replaced with the OCI Namespace the Bucket exists in.
PROCEDURE put_file
 (p_mime_type         IN VARCHAR2,
  p_file_blob         IN BLOB,
  p_file_name         IN VARCHAR2) IS

  l_response          CLOB;
  l_object_store_url  VARCHAR2(1000);

BEGIN
  -- Build the full URL to the document.
  l_object_store_url := 'https://objectstorage.us-ashburn-1.oraclecloud.com/n/XXXX/b/APEX_OCI_BLOG_FILES/o/DocumentAI/' || p_file_name;

  -- Set Mime Type in Request Header.
  apex_web_service.g_request_headers.DELETE;
  apex_web_service.g_request_headers(1).name  := 'Content-Type';
  apex_web_service.g_request_headers(1).value := p_mime_type;

  -- Call Web Service to PUT file in OCI.
  l_response := apex_web_service.make_rest_request
   (p_url                  => UTL_URL.ESCAPE(l_object_store_url),
    p_http_method          => 'PUT',
    p_body_blob            => p_file_blob,
    p_credential_static_id => GC_WC_CREDENTIAL_ID);

  IF apex_web_service.g_status_code != 200 then
    raise_application_error(-20111,'Unable to Upload File.');
  END IF;
END put_file;
Call Document AI and Parse the Response
Now that the file is in Object Storage, we can call the AnalyzeDocument REST Service (referencing the file in object store) and parse the JSON response so we can use it in PL/SQL.
PROCEDURE document_ai
  (p_file_name   IN VARCHAR2) IS

  CURSOR cr_document_data (cp_json IN CLOB) IS
    SELECT jt.*
    FROM   JSON_TABLE(cp_json, '$'
             COLUMNS (document_type_code      VARCHAR2(50)  PATH '$.detectedDocumentTypes[0].documentType',
                      document_type_score     NUMBER        PATH '$.detectedDocumentTypes[0].confidence',
                      language_code           VARCHAR2(50)  PATH '$.detectedLanguages[0].languageCode',
                      language_score          NUMBER        PATH '$.detectedLanguages[0].confidence',
                      page_count              NUMBER        PATH '$.documentMetadata.pageCount')) jt;

  CURSOR cr_document_fields (cp_json IN CLOB) IS
    SELECT jt.*
    FROM   JSON_TABLE(cp_json, '$.pages[*]'
             COLUMNS (page_number       NUMBER        PATH '$.pageNumber',
                      NESTED PATH '$.documentFields[*]' COLUMNS
                       (field_type_code VARCHAR2(50)   PATH '$.fieldType',
                        field_label     VARCHAR2(100)  PATH '$.fieldLabel.name',
                        label_score     NUMBER         PATH '$.fieldLabel.confidence',
                        field_value     VARCHAR2(1000) PATH '$.fieldValue.value'
                        ))) jt
    WHERE  jt.field_type_code = 'KEY_VALUE';

  l_request_json        VARCHAR2(32000);
  l_response_json     CLOB;
  l_doc_ai_url             VARCHAR2(1000);

BEGIN

  /* GC_OCY_DOC_AI_PAYLOAD is a global variable in the Package Spec,
    which contains the JSON Payload containing options for the analyzeDocument REST Service. */
  -- This line of code is substituting the tag #FILE_NAME# in GC_OCY_DOC_AI_PAYLOAD with the file name passed into the procedure.
  l_request_json := REPLACE(GC_OCY_DOC_AI_PAYLOAD, '#FILE_NAME#', p_file_name);

  -- Populate HTTP Header PL/SQL tables.
  apex_web_service.g_request_headers.DELETE;
  apex_web_service.g_request_headers(1).name  := 'Content-Type';
  apex_web_service.g_request_headers(1).value := 'application/json';

  -- Set the URL for the Document AI analyzeDocument REST Web Service.
  l_doc_ai_url := 'https://vision.aiservice.us-ashburn-1.oci.oraclecloud.com/20220125/actions/analyzeDocument';

  -- Call the Document AI analyzeDocument REST Web Service.
  l_response_json := apex_web_service.make_rest_request
   (p_url                  => l_doc_ai_url,
    p_http_method          => 'POST',
    p_body                 => l_request_json,
    p_credential_static_id => 'APEX_OCI_BLOG_CREDENTIAL');

  IF apex_web_service.g_status_code != 200 then
    raise_application_error(-20111,'Unable to call Document AI.');
  END IF;

  -- Get Document Level Data from JSON
  OPEN  cr_document_data (cp_json => l_response_json);
  FETCH cr_document_data INTO lr_document_data;
  CLOSE cr_document_data;

  -- Get Key Value Fields from JSON.
  FOR r_field IN cr_document_fields (cp_json => l_response_json) LOOP
    -- TBD insert key values into a table.
  END LOOP;

  END document_ai;
Accuracy Testing
I processed five receipts using the demo app, one each from Chipotle, Home Depot, Starbucks, Walgreens, and Whole Foods. The table below shows how accurately Document AI identified four fields/labels MerchantName, MerchantAddress, TransactionDate, and Total:
 Pretty impressive!
You can get the test files here.
Next Steps
I have tried to keep this post as simple as possible and focus on the functionality of the Document AI service and calling the REST endpoint. It only scratches the surface with regard to the code you would need build a complete document processing solution.
For example, you could build an AP Invoice processing application and use the text extracted from Document AI to automatically create invoices in your ERP. This sounds great, but you still need a lot of code to look through the extracted text and pull out Vendor name, inventory items, prices etc. Also consider that every Vendor has a different invoice format so Document AI could provide inconsistent results across different formats.
A good starting point would be to implement a semi-automated processes. For example:
- Vendors email invoices to an MS Office Mailbox
- An APEX Automation polls the Mailbox
- APEX posts invoice attachments to Object Storage
- APEX creates a record in a queue table
- APEX calls document AI and populates tables with document metadata
- Users review documents in the queue, using extracted document metadata to assist them with entering values into their ERP
Conclusion
This post will hopefully get you to a stage where you can start calling the Document AI REST Service and start processing responses from within APEX. With more and more cloud based AI services coming online, APEX developers are better situated than ever to incorporate them into their apps.
I encourage you to take the time to get one OCI REST Service up and running in your environment. Once you have one working, the others will come much more easily.

