

Event-Driven Integration with OCI Events, ORDS, & APEX

Search for a command to run...
Introduction One of the marquee features of APEX 26.1 was AI Interactive Reports. When I started testing this new feature, I was interested to see what was going on behind the scenes. In this post, I

Introduction One of the marquee features of APEX 26.1 is APEX AI Agents. APEX AI Agents allow you to use an LLM and your own PL/SQL and JS tools to perform actions on your data instead of just chattin
Introduction In my previous post, I looked at logging APEX AI Agent requests and responses with Request and Response handlers. Logging is the first step because it shows you what is actually moving th
Introduction Logging is one of the first things you need when building serious AI Agents. Without it, debugging quickly becomes guesswork. You can see the final answer, but not always why the model ch
Context management patterns from building agents in Oracle APEX
There are several providers, including Oracle, that sell comprehensive integration solutions. Sometimes, these are necessary, but they can be overkill (and expensive) in many cases. In this post, I will describe an event-driven file-based integration approach using APEX, ORDS, OCI Object Store, and OCI Events. This approach allows us to create a fully automated no-touch file integration using products available on the OCI Cloud Free Tier.
The diagram below describes the high-level architecture for this approach:
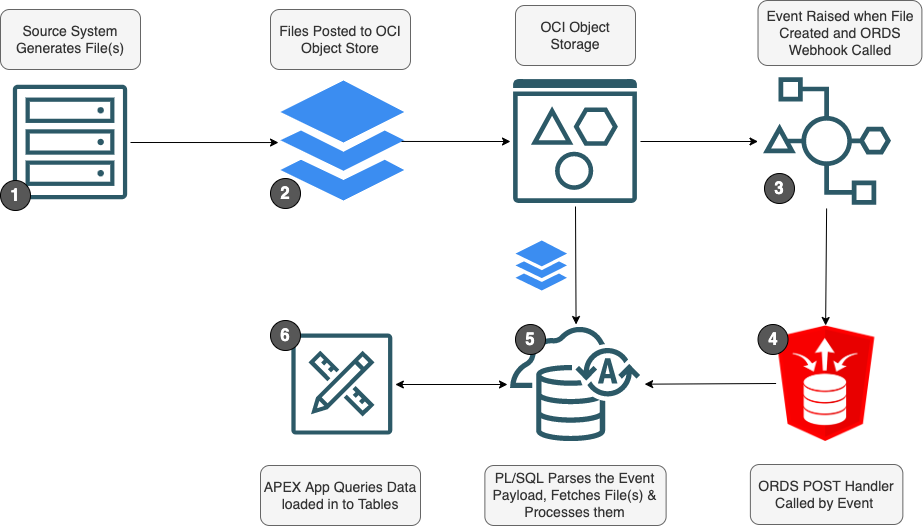
One real-world example of this approach is the integration of General Ledger Journal entries from Oracle ERP Cloud to a SaaS Oracle Database. This involved configuring ERP Cloud Business Intelligence Cloud Connector (BICC) to bulk export journal entries to an OCI Bucket. An OCI Event was configured to trigger when the files hit Object Store and call an ORDS Web Service to fetch the newly generated files and import them into a local table. This integration was capable of importing five and a half million ERP Cloud Journal Entry records in five minutes.
There are several pieces and parts to the integration approach. I will describe each of them in this section.
We need to create an ORDS Template and Handler to receive a JSON payload from the OCI Event and process it.


The PL/SQL package/procedure below can be used as a starting point. i.e., it is not production-ready. The code does the following:
CREATE OR REPLACE EDITIONABLE PACKAGE BODY blog_oci_pk AS

  -- Scope prefix used for Logger
  GC_SCOPE_PREFIX    CONSTANT VARCHAR2(60)   := LOWER($$plsql_unit) || '.';

-------------------------------------------------------------------------------
-------------------------------------------------------------------------------
PROCEDURE oci_object_created
  (p_payload      IN CLOB,
   x_http_status OUT NUMBER) IS

  l_logger_scope    logger_logs.SCOPE%TYPE := GC_SCOPE_PREFIX || utl_call_stack.subprogram(1)(2);
  l_logger_params   logger.tab_param;
  l_json_object     JSON_OBJECT_T;
  l_bucket_name     VARCHAR2(500);
  l_file_name       VARCHAR2(500);
  l_file_extension  VARCHAR2(10);
  l_confirm_url     VARCHAR2(1000);

BEGIN

  -- Assume Success
  x_http_status := 201;

  logger.append_param(l_logger_params, 'payload', p_payload);
  logger.log('Start', l_logger_scope, NULL, l_logger_params);

  -- Parse The OCI Notification JSON Payload.
  BEGIN
    l_json_object    := JSON_OBJECT_T.PARSE(p_payload);

    -- When you first establish a Notification in OCI, it Sends a URL to the EndPoint to confirm
    --   you are who you say you are. Check to See if this is that Initial Callback and log the URL to the log file.
    IF l_json_object.has('ConfirmationURL') THEN
      l_confirm_url  := l_json_object.get_String('ConfirmationURL');
      logger.append_param(l_logger_params, 'confirm_url', l_confirm_url);
      logger.log_info('First Call, Confirm URL', l_logger_scope, NULL, l_logger_params);
    ELSE
      -- Get information about the file that was received.
      l_file_name      := l_json_object.get_Object('data').get_String('resourceName');
      l_bucket_name    := l_json_object.get_Object('data').get_Object('additionalDetails').get_String('bucketName');
      l_file_extension := apex_string_util.find_file_extension(p_filename => l_file_name);
      logger.append_param(l_logger_params, 'file_name', l_file_name);
      logger.append_param(l_logger_params, 'bucket_name', l_bucket_name);
      logger.append_param(l_logger_params, 'file_extension', l_file_extension);
      logger.log('File Info Captured', l_logger_scope, NULL, l_logger_params);

       -- TBD - Fetch file from Object Store and Process it.

    END IF;
  EXCEPTION WHEN OTHERS THEN
    logger.log_error('Failed to Parse OCI File ['||SQLERRM||']', l_logger_scope, NULL, l_logger_params);
    x_http_status := 400;
    RETURN;
  END;

EXCEPTION WHEN OTHERS THEN
  logger.log_error('Unhandled Error ['||SQLERRM||']', l_logger_scope, NULL, l_logger_params);
  x_http_status := 400;
END oci_object_created;

END blog_oci_pk;
Let's turn now to the OCI components that make up this approach.
I already have an OCI compartment called DEV in which I will create a new bucket.


Next, we must tell OCI what to do when a file is created in our Bucket. We do this by creating a Notification Topic and then Subscribing the ORDS Web Service to the topic.


oci_object_created{"ConfirmationURL":"https://cell1.notification.us-ashburn-1.oci.oraclecloud.com/20181201/subscriptions/ocid1.onssubscription.oc1.iad.XXXX/confirmation?token=MDAwMHRhYUJOTWZTUjZic1NmUDdGYlN0bEVIbFdyRm45T092emJkemZySFdXM1picGkxVlXXXX==&protocol=CUSTOM_HTTPS"}
To complete confirmation, copy and paste the confirmation URL from the JSON into a browser address bar

If you look at your subscription again, it should now be active

Next, we need to create an Event Rule to post a message to the notification topic whenever a file is created in the OCI Bucket.

We now have everything in place to test our integration. Let's upload a test file to make sure everything is working OK.

{
"eventType" : "com.oraclecloud.objectstorage.createobject",
"cloudEventsVersion" : "0.1",
"eventTypeVersion" : "2.0",
"source" : "ObjectStorage",
"eventTime" : "2022-06-29T18:34:43Z",
"contentType" : "application/json",
"data" : {
  "compartmentId" : "ocid1.compartment.oc1..XXXX",
  "compartmentName" : "DEV",
  "resourceName" : "Sample_File.json",
  "resourceId" : "/n/nueva/b/BLOG_FILES/o/Sample_File.json",
  "availabilityDomain" : "IAD-AD-3",
  "additionalDetails" : {
    "bucketName" : "BLOG_FILES",
    "versionId" : "25b08005-77b3-42c3-86cb-bcb32d2c8d4e",
    "archivalState" : "Available",
    "namespace" : "XXXX",
    "bucketId" : "ocid1.bucket.oc1.iad.XXXX",
    "eTag" : "03a5d98f-9dff-4ce6-bded-9047840c288d"
  }
},
"eventID" : "c6f0012a-a04d-3e92-bb02-24e6392e6639",
"extensions" : {
  "compartmentId" : "ocid1.compartment.oc1..XXXX"
}
}
In the sample PL/SQL procedure oci_object_created, we stubbed out the code to fetch and parse the file. In this section, I'll discuss options for completing these steps.
We first have to decide if we want to process the file immediately when it is created or defer processing until a later time.
Synchronous Processing We could add code to fetch and process files inside our ORDS Handler procedure. This provides for real-time processing of files posted to OCI Object Store.
Asynchronous We could also change the ORDS Handler to log details of the newly created file in a local queue table. We can then create an APEX Automation to query the queue table and process the file at a later time.
Whichever option you choose, the approach for fetching and parsing the file will be the same.
We can use the APEX_WEB_SERVICE PL/SQL API to fetch files from OCI Object Store.
Before we can do this, we need to create an APEX Web Credential that will authenticate any requests we make to the OCI Bucket. Read my post Setup Secure APEX Access to OCI Object Storage to find out how to do this.
We can now reference the APEX Web Credential to fetch files from OCI. The PL/SQL block below will fetch the test file from OCI into a BLOB variable.
DECLARE
   l_oci_url    VARCHAR2(500);
   l_file_blob  BLOB;
BEGIN
  -- Create an APEX Session (required to reference Web Credential in APEX_WEB_SERVICE)
  apex_session.create_session (p_app_id => 2000, p_page_id => 1, p_username => 'OCI');
  l_oci_url := 'https://objectstorage.us-ashburn-1.oraclecloud.com/n/XXXX/b/BLOG_FILES/o/Sample_File.json';
  l_file_blob := apex_web_service.make_rest_request_b
   (p_url                  => UTL_URL.ESCAPE(l_oci_url),
    p_http_method          => 'GET',
    p_credential_static_id => 'WEB_CREDENTIAL_STATIC_ID');
END;
The URL is made up of the following components:
https://objectstorage.us-ashburn-1.oraclecloud.com/n/XXXX. You can get the Namespace from the OCI Console, by clicking the Profile Icon (top right), then click 'Tenancy'. Use the value hidden by the green highlight in the screenshot below

/b/BLOG_FILES/o/Sample_File.jsonThe value for p_credential_static_id is the APEX Web Credential Static ID created above.
Now that we have the file in a BLOB variable, we can parse it using the APEX_DATA_PARSER PL/SQL API. Read my post Easy file Parsing with the APEX_DATA_PARSER API for more details. You can use APEX_DATA_PARSER to parse CSV, XLSX, XML or JSON files.
With the data parsed, load it into local tables so that it can be used by your APEX Applications.
There are many ways any one integration can be implemented. I encourage you to consider using APEX and ORDS to see if you can implement an elegant solution using these no cost options of the Oracle Database.
In this post, I showed you how you can build such an elegant solution with some help from OCI Object Store and OCI Events.